From SmashWiki, the Super Smash Bros. wiki
The printable version is no longer supported and may have rendering errors. Please update your browser bookmarks and please use the default browser print function instead.
Overview
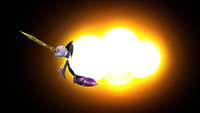
The
hitbox of Meta Knight's f-smash
Meta Knight pulls back his sword for a moment, then slashes in front of himself, dealing 14% uncharged to 19% fully charged. It's among his strongest moves in terms of knockback (KOing earlier than all of his other moves), but is also his slowest move in startup lag, with 24 frames. It can also be considered his only "slow" attack. However, it does have a very fast charge release, and very little ending lag, with even less ending lag than his down smash. The move is a powerful finisher, but its slow speed hinders its effectiveness, and a down smash is usually considered a better option due to having much faster startup. The best use for the move is for punishing the opponent's edge options above 100%, and punishing linear and/or predictable recoveries, or non-transcendent recovery moves where the opponent doesn't grab onto the edge, such as Mach Tornado.
Hitboxes
| ID |
Part |
Damage |
SD |
Angle |
BK |
KS |
FKV |
Radius |
Bone |
Offset |
SDIx |
H× |
T% |
Clang |
Rebound |
Type |
Effect |
G |
A |
Sound |
Direct
|
| 0 |
0 |
14% |
0 |
 |
28 |
99 |
0 |
7.0 |
Root |
0.0 |
6.4 |
5.0 |
1.0x |
1.0x |
0% |
 |
 |
 |
 |
 |
 |
 Slash Slash |

|
| 1 |
0 |
14% |
0 |
|
28 |
99 |
0 |
6.0 |
Root |
0.0 |
6.4 |
19.0 |
1.0x |
1.0x |
0% |
|
|
|
|
|
|
Slash |
|
| 2 |
0 |
14% |
0 |
|
28 |
99 |
0 |
6.0 |
Root |
-2.0 |
9.6 |
13.0 |
1.0x |
1.0x |
0% |
|
|
|
|
|
|
Slash |
|
| 3 |
0 |
14% |
0 |
|
28 |
99 |
0 |
6.0 |
Root |
2.0 |
3.2 |
13.0 |
1.0x |
1.0x |
0% |
|
|
|
|
|
|
Slash |
|
Timing
| Charges between
|
20-21
|
| Hitboxes
|
24-25
|
| Animation length
|
41
|
