Meta Knight (SSBB)/Down tilt: Difference between revisions
(New Page: {{ArticleIcons|ssbb=y}} ==Overview== thumb|Hitbox of Meta Knight's d-tilt. Meta Knight thrusts his sword along the ground in front of hi...) |
TheWatcher (talk | contribs) |
||
| (12 intermediate revisions by 6 users not shown) | |||
| Line 1: | Line 1: | ||
{{ArticleIcons|ssbb=y}} | {{ArticleIcons|ssbb=y}} | ||
==Overview== | |||
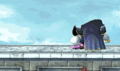
[[File:Meta Knight Down Tilt Hitbox Brawl.png|thumb|[[Hitbox]] of Meta Knight's d-tilt.]] | |||
Meta Knight thrusts his sword along the ground in front of himself, dealing extremely low [[knockback]] that hits opponents towards the ground. It has a 30% chance of [[tripping]] the opponent, and when it does so, it can easily follow up into a [[grab]], {{mvsub|Meta Knight|SSBB|down smash}}, [[SHFF]]ed {{mvsub|Meta Knight|SSBB|forward aerial}}, or {{mvsub|Meta Knight|SSBB|neutral special|alt=Mach Tornado}}. The move also has very fast [[startup]], and deceptive [[range]], being even longer than {{mvsub|Marth|SSBB|down tilt|poss=y}}. It also has very quick [[interruptibility]] and can be used to pseudo-crawl, which allows it to chain into itself repeatedly until it trips the opponent, which is when one of the aforementioned followups can be utilized. It can also be used against opponents [[recover]]ing near the edge to force them back offstage, especially against [[fastfaller]]s, who it can also [[gimp]] and lead into a {{mvsub|Meta Knight|SSBB|down aerial}} followed by a {{mvsub|Meta Knight|SSBB|up special|alt=Shuttle Loop}} [[stage spike]], or a variation of down aerials and {{mvsub|Meta Knight|SSBB|up aerial}}s. Overall, a useful move at lower percentages, though at high percentages it always knocks the opponent too far away to follow up reliably. | |||
== | ==Hitboxes== | ||
{{BrawlHitboxTableHeader}} | |||
{{BrawlHitboxTableRow | |||
|char=Meta Knight | |||
|id=0 | |||
|damage=4% | |||
|angle=361 | |||
|bk=15 | |||
|ks=88 | |||
|fkv=0 | |||
|r=180000 | |||
|bn=0 | |||
|ypos=120000 | |||
|zpos=1200000 | |||
|trip=18000 | |||
|rawflags=00100010100000110000011001000010 | |||
}} | |||
{{BrawlHitboxTableRow | |||
|char=Meta Knight | |||
|id=1 | |||
|damage=5% | |||
|angle=361 | |||
|bk=11 | |||
|ks=88 | |||
|fkv=0 | |||
|r=240000 | |||
|bn=0 | |||
|ypos=180000 | |||
|zpos=852000 | |||
|trip=18000 | |||
|rawflags=00100010100000110000011001000010 | |||
}} | |||
{{BrawlHitboxTableRow | |||
|char=Meta Knight | |||
|id=2 | |||
|damage=6% | |||
|angle=361 | |||
|bk=6 | |||
|ks=88 | |||
|fkv=0 | |||
|r=240000 | |||
|bn=0 | |||
|ypos=240000 | |||
|zpos=480000 | |||
|trip=18000 | |||
|rawflags=00100010100000110000011000000010 | |||
}} | |||
{{BrawlHitboxTableRow | |||
|char=Meta Knight | |||
|id=3 | |||
|damage=7% | |||
|angle=361 | |||
|bk=6 | |||
|ks=88 | |||
|fkv=0 | |||
|r=240000 | |||
|bn=0 | |||
|ypos=300000 | |||
|zpos=120000 | |||
|trip=18000 | |||
|rawflags=00100010100000110000011000000010 | |||
}} | |||
|} | |||
{ | ==Timing== | ||
{|class="wikitable" | |||
!Hitbox | |||
|3-4 | |||
|- | |||
!Interruptible | |||
|16 | |||
|- | |||
!Animation length | |||
|25 | |||
|} | |||
=== | {{FrameStripStart}} | ||
{{FrameStrip|t=Lag|c=2}}{{FrameStrip|t=Hitbox|c=2}}{{FrameStrip|t=Lag|c=11}}{{FrameStrip|t=Interruptible|c=10}} | |||
{{FrameStripEnd}} | |||
{{FrameIconLegend|lag=y|hitbox=y|interruptible=y}} | |||
==Gallery== | ==Gallery== | ||
| Line 28: | Line 92: | ||
{{MvSubNavMetaKnight|g=SSBB}} | {{MvSubNavMetaKnight|g=SSBB}} | ||
[[Category:Meta Knight (SSBB)]] | [[Category:Meta Knight (SSBB)]] | ||
[[Category:Down tilts | [[Category:Down tilts (SSBB)]] | ||
Latest revision as of 20:49, July 2, 2018
Overview[edit]

Meta Knight thrusts his sword along the ground in front of himself, dealing extremely low knockback that hits opponents towards the ground. It has a 30% chance of tripping the opponent, and when it does so, it can easily follow up into a grab, down smash, SHFFed forward aerial, or Mach Tornado. The move also has very fast startup, and deceptive range, being even longer than Marth's down tilt. It also has very quick interruptibility and can be used to pseudo-crawl, which allows it to chain into itself repeatedly until it trips the opponent, which is when one of the aforementioned followups can be utilized. It can also be used against opponents recovering near the edge to force them back offstage, especially against fastfallers, who it can also gimp and lead into a down aerial followed by a Shuttle Loop stage spike, or a variation of down aerials and up aerials. Overall, a useful move at lower percentages, though at high percentages it always knocks the opponent too far away to follow up reliably.
Hitboxes[edit]
| ID | Part | Damage | SD | Angle | BK | KS | FKV | Radius | Bone | Offset | SDIx | H× | T% | Clang | Rebound | Type | Effect | G | A | Sound | Direct | ||
|---|---|---|---|---|---|---|---|---|---|---|---|---|---|---|---|---|---|---|---|---|---|---|---|
| 0 | 0 | 4% | 0 | 15 | 88 | 0 | 3.0 | Root | 0.0 | 2.0 | 20.0 | 1.0x | 1.0x | 30% | |||||||||
| 1 | 0 | 5% | 0 | 11 | 88 | 0 | 4.0 | Root | 0.0 | 3.0 | 14.2 | 1.0x | 1.0x | 30% | |||||||||
| 2 | 0 | 6% | 0 | 6 | 88 | 0 | 4.0 | Root | 0.0 | 4.0 | 8.0 | 1.0x | 1.0x | 30% | |||||||||
| 3 | 0 | 7% | 0 | 6 | 88 | 0 | 4.0 | Root | 0.0 | 5.0 | 2.0 | 1.0x | 1.0x | 30% | |||||||||
Timing[edit]
| Hitbox | 3-4 |
|---|---|
| Interruptible | 16 |
| Animation length | 25 |
Lag time |
Hitbox |
Interruptible |
Gallery[edit]
Interrupting the move by shielding on the earliest possible IASA frame.

|