SSBM Icon.png

Marth (SSBM)/Up aerial: Difference between revisions

From SmashWiki, the Super Smash Bros. wiki
Jump to navigationJump to search
No edit summary
Line 3: Line 3:
==Overview==
==Overview==
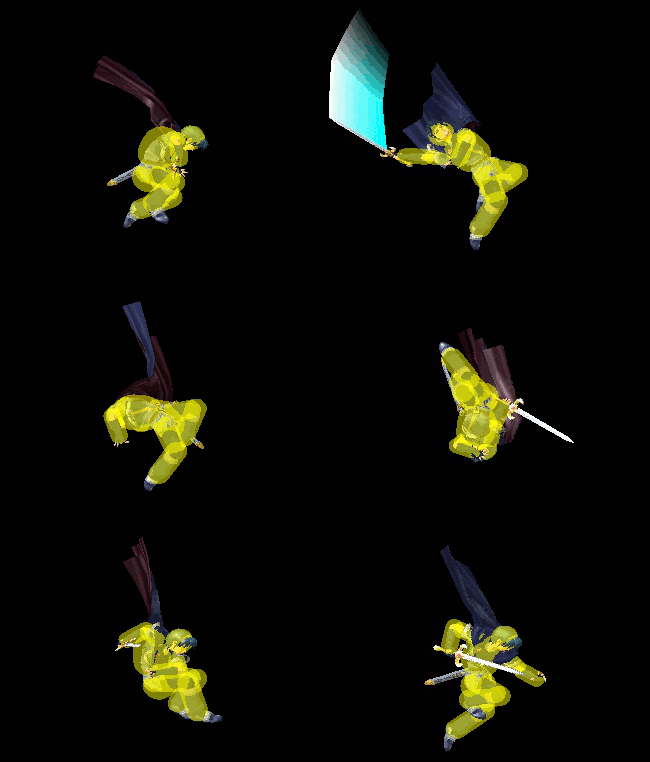
[[File:Marth Up Aerial Hitbox Melee.gif|thumb|Hitbox of Marth's up aerial.]]
[[File:Marth Up Aerial Hitbox Melee.gif|thumb|Hitbox of Marth's up aerial.]]
Marth does a forward to back upward sword slash. It deals 9% damage on the base, 10% in the middle, and 13% when tipped. It isn't very powerful and isn't a reliable KO move, whether tipped or not, being one of his weaker moves. However, it can [[juggle]] opponents easily, and can be used in [[combo]]s with moves such as {{mvsub|Marth|SSBM|up tilt}}, {{mvsub|Marth|SSBM|forward smash}}, and other aerials.
Marth does a forward to back upward sword slash. It deals 9% damage on the base, 10% in the middle, and 13% when tipped. It isn't very powerful and isn't a reliable KO move, whether tipped or not, being one of his weaker moves. However, it can [[juggle]] opponents easily, and can be used in [[combo]]s with moves such as {{mvsub|Marth|SSBM|up tilt}}, {{mvsub|Marth|SSBM|forward smash}}, {{mvsub|Marth|SSBM|up throw}}, and other aerials.


{{competitive expertise}}

Revision as of 13:05, January 5, 2014

Overview

Hitbox of Marth's up aerial in Melee.
Hitbox of Marth's up aerial.

Marth does a forward to back upward sword slash. It deals 9% damage on the base, 10% in the middle, and 13% when tipped. It isn't very powerful and isn't a reliable KO move, whether tipped or not, being one of his weaker moves. However, it can juggle opponents easily, and can be used in combos with moves such as up tilt, forward smash, up throw, and other aerials.


Competitive.png This article or section may require competitive expertise.
You can discuss this issue on the talk page or edit this page to improve it.

Hitboxes

ID Part Damage SD Angle BK KS FKV Radius Bone Offset Clang Rebound Effect G A Sound
0 0 13% 0 AngleIcon90.png 40 70 0 0.015624 76 0.0187488 0.0 0.0 HitboxTableIcon(Clang).png HitboxTableIcon(Rebound).png EffectIcon(Normal).png HitboxTableIcon(GroundedTrue).png HitboxTableIcon(AerialTrue).png L Slash
1 0 10% 0 AngleIcon80.png 30 70 0 0.015624 76 0.0 0.0 0.0 HitboxTableIcon(Clang).png HitboxTableIcon(Rebound).png EffectIcon(Slash).png HitboxTableIcon(GroundedTrue).png HitboxTableIcon(AerialTrue).png M Slash
2 0 9% 0 AngleIcon80.png 20 70 0 0.015624 71 0.0 0.0 0.0 HitboxTableIcon(Clang).png HitboxTableIcon(Rebound).png EffectIcon(Slash).png HitboxTableIcon(GroundedTrue).png HitboxTableIcon(AerialTrue).png M Slash
3 0 9% 0 AngleIcon80.png 18 70 0 0.015624 25 0.0 0.0 0.0 HitboxTableIcon(Clang).png HitboxTableIcon(Rebound).png EffectIcon(Slash).png HitboxTableIcon(GroundedTrue).png HitboxTableIcon(AerialTrue).png S Slash

Timing

Attack

Initial autocancel 1-4
Hitbox 5-8
Ending autocancel 27-
Animation length 45
Interruptible 60
FrameIcon(Lag).png FrameIcon(Lag).png FrameIcon(Lag).png FrameIcon(Lag).png FrameIcon(Hitbox).png FrameIcon(Hitbox).png FrameIcon(Hitbox).png FrameIcon(Hitbox).png FrameIcon(Lag).png FrameIcon(Lag).png FrameIcon(Lag).png FrameIcon(Lag).png FrameIcon(Lag).png FrameIcon(Lag).png FrameIcon(Lag).png FrameIcon(Lag).png FrameIcon(Lag).png FrameIcon(Lag).png FrameIcon(Lag).png FrameIcon(Lag).png FrameIcon(Lag).png FrameIcon(Lag).png FrameIcon(Lag).png FrameIcon(Lag).png FrameIcon(Lag).png FrameIcon(Lag).png FrameIcon(Lag).png FrameIcon(Lag).png FrameIcon(Lag).png FrameIcon(Lag).png FrameIcon(Lag).png FrameIcon(Lag).png FrameIcon(Lag).png FrameIcon(Lag).png FrameIcon(Lag).png FrameIcon(Lag).png FrameIcon(Lag).png FrameIcon(Lag).png FrameIcon(Lag).png FrameIcon(Lag).png FrameIcon(Lag).png FrameIcon(Lag).png FrameIcon(Lag).png FrameIcon(Lag).png FrameIcon(Lag).png
FrameIcon(Autocancel).png FrameIcon(Autocancel).png FrameIcon(Autocancel).png FrameIcon(Autocancel).png FrameIcon(Blank).png FrameIcon(Blank).png FrameIcon(Blank).png FrameIcon(Blank).png FrameIcon(Blank).png FrameIcon(Blank).png FrameIcon(Blank).png FrameIcon(Blank).png FrameIcon(Blank).png FrameIcon(Blank).png FrameIcon(Blank).png FrameIcon(Blank).png FrameIcon(Blank).png FrameIcon(Blank).png FrameIcon(Blank).png FrameIcon(Blank).png FrameIcon(Blank).png FrameIcon(Blank).png FrameIcon(Blank).png FrameIcon(Blank).png FrameIcon(Blank).png FrameIcon(Blank).png FrameIcon(Autocancel).png FrameIcon(Autocancel).png FrameIcon(Autocancel).png FrameIcon(Autocancel).png FrameIcon(Autocancel).png FrameIcon(Autocancel).png FrameIcon(Autocancel).png FrameIcon(Autocancel).png FrameIcon(Autocancel).png FrameIcon(Autocancel).png FrameIcon(Autocancel).png FrameIcon(Autocancel).png FrameIcon(Autocancel).png FrameIcon(Autocancel).png FrameIcon(Autocancel).png FrameIcon(Autocancel).png FrameIcon(Autocancel).png FrameIcon(Autocancel).png FrameIcon(Autocancel).png

Landing lag

Animation length 15
L-cancelled animation length 7