SSBB Icon.png

Mario (SSBB)/Neutral attack/Hit 3: Difference between revisions

From SmashWiki, the Super Smash Bros. wiki
Jump to navigationJump to search
No edit summary
 
Line 1: Line 1:
{{ArticleIcons|ssbb=y}}
:''For an overview of the overall natural combo, see [[Mario (SSBB)/Neutral attack|here]].''
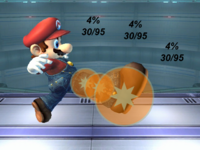
[[File:MarioSSBBNeutral(hit3clean).png|thumb|Hitbox visualisation showing Mario's third jab.]]
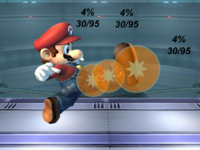
[[File:MarioSSBBNeutral(hit3late).png|thumb|Hitbox visualisation showing Mario's third jab.]]
==Overview==
{{competitive expertise}}
==Hitboxes==
==Hitboxes==
{{ImageCaption|Image:MarioSSBBNeutral(hit3clean).png|Image:MarioSSBBNeutral(hit3late).png|width1=200x200px|width2=200x200px|caption=Hitboxes of the move, with the clean hitbox on the left, and the late hitbox on the right.}}
{{BrawlHitboxTableHeader}}
{{HitboxTableTitle|Clean hit|24}}
{{BrawlHitboxTableRow
|id=0
|id=0
Line 12: Line 18:
|fkv=0
|fkv=0
|r=300000
|r=300000
|bn=17
|ypos=330000
|rawflags=00111001100000110000010001000000
}}
{{BrawlHitboxTableRow
|id=1
|damage=4%
|angle=361
|bk=30
|ks=95
|fkv=0
|r=150000
|bn=17
|ypos=60000
|rawflags=00111001100000110000010001000000
}}
{{BrawlHitboxTableRow
|id=2
|damage=4%
|angle=361
|bk=30
|ks=95
|fkv=0
|r=150000
|bn=17
|ypos=-90000
|rawflags=00111001100000110000010001000000
}}
{{HitboxTableTitle|Late hit hit|24}}
{{BrawlHitboxTableRow
|id=0
|damage=4%
|angle=361
|bk=30
|ks=95
|fkv=0
|r=216000
|bn=17
|bn=17
|ypos=330000
|ypos=330000
Line 53: Line 96:
{|class="wikitable"
{|class="wikitable"
|-
|-
!Larger hitbox
!Clean hit
|7-8
|7-8
|-
|-
!Smaller hitbox*
!Late hit
|9-10
|9-10
|-
|-
Line 65: Line 108:
|39
|39
|}
|}
<nowiki>*</nowiki> Hitbox 0 reduced in size from {{BrawlHitboxScale|300000}} to {{BrawlHitboxScale|216000}}.


{{FrameStripStart}}
{{FrameStripStart}}

Latest revision as of 14:19, June 6, 2021

For an overview of the overall natural combo, see here.
Hitbox visualisation showing Mario's third jab.

Overview[edit]

Competitive.png This article or section may require competitive expertise.
You can discuss this issue on the talk page or edit this page to improve it.

Hitboxes[edit]

ID Part Damage SD Angle BK KS FKV Radius Bone Offset SDIx T% Clang Rebound Type Effect G A Sound Direct
Clean hit
0 0 4% 0 Sakurai angle 30 95 0 5.0 17 0.0 5.5 0.0 1.0x 1.0x 0% HitboxTableIcon(Clang).png HitboxTableIcon(Rebound).png TypeIcon(Foot).png EffectIcon(Normal).png HitboxTableIcon(GroundedTrue).png HitboxTableIcon(AerialTrue).png M Kick SpecialsDirect.png
1 0 4% 0 Sakurai angle 30 95 0 2.5 17 0.0 1.0 0.0 1.0x 1.0x 0% HitboxTableIcon(Clang).png HitboxTableIcon(Rebound).png TypeIcon(Foot).png EffectIcon(Normal).png HitboxTableIcon(GroundedTrue).png HitboxTableIcon(AerialTrue).png M Kick SpecialsDirect.png
2 0 4% 0 Sakurai angle 30 95 0 2.5 17 0.0 -1.5 0.0 1.0x 1.0x 0% HitboxTableIcon(Clang).png HitboxTableIcon(Rebound).png TypeIcon(Foot).png EffectIcon(Normal).png HitboxTableIcon(GroundedTrue).png HitboxTableIcon(AerialTrue).png M Kick SpecialsDirect.png
Late hit hit
0 0 4% 0 Sakurai angle 30 95 0 3.6 17 0.0 5.5 0.0 1.0x 1.0x 0% HitboxTableIcon(Clang).png HitboxTableIcon(Rebound).png TypeIcon(Foot).png EffectIcon(Normal).png HitboxTableIcon(GroundedTrue).png HitboxTableIcon(AerialTrue).png M Kick SpecialsDirect.png
1 0 4% 0 Sakurai angle 30 95 0 2.5 17 0.0 1.0 0.0 1.0x 1.0x 0% HitboxTableIcon(Clang).png HitboxTableIcon(Rebound).png TypeIcon(Foot).png EffectIcon(Normal).png HitboxTableIcon(GroundedTrue).png HitboxTableIcon(AerialTrue).png M Kick SpecialsDirect.png
2 0 4% 0 Sakurai angle 30 95 0 2.5 17 0.0 -1.5 0.0 1.0x 1.0x 0% HitboxTableIcon(Clang).png HitboxTableIcon(Rebound).png TypeIcon(Foot).png EffectIcon(Normal).png HitboxTableIcon(GroundedTrue).png HitboxTableIcon(AerialTrue).png M Kick SpecialsDirect.png

Post hit data[edit]

Hitbox Base knockback Knockback scaling KO percent with poor DI KO percent with no DI KO percent with good DI
Any 1573 13.417 311.32% 344.86% 391.44%

Timing[edit]

Clean hit 7-8
Late hit 9-10
Interruptible 30
Animation length 39
FrameIcon(Lag).png FrameIcon(Lag).png FrameIcon(Lag).png FrameIcon(Lag).png FrameIcon(Lag).png FrameIcon(Lag).png FrameIcon(Hitbox).png FrameIcon(HitboxChangeS).png FrameIcon(HitboxChangeE).png FrameIcon(Hitbox).png FrameIcon(Lag).png FrameIcon(Lag).png FrameIcon(Lag).png FrameIcon(Lag).png FrameIcon(Lag).png FrameIcon(Lag).png FrameIcon(Lag).png FrameIcon(Lag).png FrameIcon(Lag).png FrameIcon(Lag).png FrameIcon(Lag).png FrameIcon(Lag).png FrameIcon(Lag).png FrameIcon(Lag).png FrameIcon(Lag).png FrameIcon(Lag).png FrameIcon(Lag).png FrameIcon(Lag).png FrameIcon(Lag).png FrameIcon(Interruptible).png FrameIcon(Interruptible).png FrameIcon(Interruptible).png FrameIcon(Interruptible).png FrameIcon(Interruptible).png FrameIcon(Interruptible).png FrameIcon(Interruptible).png FrameIcon(Interruptible).png FrameIcon(Interruptible).png FrameIcon(Interruptible).png
Legend (1 square = 1 frame)
FrameIcon(Lag).png
Lag time
FrameIcon(Hitbox).png
Hitbox
FrameIcon(HitboxChangeS).pngFrameIcon(HitboxChangeE).png
Hitbox change
FrameIcon(Interruptible).png
Interruptible