Mario (SSBB)/Down tilt
Overview
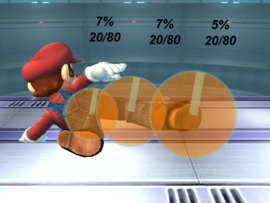
Mario performs a leg sweep. The move has decently fast startup lag, coming out on frame 5 and the move has surprisingly decent range, with the move being slightly disjointed. The move deals 5% on Mario's foot and 7% on his leg/body, with the move sending opponents upwards with very weak knockback.
However, the move's main issue is its high ending lag. The move has an FAF of 35, making it easy to whiff punish and punish on shield, considering its short hitbox duration. This is made even worse when combined with the move's weak vertical knockback. At low percents, the move can easily be punished on hit, with some characters even being able to land some of their stronger attacks. At mid percents, the move can still be punished on hit by numerous members of the cast, with the move not becoming completely safe right up until higher percents. Even when Mario can use the move safely, the opponent is sent too far away and Mario has too much ending lag to do anything. The sweetspots are also positioned closer to Mario and have lower priority than the sourspot, so the weaker and more punishable sourspot will usually connect if the move is used.
Overall, Mario's down tilt is easily Mario's worst move, as using the move actively puts Mario at a disadvantage. If the move whiffs or is shielded, Mario is left in a disadvantageous spot but even if he connects the move, his opponent still has an advantage over him. Mario can flat out risk losing a stock or at least take a lot of damage if he lands the move. This makes Mario's down tilt completely useless, as his jab and forward tilt are faster and safer spacing moves, while up tilt is a safer and more effective move at close range. It is not only considered Mario's worst move but it is even considered to be one of the worst moves in the entire game, as there is never a reason to use the move and when it is used, it puts the player at a disadvantage, even if the move connects.
Hitboxes
Timing
| Hitboxes | 5-7 |
|---|---|
| Animation length | 34 |
| Interruptible | 35 |
Lag time |
Hitbox |
|
