SSB4 Icon.png

Dark Pit (SSB4)/Up smash: Difference between revisions

From SmashWiki, the Super Smash Bros. wiki
Jump to navigationJump to search
mNo edit summary
m (Text replacement - "== ([^=])" to "== $1")
 
(3 intermediate revisions by 3 users not shown)
Line 7: Line 7:


==Hitboxes==
==Hitboxes==
{{SSB4HitboxTableHeader}}
{{HitboxTableTitle|Hit 1|42}}
Line 24: Line 23:
|zpos=0.0
|zpos=0.0
|effect=Slash
|effect=Slash
|type=Bow
|type=Sacred
|sdi=1.0
|sdi=1.0
|trip=0
|trip=0
Line 44: Line 43:
|zpos=7.0
|zpos=7.0
|effect=Slash
|effect=Slash
|type=Bow
|type=Sacred
|sdi=1.0
|sdi=1.0
|trip=0
|trip=0
Line 64: Line 63:
|zpos=7.0
|zpos=7.0
|effect=Slash
|effect=Slash
|type=Bow
|type=Sacred
|sdi=1.0
|sdi=1.0
|trip=0
|trip=0
Line 85: Line 84:
|zpos=0.0
|zpos=0.0
|effect=Slash
|effect=Slash
|type=Bow
|type=Sacred
|sdi=1.0
|sdi=1.0
|trip=0
|trip=0
Line 105: Line 104:
|zpos=7.0
|zpos=7.0
|effect=Slash
|effect=Slash
|type=Bow
|type=Sacred
|sdi=1.0
|sdi=1.0
|trip=0
|trip=0
Line 125: Line 124:
|zpos=-7.0
|zpos=-7.0
|effect=Slash
|effect=Slash
|type=Bow
|type=Sacred
|sdi=1.0
|sdi=1.0
|trip=0
|trip=0
Line 146: Line 145:
|zpos=0.0
|zpos=0.0
|effect=Slash
|effect=Slash
|type=Bow
|type=Sacred
|sdi=0.0
|sdi=0.0
|ff=1.2
|ff=1.2
Line 167: Line 166:
|zpos=0.0
|zpos=0.0
|effect=Slash
|effect=Slash
|type=Bow
|type=Sacred
|sdi=0.0
|sdi=0.0
|ff=1.2
|ff=1.2
Line 188: Line 187:
|zpos=7.0
|zpos=7.0
|effect=Slash
|effect=Slash
|type=Bow
|type=Sacred
|sdi=0.0
|sdi=0.0
|ff=1.2
|ff=1.2
Line 209: Line 208:
|zpos=-8.0
|zpos=-8.0
|effect=Slash
|effect=Slash
|type=Bow
|type=Sacred
|sdi=0.0
|sdi=0.0
|ff=1.2
|ff=1.2
Line 247: Line 246:


{{FrameIconLegend|lag=y|charge=y|hitbox=y|hitboxchange=y|interruptible=y}}


{{MvSubNavDarkPit|g=SSB4}}
Line 253: Line 251:
[[Category:Up smashes (SSB4)]]
[[Category:Up smashes (SSB4)]]
[[Category:Slash attacks (SSB4)]]
[[Category:Slash attacks (SSB4)]]
[[Category:Bow attacks (SSB4)]]

Latest revision as of 21:19, April 12, 2022

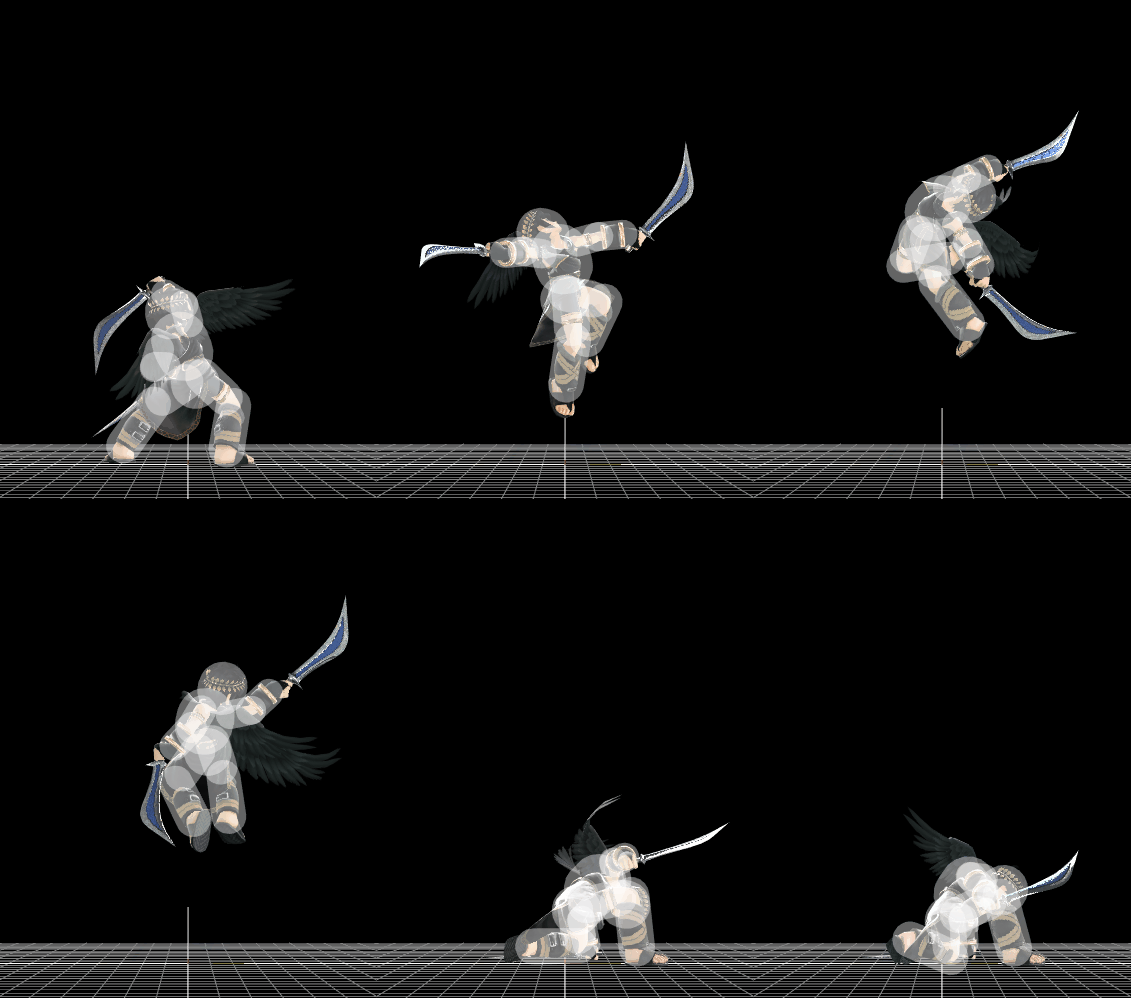
Hitbox visualization showing Dark Pit's up smash.

Overview[edit]

Competitive.png This article or section may require competitive expertise.
You can discuss this issue on the talk page or edit this page to improve it.

A leaping triple slash. Quick startup and high cooldown. Has low horizontal range despite the visuals; unable to hit behind Dark Pit and only able to drag point-blank opponents into the attack. Can be used after down throw at lower percents as a read.

Hitboxes[edit]

ID Part Damage SD Angle BK KS FKV Radius Bone Offset SDIx T% Clang Rebound Type Effect G A Sound Direct
Hit 1
0 0 3% 0 Autolink angle (365) 40 100 20 4.0 0 0.0 28.0 0.0 1.0x 1.0x 0% HitboxTableIcon(Clang).png HitboxTableIcon(Rebound).png The icon for the sacred type. EffectIcon(Slash).png HitboxTableIcon(GroundedTrue).png HitboxTableIcon(AerialTrue).png S Slash SpecialsDirect.png
1 0 3% 0 Autolink angle (365) 40 100 33 4.5 0 0.0 24.0 7.0 1.0x 1.0x 0% HitboxTableIcon(Clang).png HitboxTableIcon(Rebound).png The icon for the sacred type. EffectIcon(Slash).png HitboxTableIcon(GroundedTrue).png HitboxTableIcon(AerialTrue).png S Slash SpecialsDirect.png
2 0 3% 0 AngleIcon105.png 40 100 33 4.5 0 0.0 24.0 7.0 1.0x 1.0x 0% HitboxTableIcon(Clang).png HitboxTableIcon(Rebound).png The icon for the sacred type. EffectIcon(Slash).png HitboxTableIcon(GroundedTrue).png HitboxTableIcon(AerialTrue).png S Slash SpecialsDirect.png
Hit 2
0 1 2% 0 AngleIcon98.png 0 100 20 4.0 0 0.0 28.0 0.0 1.0x 1.0x 0% HitboxTableIcon(Clang).png HitboxTableIcon(Rebound).png The icon for the sacred type. EffectIcon(Slash).png HitboxTableIcon(GroundedTrue).png HitboxTableIcon(AerialTrue).png S Slash SpecialsDirect.png
1 1 2% 0 AngleIcon120.png 0 100 50 5.2 0 0.0 24.0 7.0 1.0x 1.0x 0% HitboxTableIcon(Clang).png HitboxTableIcon(Rebound).png The icon for the sacred type. EffectIcon(Slash).png HitboxTableIcon(GroundedTrue).png HitboxTableIcon(AerialTrue).png S Slash SpecialsDirect.png
2 1 2% 0 AngleIcon120.png 0 100 50 5.2 0 0.0 24.0 -7.0 1.0x 1.0x 0% HitboxTableIcon(Clang).png HitboxTableIcon(Rebound).png The icon for the sacred type. EffectIcon(Slash).png HitboxTableIcon(GroundedTrue).png HitboxTableIcon(AerialTrue).png S Slash SpecialsDirect.png
Hit 3
0 2 8% 0 AngleIcon89.png 66 102 0 5.8 0 0.0 34.0 0.0 0.0x 1.2x 0% HitboxTableIcon(Clang).png HitboxTableIcon(Rebound).png The icon for the sacred type. EffectIcon(Slash).png HitboxTableIcon(GroundedTrue).png HitboxTableIcon(AerialTrue).png M Slash SpecialsDirect.png
1 2 8% 0 AngleIcon89.png 66 102 0 5.0 0 0.0 24.0 0.0 0.0x 1.2x 0% HitboxTableIcon(Clang).png HitboxTableIcon(Rebound).png The icon for the sacred type. EffectIcon(Slash).png HitboxTableIcon(GroundedTrue).png HitboxTableIcon(AerialTrue).png M Slash SpecialsDirect.png
2 2 8% 0 AngleIcon89.png 66 102 0 5.0 0 0.0 31.0 7.0 0.0x 1.2x 0% HitboxTableIcon(Clang).png HitboxTableIcon(Rebound).png The icon for the sacred type. EffectIcon(Slash).png HitboxTableIcon(GroundedTrue).png HitboxTableIcon(AerialTrue).png M Slash SpecialsDirect.png
3 0 8% 0 AngleIcon89.png 66 102 0 5.0 0 0.0 31.0 -8.0 0.0x 1.2x 0% HitboxTableIcon(Clang).png HitboxTableIcon(Rebound).png The icon for the sacred type. EffectIcon(Slash).png HitboxTableIcon(GroundedTrue).png HitboxTableIcon(AerialTrue).png M Slash SpecialsDirect.png

Timing[edit]

Charges between 1-2
Hit 1, Clean 6
Hit 1, Late 7
Hit 2 10
Hit 3 18
Interruptible 52
Animation length 69
FrameIcon(LagChargeS).png FrameIcon(LagChargeE).png FrameIcon(Lag).png FrameIcon(Lag).png FrameIcon(Lag).png FrameIcon(Lag).png FrameIcon(Lag).png FrameIcon(Lag).png FrameIcon(Lag).png FrameIcon(HitboxChangeS).png FrameIcon(HitboxChangeE).png FrameIcon(Lag).png FrameIcon(Lag).png FrameIcon(Hitbox).png FrameIcon(Lag).png FrameIcon(Lag).png FrameIcon(Lag).png FrameIcon(Lag).png FrameIcon(Lag).png FrameIcon(Lag).png FrameIcon(Lag).png FrameIcon(Hitbox).png FrameIcon(Lag).png FrameIcon(Lag).png FrameIcon(Lag).png FrameIcon(Lag).png FrameIcon(Lag).png FrameIcon(Lag).png FrameIcon(Lag).png FrameIcon(Lag).png FrameIcon(Lag).png FrameIcon(Lag).png FrameIcon(Lag).png FrameIcon(Lag).png FrameIcon(Lag).png FrameIcon(Lag).png FrameIcon(Lag).png FrameIcon(Lag).png FrameIcon(Lag).png FrameIcon(Lag).png FrameIcon(Lag).png FrameIcon(Lag).png FrameIcon(Lag).png FrameIcon(Lag).png FrameIcon(Lag).png FrameIcon(Lag).png FrameIcon(Lag).png FrameIcon(Lag).png FrameIcon(Lag).png FrameIcon(Lag).png FrameIcon(Lag).png FrameIcon(Lag).png FrameIcon(Lag).png FrameIcon(Lag).png FrameIcon(Lag).png FrameIcon(Interruptible).png FrameIcon(Interruptible).png FrameIcon(Interruptible).png FrameIcon(Interruptible).png FrameIcon(Interruptible).png FrameIcon(Interruptible).png FrameIcon(Interruptible).png FrameIcon(Interruptible).png FrameIcon(Interruptible).png FrameIcon(Interruptible).png FrameIcon(Interruptible).png FrameIcon(Interruptible).png FrameIcon(Interruptible).png FrameIcon(Interruptible).png FrameIcon(Interruptible).png FrameIcon(Interruptible).png FrameIcon(Interruptible).png FrameIcon(Interruptible).png
Legend (1 square = 1 frame)
FrameIcon(Lag).png
Lag time
FrameIcon(LagChargeS).pngFrameIcon(LagChargeE).png
Charge interval
FrameIcon(Hitbox).png
Hitbox
FrameIcon(HitboxChangeS).pngFrameIcon(HitboxChangeE).png
Hitbox change
FrameIcon(Interruptible).png
Interruptible