SSBU Icon.png

Marth (SSBU)/Forward tilt

From SmashWiki, the Super Smash Bros. wiki
< Marth (SSBU)
Revision as of 07:30, December 4, 2021 by 131.252.57.109 (talk) (→‎Overview: Initial description added.)
Jump to navigationJump to search
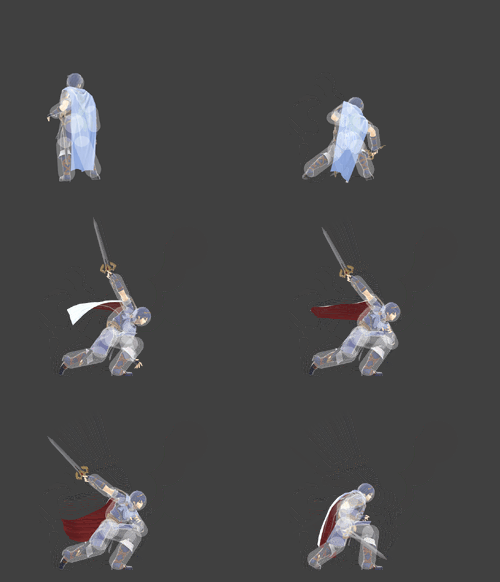
Hitbox visualization showing Marth's forward tilt.
Competitive.png This article or section may require competitive expertise.
You can discuss this issue on the talk page or edit this page to improve it.

Overview

Summary: The main uses of Marth's forward tilt are as:

  • a safer alternative to smash attacks for fishing for kills against high percent targets,
  • a more reliable mid platform kill option than Marth's smash attacks, without risking being in the air or using his up smash,
  • a mid percent followup to falling (often, short hopped) aerials
  • and a lower execution requirement follow-up to down tilt tech chases.

Marth's smash attacks may seem appealing for finishing stocks, but tipper forward tilt is much more reliable to hit, as it is faster, takes less time to recover if whiffed, and has more range in many practical applications. Even if a smash attack lands, if it is not tippered then the recovery time can prevent follow-ups, and if it misses entirely then Marth becomes vulnerable. Therefore, Marths having trouble with safer kill consistency should try to use forward tilt more often in place of, in particular, forward smash and up smash. Notably, it can be used for finishing stocks if used from the ground aiming at middle level platforms of stages such as Battlefield and Pokémon Stadium 2. However, caution should be taken when using it on Yoshi's Story and Dream Land, where there can be more vertical distance between the ground and the middle height platforms. In these, forward tilt can be used in conjunction with up tilt and Marth's aerials to keep people above you, which is a sound game plan in many of Marth's matchups.

At lower percents, it is inadvisable to use forward tilt in the neutral game especially against faster characters capable of disrupting Marth's space control. In particular, untippered forward tilt has almost no follow ups against most such low percent targets due to its recovery frames, and Marth may lose the subsequent frame data race to continue pressure, forcing him to shield. Furthermore, the nature of dashing and variety of high range characters in Ultimate makes dashing back out of this situation often troublesome. Seek to use it either as described above, i.e. as a kill option, or as a followup to a fast falled aerial, the most useful of which being neutral air (which when tippered, fast falled, spaced and timed correctly is Marth's safest move on shield) or forward air (for dealing with opponents that may be approaching above, but so quickly that forward tilt's rising arc would be too slow to challenge). Alternatively, forward tilt can be a followup to Marth's tech chases that are often started with down tilt. If you are uncomfortable with your reaction time at first, you can use forward tilt instead of Marth's smash attacks to punish some missed techs (though the reader is informed that Marth's down smash is a very common and often reliable follow-up to a down tilt tech chase).

Hitboxes

ID Part Rehit rate Damage SD Angle Angle type BK KS FKV Set weight Radius Bone Offset SDI× T% Clang Rebound Effect Type G A Sound Direct Hit bits Hit part Blockable Reflectable Absorbable Flinchless No GFX Heedless
0 0 0 9.0% 0 Sakurai angle Standard 30 70 0 HitboxTableIcon(False).png 3.5 sword1 1.0 0.0 2.5 0.7× 1.0× 0% HitboxTableIcon(Clang).png HitboxTableIcon(Rebound).png EffectIcon(Slash).png TypeIcon(Sword).png HitboxTableIcon(GroundedTrue).png HitboxTableIcon(AerialTrue).png M Slash SpecialsDirect.png All All HitboxTableIcon(Blockable).png HitboxTableIcon(Unreflectable).png HitboxTableIcon(Unabsorbable).png HitboxTableIcon(False).png HitboxTableIcon(False).png HitboxTableIcon(False).png
1 0 0 9.0% 0 Sakurai angle Standard 30 70 0 HitboxTableIcon(False).png 3.0 armr 0.0 1.0 0.0 0.7× 1.0× 0% HitboxTableIcon(Clang).png HitboxTableIcon(Rebound).png EffectIcon(Slash).png TypeIcon(Sword).png HitboxTableIcon(GroundedTrue).png HitboxTableIcon(AerialTrue).png M Slash SpecialsDirect.png All All HitboxTableIcon(Blockable).png HitboxTableIcon(Unreflectable).png HitboxTableIcon(Unabsorbable).png HitboxTableIcon(False).png HitboxTableIcon(False).png HitboxTableIcon(False).png
2 0 0 12.0% 0 Sakurai angle Standard 55 85 0 HitboxTableIcon(False).png 3.5 sword1 1.0 0.0 7.7 1.25× 1.0× 0% HitboxTableIcon(Clang).png HitboxTableIcon(Rebound).png EffectIcon(Slash).png TypeIcon(Sword).png HitboxTableIcon(GroundedTrue).png HitboxTableIcon(AerialTrue).png L Marth Sword SpecialsDirect.png All All HitboxTableIcon(Blockable).png HitboxTableIcon(Unreflectable).png HitboxTableIcon(Unabsorbable).png HitboxTableIcon(False).png HitboxTableIcon(False).png HitboxTableIcon(False).png

Timing

Hitboxes 8-11
Interruptible 34
Animation length 43
FrameIcon(Lag).png FrameIcon(Lag).png FrameIcon(Lag).png FrameIcon(Lag).png FrameIcon(Lag).png FrameIcon(Lag).png FrameIcon(Lag).png FrameIcon(Hitbox).png FrameIcon(Hitbox).png FrameIcon(Hitbox).png FrameIcon(Hitbox).png FrameIcon(Lag).png FrameIcon(Lag).png FrameIcon(Lag).png FrameIcon(Lag).png FrameIcon(Lag).png FrameIcon(Lag).png FrameIcon(Lag).png FrameIcon(Lag).png FrameIcon(Lag).png FrameIcon(Lag).png FrameIcon(Lag).png FrameIcon(Lag).png FrameIcon(Lag).png FrameIcon(Lag).png FrameIcon(Lag).png FrameIcon(Lag).png FrameIcon(Lag).png FrameIcon(Lag).png FrameIcon(Lag).png FrameIcon(Lag).png FrameIcon(Lag).png FrameIcon(Lag).png FrameIcon(Interruptible).png FrameIcon(Interruptible).png FrameIcon(Interruptible).png FrameIcon(Interruptible).png FrameIcon(Interruptible).png FrameIcon(Interruptible).png FrameIcon(Interruptible).png FrameIcon(Interruptible).png FrameIcon(Interruptible).png FrameIcon(Interruptible).png
Legend (1 square = 1 frame)
FrameIcon(Lag).png
Lag time
FrameIcon(Hitbox).png
Hitbox
FrameIcon(Interruptible).png
Interruptible