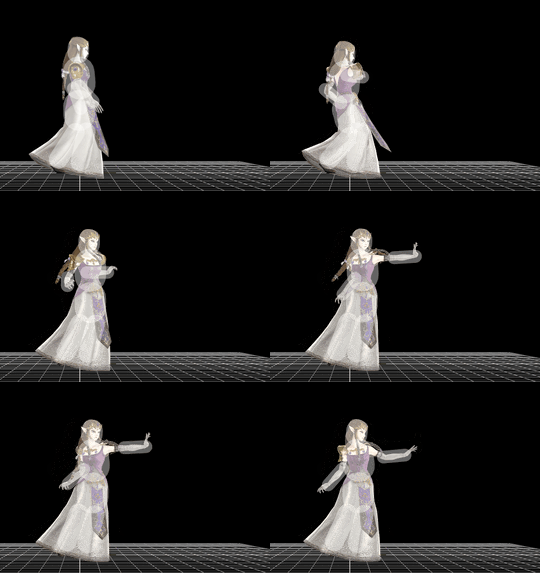
Zelda (SSB4)/Neutral attack: Difference between revisions
From SmashWiki, the Super Smash Bros. wiki
Jump to navigationJump to search
mNo edit summary |
SuperSqank (talk | contribs) mNo edit summary |
||
| (11 intermediate revisions by 7 users not shown) | |||
| Line 1: | Line 1: | ||
{{ArticleIcons|ssb4=y}} | {{ArticleIcons|ssb4=y}} | ||
[[File:ZeldaJab.gif|thumb|270px|Hitbox visualization showing Zelda's jab.]] | |||
{{competitive expertise}} | {{competitive expertise}} | ||
{{ | |||
==Update history== | |||
{{GameIcon|ssb4}} [[1.1.0]] | |||
*{{buff|Neutral attack deals more damage: 2% (hits 1-3) → 2.5% (hits 1-2)/3% (hit 3)), without full compensation on the final hit's knockback (24 (base), 150 (scaling) → 35/130). Its heavy position, bone, angles, hitbox sizes, and weight-based knockback have been adjusted on all of its hits. Altogether, these changes improve its set-up potential and make its hits connect together better.}} | |||
{{GameIcon|ssb4}} [[1.1.5]] | |||
*{{buff|Neutral attack deals more damage (2.5% (hits 1-2)/3% (hit 3)/8% (total) → 3%/5%/11%). The final hit's knockback was mostly compensated (35 (base)/130 (scaling) → 40/95).}} | |||
==Hitboxes== | ==Hitboxes== | ||
{{SSB4HitboxTableHeader}} | {{SSB4HitboxTableHeader}} | ||
{{HitboxTableTitle|Hit 1-2 (loop)|42}} | {{HitboxTableTitle|Hit 1-2 (loop)|42}} | ||
| Line 10: | Line 16: | ||
|id=0 | |id=0 | ||
|part=0 | |part=0 | ||
|damage= | |damage=3% | ||
|angle=361 | |angle=361 | ||
|bk=0 | |bk=0 | ||
| Line 31: | Line 37: | ||
|id=1 | |id=1 | ||
|part=0 | |part=0 | ||
|damage= | |damage=3% | ||
|angle=140 | |angle=140 | ||
|bk=0 | |bk=0 | ||
| Line 40: | Line 46: | ||
|xpos=0.0 | |xpos=0.0 | ||
|ypos=12.5 | |ypos=12.5 | ||
|zpos= | |zpos=9.5 | ||
|clang=f | |clang=f | ||
|effect=Magic | |effect=Magic | ||
| Line 52: | Line 58: | ||
|id=2 | |id=2 | ||
|part=0 | |part=0 | ||
|damage= | |damage=3% | ||
|angle=140 | |angle=140 | ||
|bk=0 | |bk=0 | ||
| Line 74: | Line 80: | ||
|id=0 | |id=0 | ||
|part=0 | |part=0 | ||
|damage= | |damage=5% | ||
|angle=361 | |angle=361 | ||
|bk= | |bk=40 | ||
|ks= | |ks=95 | ||
|fkv=0 | |fkv=0 | ||
|r=6.0 | |r=6.0 | ||
| Line 95: | Line 101: | ||
|id=1 | |id=1 | ||
|part=0 | |part=0 | ||
|damage= | |damage=5% | ||
|angle=361 | |angle=361 | ||
|bk= | |bk=40 | ||
|ks= | |ks=95 | ||
|fkv=0 | |fkv=0 | ||
|r=3.6 | |r=3.6 | ||
| Line 116: | Line 122: | ||
|id=2 | |id=2 | ||
|part=0 | |part=0 | ||
|damage= | |damage=5% | ||
|angle=361 | |angle=361 | ||
|bk= | |bk=40 | ||
|ks= | |ks=95 | ||
|fkv=0 | |fkv=0 | ||
|r=3.6 | |r=3.6 | ||
| Line 136: | Line 142: | ||
|} | |} | ||
==Timing== | |||
{|class="wikitable" | |||
!Hits 1-2 | |||
|11, 13 | |||
|- | |||
!Hit 3 | |||
|15 | |||
|- | |||
!Interruptible | |||
|24 | |||
|- | |||
!Animation length | |||
|39 | |||
|} | |||
{{FrameStripStart}} | |||
{{FrameStrip|t=Lag|c=10}}{{FrameStrip|t=Hitbox|c=1}}{{FrameStrip|t=Lag|c=1}}{{FrameStrip|t=Hitbox|c=1}}{{FrameStrip|t=Lag|c=1}}{{FrameStrip|t=Hitbox|c=1}}{{FrameStrip|t=Lag|c=8}}{{FrameStrip|t=Interruptible|c=16}} | |||
{{FrameStripEnd}} | |||
{{FrameIconLegend|lag=y|hitbox=y|interruptible=y}} | |||
{{MvSubNavZelda|g=SSB4}} | {{MvSubNavZelda|g=SSB4}} | ||
[[Category:Zelda (SSB4)]] | |||
[[Category:Neutral attacks (SSB4)]] | |||
Latest revision as of 14:47, March 2, 2023
Update history[edit]
 Neutral attack deals more damage: 2% (hits 1-3) → 2.5% (hits 1-2)/3% (hit 3)), without full compensation on the final hit's knockback (24 (base), 150 (scaling) → 35/130). Its heavy position, bone, angles, hitbox sizes, and weight-based knockback have been adjusted on all of its hits. Altogether, these changes improve its set-up potential and make its hits connect together better.
 Neutral attack deals more damage (2.5% (hits 1-2)/3% (hit 3)/8% (total) → 3%/5%/11%). The final hit's knockback was mostly compensated (35 (base)/130 (scaling) → 40/95).
Hitboxes[edit]
Timing[edit]
| Hits 1-2 | 11, 13 |
|---|---|
| Hit 3 | 15 |
| Interruptible | 24 |
| Animation length | 39 |
Lag time |
Hitbox |
Interruptible |
|

