Super Smash Bros. Melee

Zelda (SSBM)/Forward aerial: Difference between revisions

From SmashWiki, the Super Smash Bros. wiki
Jump to navigationJump to search
 
Line 4: Line 4:
==Overview==
==Overview==
===Technique===
===Technique===
Zelda's [[Lightning Kick]] has a unique animation that sharply raises her ECB, then drops it slightly immediately following. Using this to land on a platform is referred to as an aerial interrupt (AI). Timing this aerial interrupt can land Zelda, autocancel for 4 frames, and leave Zelda actionable on platform. This is likely the fastest way to land and be actionable on a side platform on all stages. The aerial interrupt is also one of the strongest, albeit hardest, ledge options Zelda has available to her, granting 7 frames of invulnerable actionability from ledge on a stage with flat walls, 10 frames on [[Yoshi's Story]], or 13 frames on [[Battlefield (SSBM)|Battlefield]].
Zelda's [[Lightning Kick]] has a unique animation that sharply raises her ECB, then drops it slightly immediately following. Using this to land on a platform is referred to as an aerial interrupt (AI). Timing this aerial interrupt can land Zelda, autocancel for 4 frames, and leave Zelda actionable on platform. This is likely the fastest way to land and be actionable on a side platform on all stages. The aerial interrupt is also one of the strongest, albeit hardest, ledge options Zelda has available to her, granting 9 frames of invulnerable actionability from ledge on a stage with flat walls, 10 frames on [[Yoshi's Story]], or 13 frames on [[Battlefield (SSBM)|Battlefield]].


==Hitboxes==
==Hitboxes==

Latest revision as of 13:35, November 2, 2022

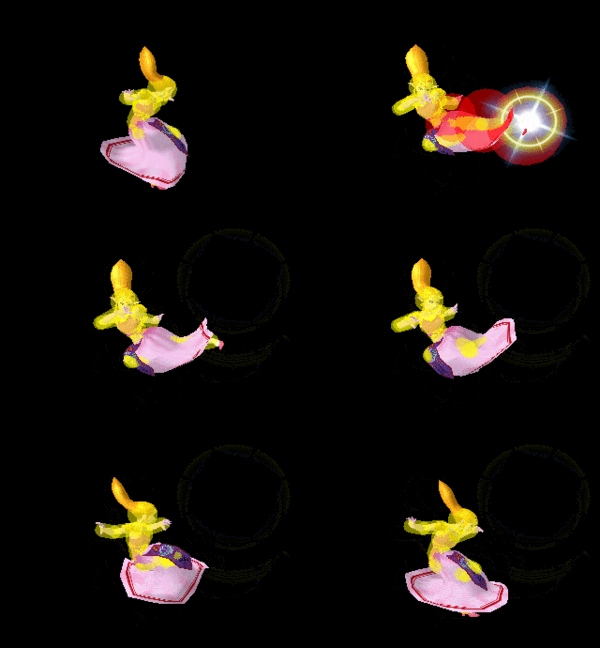
Hitbox visualization showing Zelda's forward aerial.
Competitive.png This article or section may require competitive expertise.
You can discuss this issue on the talk page or edit this page to improve it.

Overview[edit]

Technique[edit]

Zelda's Lightning Kick has a unique animation that sharply raises her ECB, then drops it slightly immediately following. Using this to land on a platform is referred to as an aerial interrupt (AI). Timing this aerial interrupt can land Zelda, autocancel for 4 frames, and leave Zelda actionable on platform. This is likely the fastest way to land and be actionable on a side platform on all stages. The aerial interrupt is also one of the strongest, albeit hardest, ledge options Zelda has available to her, granting 9 frames of invulnerable actionability from ledge on a stage with flat walls, 10 frames on Yoshi's Story, or 13 frames on Battlefield.

Hitboxes[edit]

ID Part Damage SD Angle BK KS FKV Radius Bone Offset Clang Rebound Effect G A Sound
0 0 10% 0 Sakurai angle 0 80 0 3.906 7 0.0 0.0 0.0 HitboxTableIcon(NoClang).png HitboxTableIcon(Rebound).png Normal (effect) HitboxTableIcon(GroundedTrue).png HitboxTableIcon(AerialTrue).png S Punch
1 0 10% 0 Sakurai angle 0 80 0 3.1248 4 0.0 0.0 0.0 HitboxTableIcon(NoClang).png HitboxTableIcon(Rebound).png Normal (effect) HitboxTableIcon(GroundedTrue).png HitboxTableIcon(AerialTrue).png S Punch
2 0 20% 0 Sakurai angle 30 96 0 5.0778 10 0.0 0.0 0.0 HitboxTableIcon(NoClang).png HitboxTableIcon(Rebound).png Electric (effect) HitboxTableIcon(GroundedTrue).png HitboxTableIcon(AerialTrue).png L Kick

Timing[edit]

Initial autocancel 1-7
Hitboxes 8-11
Ending autocancel 25-
Interruptible 36
Animation length 39
FrameIcon(Lag).png FrameIcon(Lag).png FrameIcon(Lag).png FrameIcon(Lag).png FrameIcon(Lag).png FrameIcon(Lag).png FrameIcon(Lag).png FrameIcon(Hitbox).png FrameIcon(Hitbox).png FrameIcon(Hitbox).png FrameIcon(Hitbox).png FrameIcon(Lag).png FrameIcon(Lag).png FrameIcon(Lag).png FrameIcon(Lag).png FrameIcon(Lag).png FrameIcon(Lag).png FrameIcon(Lag).png FrameIcon(Lag).png FrameIcon(Lag).png FrameIcon(Lag).png FrameIcon(Lag).png FrameIcon(Lag).png FrameIcon(Lag).png FrameIcon(Lag).png FrameIcon(Lag).png FrameIcon(Lag).png FrameIcon(Lag).png FrameIcon(Lag).png FrameIcon(Lag).png FrameIcon(Lag).png FrameIcon(Lag).png FrameIcon(Lag).png FrameIcon(Lag).png FrameIcon(Lag).png FrameIcon(Interruptible).png FrameIcon(Interruptible).png FrameIcon(Interruptible).png FrameIcon(Interruptible).png
FrameIcon(Autocancel).png FrameIcon(Autocancel).png FrameIcon(Autocancel).png FrameIcon(Autocancel).png FrameIcon(Autocancel).png FrameIcon(Autocancel).png FrameIcon(Autocancel).png FrameIcon(Blank).png FrameIcon(Blank).png FrameIcon(Blank).png FrameIcon(Blank).png FrameIcon(Blank).png FrameIcon(Blank).png FrameIcon(Blank).png FrameIcon(Blank).png FrameIcon(Blank).png FrameIcon(Blank).png FrameIcon(Blank).png FrameIcon(Blank).png FrameIcon(Blank).png FrameIcon(Blank).png FrameIcon(Blank).png FrameIcon(Blank).png FrameIcon(Blank).png FrameIcon(Autocancel).png FrameIcon(Autocancel).png FrameIcon(Autocancel).png FrameIcon(Autocancel).png FrameIcon(Autocancel).png FrameIcon(Autocancel).png FrameIcon(Autocancel).png FrameIcon(Autocancel).png FrameIcon(Autocancel).png FrameIcon(Autocancel).png FrameIcon(Autocancel).png FrameIcon(Autocancel).png FrameIcon(Autocancel).png FrameIcon(Autocancel).png FrameIcon(Autocancel).png

Landing lag[edit]

Animation length 18
L-cancelled animation length 9
Normal  FrameIcon(Lag).png FrameIcon(Lag).png FrameIcon(Lag).png FrameIcon(Lag).png FrameIcon(Lag).png FrameIcon(Lag).png FrameIcon(Lag).png FrameIcon(Lag).png FrameIcon(Lag).png FrameIcon(Lag).png FrameIcon(Lag).png FrameIcon(Lag).png FrameIcon(Lag).png FrameIcon(Lag).png FrameIcon(Lag).png FrameIcon(Lag).png FrameIcon(Lag).png FrameIcon(Lag).png
L-cancelled  FrameIcon(Lag).png FrameIcon(Lag).png FrameIcon(Lag).png FrameIcon(Lag).png FrameIcon(Lag).png FrameIcon(Lag).png FrameIcon(Lag).png FrameIcon(Lag).png FrameIcon(Lag).png FrameIcon(Blank).png FrameIcon(Blank).png FrameIcon(Blank).png FrameIcon(Blank).png FrameIcon(Blank).png FrameIcon(Blank).png FrameIcon(Blank).png FrameIcon(Blank).png FrameIcon(Blank).png
Legend (1 square = 1 frame)
Lag
Lag time
Hitbox
Hitbox
Auto-canceling
Autocancel
Interruptibility
Interruptible