SSBU Icon.png

Ice Climbers (SSBU)/Down aerial: Difference between revisions

From SmashWiki, the Super Smash Bros. wiki
Jump to navigationJump to search
(→‎Overview: Stuff about Icies' dair. Will elaborate more later on...)
(→‎Overview: Continuing to elaborate...)
Line 4: Line 4:
{{competitive expertise}}
==Overview==
==Overview==
Each of the duo turns their mallet upside down, frantically clinging to it as they forcibly descend. Like other stall-and-fall down airs, it places a sizeable, highly active hitbox directly below them with a sharp downward trajectory and high landing lag. But unlike most of its kind, the Ice Climbers' down aerial doesn't spike no matter when or where it lands, and doesn't plummet very quickly. The partner's version has a noticably smaller hitbox and a horizontal launch angle rather than a vertical one.
Each of the duo turns their mallet upside down, frantically clinging to it as they forcibly descend. Like other stall-and-fall down airs, it places a sizeable, highly active hitbox directly below them with a sharp downward trajectory and high landing lag. But unlike most of its kind, the Ice Climbers' down aerial doesn't spike no matter when or where it lands, and doesn't plummet very quickly. The partner's version has a noticably smaller hitbox and a horizontal launch angle rather than a vertical one. While it's fairly unsafe on shield, (the only punishable aerial in their kit, in fact.) down aerial's landing animation has the climbers bounce off the ground, which can cause some out of shield options to miss them.


The below-average falling speed combined with the duo's excellent recovery allow it to be used for edgeguarding, and its high knockback and low launch angle make it very dangerous to opponents who are hit offstage. This is of course, a high-risk-high reward maneuver, as it can put the climbers in a much worse position if they miss, and it may even help foes recover if only the leader's attack connects.
While landing with down aerial normally lack combo potential, it grants a much bigger frame advantage than it normally would when autocanceled. An autocanceled down aerial can lead to a dash attack at low percents, dealing half a stock's worth of damage with the attacks that follow. But the combo routes involving down air wear off quickly due to the move's high horizontal knockback. It can start tech-chases at later percentages, though.


==Hitboxes==
==Hitboxes==

Revision as of 16:07, May 20, 2024

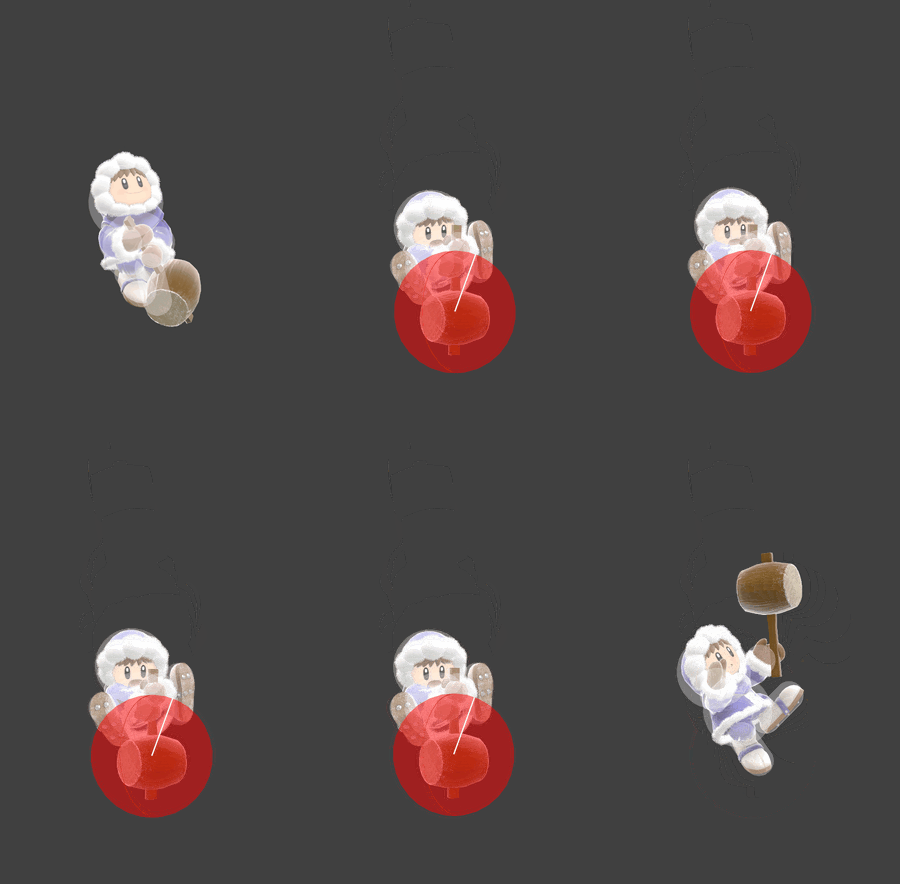
Hitbox visualization showing Popo's down aerial.
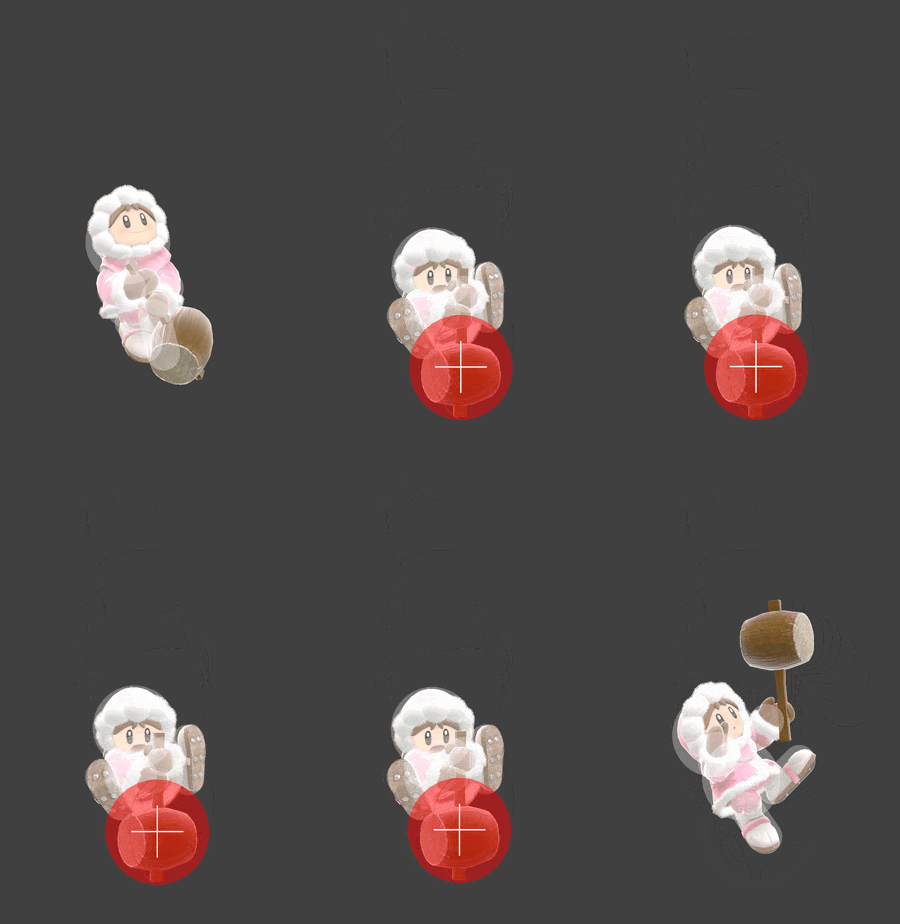
Hitbox visualization showing Nana's down aerial.
Competitive.png This article or section may require competitive expertise.
You can discuss this issue on the talk page or edit this page to improve it.

Overview

Each of the duo turns their mallet upside down, frantically clinging to it as they forcibly descend. Like other stall-and-fall down airs, it places a sizeable, highly active hitbox directly below them with a sharp downward trajectory and high landing lag. But unlike most of its kind, the Ice Climbers' down aerial doesn't spike no matter when or where it lands, and doesn't plummet very quickly. The partner's version has a noticably smaller hitbox and a horizontal launch angle rather than a vertical one. While it's fairly unsafe on shield, (the only punishable aerial in their kit, in fact.) down aerial's landing animation has the climbers bounce off the ground, which can cause some out of shield options to miss them.

The below-average falling speed combined with the duo's excellent recovery allow it to be used for edgeguarding, and its high knockback and low launch angle make it very dangerous to opponents who are hit offstage. This is of course, a high-risk-high reward maneuver, as it can put the climbers in a much worse position if they miss, and it may even help foes recover if only the leader's attack connects.

While landing with down aerial normally lack combo potential, it grants a much bigger frame advantage than it normally would when autocanceled. An autocanceled down aerial can lead to a dash attack at low percents, dealing half a stock's worth of damage with the attacks that follow. But the combo routes involving down air wear off quickly due to the move's high horizontal knockback. It can start tech-chases at later percentages, though.

Hitboxes

ID Part Rehit rate Damage SD Angle Angle type BK KS FKV Set weight Radius Bone Offset SDI× T% Clang Rebound Effect Type G A Sound Direct Hit bits Hit part Blockable Reflectable Absorbable Flinchless No GFX Heedless
Leader
0 0 0 8.0% 0 AngleIcon70.png Standard 40 90 0 HitboxTableIcon(False).png 6.0 havel 0.0 6.5 0.0 1.0× 1.0× 0% HitboxTableIcon(Clang).png HitboxTableIcon(Rebound).png EffectIcon(Normal).png TypeIcon(Hammer).png HitboxTableIcon(GroundedTrue).png HitboxTableIcon(AerialTrue).png L Punch SpecialsDirect.png All All HitboxTableIcon(Blockable).png HitboxTableIcon(Unreflectable).png HitboxTableIcon(Unabsorbable).png HitboxTableIcon(False).png HitboxTableIcon(False).png HitboxTableIcon(False).png
Partner
0 0 0 6.0% 0 Sakurai angle Standard 40 130 0 HitboxTableIcon(False).png 4.5 havel 0.0 6.5 0.0 1.0× 1.0× 0% HitboxTableIcon(Clang).png HitboxTableIcon(Rebound).png EffectIcon(Normal).png TypeIcon(Hammer).png HitboxTableIcon(GroundedTrue).png HitboxTableIcon(AerialTrue).png L Punch SpecialsDirect.png All All HitboxTableIcon(Blockable).png HitboxTableIcon(Unreflectable).png HitboxTableIcon(Unabsorbable).png HitboxTableIcon(False).png HitboxTableIcon(False).png HitboxTableIcon(False).png

Timing

Attack

The move first sets the Ice Climbers' vertical momentum to 1 on frames 1-12, then sets their horizontal momentum to 0.3 and their vertical momentum to -2.6 from frame 12 onward. Manual horizontal movement is also disabled during frames 1-35.

Hitboxes 12-51
Ending autocancel 54-
Interruptible 64
Animation length 68
FrameIcon(Lag).png FrameIcon(Lag).png FrameIcon(Lag).png FrameIcon(Lag).png FrameIcon(Lag).png FrameIcon(Lag).png FrameIcon(Lag).png FrameIcon(Lag).png FrameIcon(Lag).png FrameIcon(Lag).png FrameIcon(Lag).png FrameIcon(Hitbox).png FrameIcon(Hitbox).png FrameIcon(Hitbox).png FrameIcon(Hitbox).png FrameIcon(Hitbox).png FrameIcon(Hitbox).png FrameIcon(Hitbox).png FrameIcon(Hitbox).png FrameIcon(Hitbox).png FrameIcon(Hitbox).png FrameIcon(Hitbox).png FrameIcon(Hitbox).png FrameIcon(Hitbox).png FrameIcon(Hitbox).png FrameIcon(Hitbox).png FrameIcon(Hitbox).png FrameIcon(Hitbox).png FrameIcon(Hitbox).png FrameIcon(Hitbox).png FrameIcon(Hitbox).png FrameIcon(Hitbox).png FrameIcon(Hitbox).png FrameIcon(Hitbox).png FrameIcon(Hitbox).png FrameIcon(Hitbox).png FrameIcon(Hitbox).png FrameIcon(Hitbox).png FrameIcon(Hitbox).png FrameIcon(Hitbox).png FrameIcon(Hitbox).png FrameIcon(Hitbox).png FrameIcon(Hitbox).png FrameIcon(Hitbox).png FrameIcon(Hitbox).png FrameIcon(Hitbox).png FrameIcon(Hitbox).png FrameIcon(Hitbox).png FrameIcon(Hitbox).png FrameIcon(Hitbox).png FrameIcon(Hitbox).png FrameIcon(Lag).png FrameIcon(Lag).png FrameIcon(Lag).png FrameIcon(Lag).png FrameIcon(Lag).png FrameIcon(Lag).png FrameIcon(Lag).png FrameIcon(Lag).png FrameIcon(Lag).png FrameIcon(Lag).png FrameIcon(Lag).png FrameIcon(Lag).png FrameIcon(Interruptible).png FrameIcon(Interruptible).png FrameIcon(Interruptible).png FrameIcon(Interruptible).png FrameIcon(Interruptible).png
FrameIcon(Blank).png FrameIcon(Blank).png FrameIcon(Blank).png FrameIcon(Blank).png FrameIcon(Blank).png FrameIcon(Blank).png FrameIcon(Blank).png FrameIcon(Blank).png FrameIcon(Blank).png FrameIcon(Blank).png FrameIcon(Blank).png FrameIcon(Blank).png FrameIcon(Blank).png FrameIcon(Blank).png FrameIcon(Blank).png FrameIcon(Blank).png FrameIcon(Blank).png FrameIcon(Blank).png FrameIcon(Blank).png FrameIcon(Blank).png FrameIcon(Blank).png FrameIcon(Blank).png FrameIcon(Blank).png FrameIcon(Blank).png FrameIcon(Blank).png FrameIcon(Blank).png FrameIcon(Blank).png FrameIcon(Blank).png FrameIcon(Blank).png FrameIcon(Blank).png FrameIcon(Blank).png FrameIcon(Blank).png FrameIcon(Blank).png FrameIcon(Blank).png FrameIcon(Blank).png FrameIcon(Blank).png FrameIcon(Blank).png FrameIcon(Blank).png FrameIcon(Blank).png FrameIcon(Blank).png FrameIcon(Blank).png FrameIcon(Blank).png FrameIcon(Blank).png FrameIcon(Blank).png FrameIcon(Blank).png FrameIcon(Blank).png FrameIcon(Blank).png FrameIcon(Blank).png FrameIcon(Blank).png FrameIcon(Blank).png FrameIcon(Blank).png FrameIcon(Blank).png FrameIcon(Blank).png FrameIcon(Autocancel).png FrameIcon(Autocancel).png FrameIcon(Autocancel).png FrameIcon(Autocancel).png FrameIcon(Autocancel).png FrameIcon(Autocancel).png FrameIcon(Autocancel).png FrameIcon(Autocancel).png FrameIcon(Autocancel).png FrameIcon(Autocancel).png FrameIcon(Autocancel).png FrameIcon(Autocancel).png FrameIcon(Autocancel).png FrameIcon(Autocancel).png FrameIcon(Autocancel).png

Landing lag

Interruptible 21
Animation length 31
FrameIcon(Lag).png FrameIcon(Lag).png FrameIcon(Lag).png FrameIcon(Lag).png FrameIcon(Lag).png FrameIcon(Lag).png FrameIcon(Lag).png FrameIcon(Lag).png FrameIcon(Lag).png FrameIcon(Lag).png FrameIcon(Lag).png FrameIcon(Lag).png FrameIcon(Lag).png FrameIcon(Lag).png FrameIcon(Lag).png FrameIcon(Lag).png FrameIcon(Lag).png FrameIcon(Lag).png FrameIcon(Lag).png FrameIcon(Lag).png FrameIcon(Interruptible).png FrameIcon(Interruptible).png FrameIcon(Interruptible).png FrameIcon(Interruptible).png FrameIcon(Interruptible).png FrameIcon(Interruptible).png FrameIcon(Interruptible).png FrameIcon(Interruptible).png FrameIcon(Interruptible).png FrameIcon(Interruptible).png FrameIcon(Interruptible).png
Legend (1 square = 1 frame)
FrameIcon(Lag).png
Lag time
FrameIcon(Hitbox).png
Hitbox
FrameIcon(Autocancel).png
Autocancel
FrameIcon(Interruptible).png
Interruptible