SSBU Icon.png

Ridley (SSBU)/Down throw

From SmashWiki, the Super Smash Bros. wiki
Jump to navigationJump to search
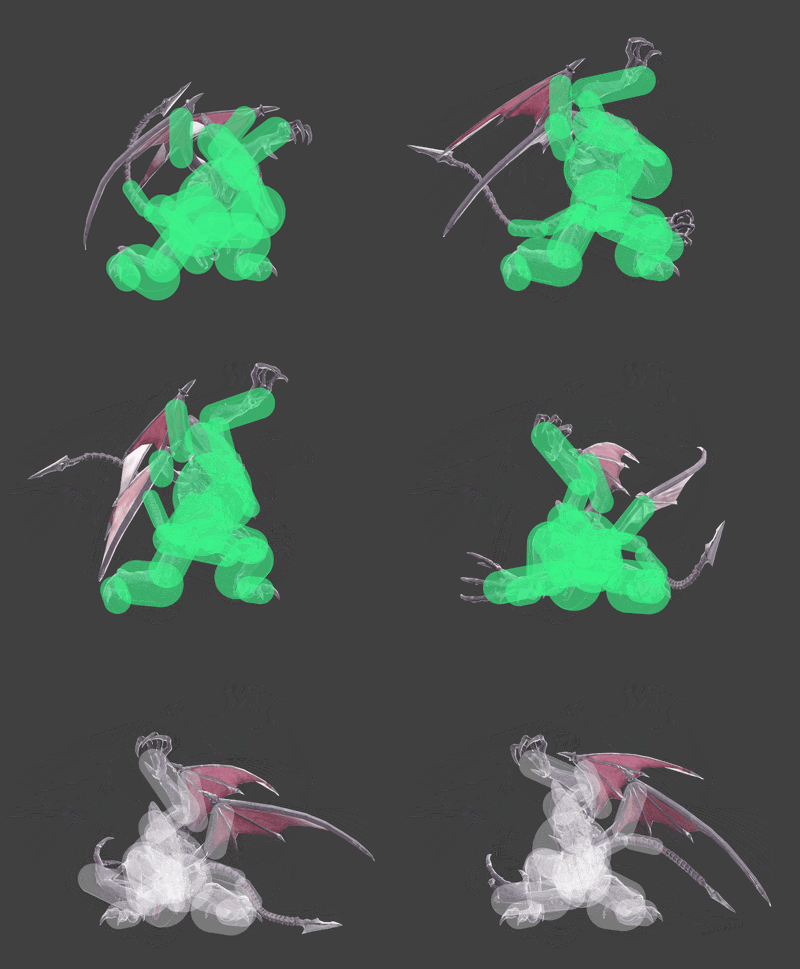
Ridley down throw hurtbox visualization
RidleyDThrow.gif

Overview[edit]

Ridley slams the opponent to the ground. Down throw is an extremely strong combo tool at 0%, as it doesn't send into tumble until around 18.4% on average[1]. Due to this, as well as it being a throw, the opponent cannot interact with DI or even ASDI. Ridley removes all interaction bar their option out of hitstun, enabling every combo at this point to be consistent.

Down throw can be used to set up for Skewer, which catches panic airdodges. However, waiting and using shield can prevent this and leave Ridley at -29 on shield frame advantage. Most Ridley players will use a full momentum short hop fast fall neutral aerial to try and regrab, or forward aerial for its high damage with a tipper while being able to combo into itself. Both of these combo routes should end with the opponent at around 50%, giving Ridley a fair opener.

Down throw can be confirmed through moves such as landing forward or neutral aerial, or a half-charged Plasma Breath (which has less endlag than a fully charged one). However, the latter tends to leave the opponent out of the tumble percentage range, which can make it more difficult to get a good combo.

With the assistance of platforms, down throw can also KO at higher percentages. This is Ridley's main kill throw in circumstances where it's necessary.

Ridley Down Throw KO%s on Battlefield VS Mario w/Optimal DI
Circumstance Kill%
Stage Base 216.28%
Stage Base (max rage) 188.5%
Side Platform 200.92%
Side Platform (max rage) 174.52%
Top Platform 185.06%
Top Platform (max rage) 160.12%

Optimal DI is a 314° angle on the control stick.

Throw Data[edit]

Kind ID Damage Angle Angle type BK KS FKV Effect Type Sound
Throw 0 7.0% AngleIcon74.png Forward 40 115 0 0.0× EffectIcon(Normal).png TypeIcon(Throwing).png S None
Break 0 3.0% Sakurai angle Forward 40 100 0 0.0× EffectIcon(Normal).png TypeIcon(Throwing).png S None

Timing[edit]

During frame 18, the move inflicts 4 frames of hitlag to both Ridley and the opponent, during which the opponent is invincible. This section shows its timing without the hitlag.

Invincibility 1-22
Throw Release 22
Interruptible 36
Animation length 55
FrameIcon(Lag).png FrameIcon(Lag).png FrameIcon(Lag).png FrameIcon(Lag).png FrameIcon(Lag).png FrameIcon(Lag).png FrameIcon(Lag).png FrameIcon(Lag).png FrameIcon(Lag).png FrameIcon(Lag).png FrameIcon(Lag).png FrameIcon(Lag).png FrameIcon(Lag).png FrameIcon(Lag).png FrameIcon(Lag).png FrameIcon(Lag).png FrameIcon(Lag).png FrameIcon(Lag).png FrameIcon(Lag).png FrameIcon(Lag).png FrameIcon(LagThrowS).png FrameIcon(LagThrowE).png FrameIcon(Lag).png FrameIcon(Lag).png FrameIcon(Lag).png FrameIcon(Lag).png FrameIcon(Lag).png FrameIcon(Lag).png FrameIcon(Lag).png FrameIcon(Lag).png FrameIcon(Lag).png FrameIcon(Lag).png FrameIcon(Lag).png FrameIcon(Lag).png FrameIcon(Lag).png FrameIcon(Interruptible).png FrameIcon(Interruptible).png FrameIcon(Interruptible).png FrameIcon(Interruptible).png FrameIcon(Interruptible).png FrameIcon(Interruptible).png FrameIcon(Interruptible).png FrameIcon(Interruptible).png FrameIcon(Interruptible).png FrameIcon(Interruptible).png FrameIcon(Interruptible).png FrameIcon(Interruptible).png FrameIcon(Interruptible).png FrameIcon(Interruptible).png FrameIcon(Interruptible).png FrameIcon(Interruptible).png FrameIcon(Interruptible).png FrameIcon(Interruptible).png FrameIcon(Interruptible).png FrameIcon(Interruptible).png
FrameIcon(Invincible).png FrameIcon(Invincible).png FrameIcon(Invincible).png FrameIcon(Invincible).png FrameIcon(Invincible).png FrameIcon(Invincible).png FrameIcon(Invincible).png FrameIcon(Invincible).png FrameIcon(Invincible).png FrameIcon(Invincible).png FrameIcon(Invincible).png FrameIcon(Invincible).png FrameIcon(Invincible).png FrameIcon(Invincible).png FrameIcon(Invincible).png FrameIcon(Invincible).png FrameIcon(Invincible).png FrameIcon(Invincible).png FrameIcon(Invincible).png FrameIcon(Invincible).png FrameIcon(Invincible).png FrameIcon(Invincible).png FrameIcon(Vulnerable).png FrameIcon(Vulnerable).png FrameIcon(Vulnerable).png FrameIcon(Vulnerable).png FrameIcon(Vulnerable).png FrameIcon(Vulnerable).png FrameIcon(Vulnerable).png FrameIcon(Vulnerable).png FrameIcon(Vulnerable).png FrameIcon(Vulnerable).png FrameIcon(Vulnerable).png FrameIcon(Vulnerable).png FrameIcon(Vulnerable).png FrameIcon(Vulnerable).png FrameIcon(Vulnerable).png FrameIcon(Vulnerable).png FrameIcon(Vulnerable).png FrameIcon(Vulnerable).png FrameIcon(Vulnerable).png FrameIcon(Vulnerable).png FrameIcon(Vulnerable).png FrameIcon(Vulnerable).png FrameIcon(Vulnerable).png FrameIcon(Vulnerable).png FrameIcon(Vulnerable).png FrameIcon(Vulnerable).png FrameIcon(Vulnerable).png FrameIcon(Vulnerable).png FrameIcon(Vulnerable).png FrameIcon(Vulnerable).png FrameIcon(Vulnerable).png FrameIcon(Vulnerable).png FrameIcon(Vulnerable).png
Legend (1 square = 1 frame)
FrameIcon(Lag).png
Lag time
FrameIcon(Vulnerable).png
Vulnerable
FrameIcon(Invincible).png
Invincible
FrameIcon(BlankThrowS).pngFrameIcon(BlankThrowE).png
Throw point
FrameIcon(Interruptible).png
Interruptible