SSBB Icon.png

Kirby (SSBB)/Forward throw

From SmashWiki, the Super Smash Bros. wiki
Jump to navigationJump to search

Overview[edit]

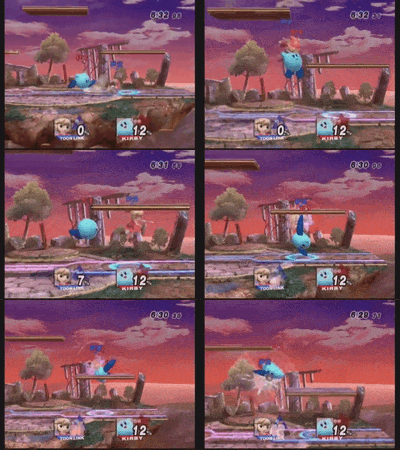
A throw combo with Kirby in Super Smash Bros. Brawl
An example of a throw combo started with this move: f-throw→uair→u-tilt→uair→bair

Kirby slowly rises while holding the opponent, flips, and slams them to the ground, dealing 8% damage and fairly low base knockback. The move is very similar to the Suplex ability from Kirby Super Star. This throw has excellent combo ability at low percentages, with a variety of followup options that can deal over 40%, with some being able to deal as much as 40% damage. The combos are most effective on heavier characters and are especially helpful against characters with their own damage racking combos (such as Falco's chain throw), as Kirby can easily take back a percentage lead he may have lost earlier. It can also KO at percentages around 200%. Many combos can be started with this throw:

  • F-throw→uair→reverse u-tiltbair - The most well-known Kirby throw combo, commonly known as the Gonzo Combo. If all hits connect, it quickly racks up 38% damage. Generally performed on any opponent at 0% except for the floatiest characters, who can avoid the up air by simply jumping away. Lighter characters can SDI out of the up air to avoid getting hit by the up tilt. The back aerial can be replaced by an up aerial to start a juggle combo depending on the opponent's DI.
  • F-throw→Hammer - This combo is not guaranteed, but is useful for mixups to rack up extra damage when the opponent would expect somethng different.
  • F-throw→Uair→Re-grab - At around 0%, Kirby can uair and regrab heavier characters or fastfallers, for some extra damage, and afterwards, can perform another Gonzo Combo on certain characters.
  • F-throw→Jump→Uair - After the percentage is too high for guaranteed followups to work, Kirby can jump and perform an up air to try to hit the opponent. How this is performed depends on the opponent's falling speed and weight. Since many players will air dodge after being thrown, Kirby can also try to read the air dodge and get another followup, such as an aerial Hammer. A down throw setup can be more useful at these percentages.

Throw data[edit]

ID Damage Angle BK KS FKV Bone SDIx FFx T% Type Effect Sound
0 8% AngleIcon65.png Forwards 40 100 0 0 1.0x None 0% TypeIcon(Throwing).png EffectIcon(Normal).png S None
1 3% Sakurai angle Forwards 60 100 0 0 1.0x None 0% TypeIcon(Throwing).png EffectIcon(Normal).png S None

Timing[edit]

Invincibility 1-8
Throw 45
Animation length 61
FrameIcon(Lag).png FrameIcon(Lag).png FrameIcon(Lag).png FrameIcon(Lag).png FrameIcon(Lag).png FrameIcon(Lag).png FrameIcon(Lag).png FrameIcon(Lag).png FrameIcon(Lag).png FrameIcon(Lag).png FrameIcon(Lag).png FrameIcon(Lag).png FrameIcon(Lag).png FrameIcon(Lag).png FrameIcon(Lag).png FrameIcon(Lag).png FrameIcon(Lag).png FrameIcon(Lag).png FrameIcon(Lag).png FrameIcon(Lag).png FrameIcon(Lag).png FrameIcon(Lag).png FrameIcon(Lag).png FrameIcon(Lag).png FrameIcon(Lag).png FrameIcon(Lag).png FrameIcon(Lag).png FrameIcon(Lag).png FrameIcon(Lag).png FrameIcon(Lag).png FrameIcon(Lag).png FrameIcon(Lag).png FrameIcon(Lag).png FrameIcon(Lag).png FrameIcon(Lag).png FrameIcon(Lag).png FrameIcon(Lag).png FrameIcon(Lag).png FrameIcon(Lag).png FrameIcon(Lag).png FrameIcon(Lag).png FrameIcon(Lag).png FrameIcon(Lag).png FrameIcon(LagThrowS).png FrameIcon(LagThrowE).png FrameIcon(Lag).png FrameIcon(Lag).png FrameIcon(Lag).png FrameIcon(Lag).png FrameIcon(Lag).png FrameIcon(Lag).png FrameIcon(Lag).png FrameIcon(Lag).png FrameIcon(Lag).png FrameIcon(Lag).png FrameIcon(Lag).png FrameIcon(Lag).png FrameIcon(Lag).png FrameIcon(Lag).png FrameIcon(Lag).png FrameIcon(Lag).png
FrameIcon(Invincible).png FrameIcon(Invincible).png FrameIcon(Invincible).png FrameIcon(Invincible).png FrameIcon(Invincible).png FrameIcon(Invincible).png FrameIcon(Invincible).png FrameIcon(Invincible).png FrameIcon(Vulnerable).png FrameIcon(Vulnerable).png FrameIcon(Vulnerable).png FrameIcon(Vulnerable).png FrameIcon(Vulnerable).png FrameIcon(Vulnerable).png FrameIcon(Vulnerable).png FrameIcon(Vulnerable).png FrameIcon(Vulnerable).png FrameIcon(Vulnerable).png FrameIcon(Vulnerable).png FrameIcon(Vulnerable).png FrameIcon(Vulnerable).png FrameIcon(Vulnerable).png FrameIcon(Vulnerable).png FrameIcon(Vulnerable).png FrameIcon(Vulnerable).png FrameIcon(Vulnerable).png FrameIcon(Vulnerable).png FrameIcon(Vulnerable).png FrameIcon(Vulnerable).png FrameIcon(Vulnerable).png FrameIcon(Vulnerable).png FrameIcon(Vulnerable).png FrameIcon(Vulnerable).png FrameIcon(Vulnerable).png FrameIcon(Vulnerable).png FrameIcon(Vulnerable).png FrameIcon(Vulnerable).png FrameIcon(Vulnerable).png FrameIcon(Vulnerable).png FrameIcon(Vulnerable).png FrameIcon(Vulnerable).png FrameIcon(Vulnerable).png FrameIcon(Vulnerable).png FrameIcon(Vulnerable).png FrameIcon(Vulnerable).png FrameIcon(Vulnerable).png FrameIcon(Vulnerable).png FrameIcon(Vulnerable).png FrameIcon(Vulnerable).png FrameIcon(Vulnerable).png FrameIcon(Vulnerable).png FrameIcon(Vulnerable).png FrameIcon(Vulnerable).png FrameIcon(Vulnerable).png FrameIcon(Vulnerable).png FrameIcon(Vulnerable).png FrameIcon(Vulnerable).png FrameIcon(Vulnerable).png FrameIcon(Vulnerable).png FrameIcon(Vulnerable).png FrameIcon(Vulnerable).png
Legend (1 square = 1 frame)
FrameIcon(Lag).png
Lag time
FrameIcon(Vulnerable).png
Vulnerable
FrameIcon(Invincible).png
Invincible
FrameIcon(BlankThrowS).pngFrameIcon(BlankThrowE).png
Throw point