Yoshi (SSB)/Forward tilt: Difference between revisions
m (→Overview) |
m (Text replacement - "== ([^=])" to "== $1") |
||
| (2 intermediate revisions by 2 users not shown) | |||
| Line 3: | Line 3: | ||
==Overview== | ==Overview== | ||
[[File:Yoshi Forward Tilt Hitbox Smash 64.gif|thumb|The hitbox of Yoshi's f-tilt]] | [[File:Yoshi Forward Tilt Hitbox Smash 64.gif|thumb|The hitbox of Yoshi's f-tilt]] | ||
Yoshi does a quick kick forward that can be [[Angling|angled]]. It does below average vertical diagonal knockback with rather high [[hitstun]], being able to easily set up a {{mvsub|Yoshi|SSB|forward aerial}} [[meteor smash]] at low-mid percentages to mid-high percentages. At low percentages, Yoshi can use a string of forward tilts across the stage and end with a short hop→forward aerial. On [[fastfaller]]s, a {{mvsub|Yoshi|SSB|down smash}} can also be used after, useful for getting the opponent offstage in general. At around 100%, the move can be angled up and followed with a full hop→fair. The latter can also followup into a {{mvsub|Yoshi|SSB|neutral aerial}} instead - hitting with its late hitbox can lead into another f-tilt→nair, which can be done repeatedly until the f-tilt→fair is used at the edge of the stage. It can also combo into an {{mvsub|Yoshi|SSB|up smash}}, though this cannot be done at the percentages where the up smash will KO. A weakness of the move is that it has subpar [[range]], meaning that it cannot be used effectively for [[spacing]] (although Yoshi does have some better options for this such as his {{mvsub|Yoshi|SSB|down tilt}}). Also, during a string of forward tilts, if one does the next f-tilt too late, the opponent will be able to [[tech]] roll to escape the combo | Yoshi does a quick kick forward that can be [[Angling|angled]]. It does below average vertical diagonal knockback with rather high [[hitstun]], being able to easily set up a {{mvsub|Yoshi|SSB|forward aerial}} [[meteor smash]] at low-mid percentages to mid-high percentages. At low percentages, Yoshi can use a string of forward tilts across the stage and end with a short hop→forward aerial. On [[fastfaller]]s, a {{mvsub|Yoshi|SSB|down smash}} can also be used after, useful for getting the opponent offstage in general. At around 100%, the move can be angled up and followed with a full hop→fair. The latter can also followup into a {{mvsub|Yoshi|SSB|neutral aerial}} instead - hitting with its late hitbox can lead into another f-tilt→nair, which can be done repeatedly until the f-tilt→fair is used at the edge of the stage. It can also combo into an {{mvsub|Yoshi|SSB|up smash}}, though this cannot be done at the percentages where the up smash will KO. A weakness of the move is that it has subpar [[range]], meaning that it cannot be used effectively for [[spacing]] (although Yoshi does have some better options for this such as his {{mvsub|Yoshi|SSB|down tilt}}). Also, during a string of forward tilts, if one does the next f-tilt too late, the opponent will be able to [[tech]] roll to escape the combo. | ||
{{ | ==Hitboxes== | ||
{{SSB64HitboxTableHeader}} | |||
{{SSB64HitboxTableRow | |||
|id=0 | |||
|part=0 | |||
|damage=13% | |||
|angle=70 | |||
|bk=8 | |||
|ks=100 | |||
|fkv=0 | |||
|r=150 | |||
|bn=28 | |||
|type=foot | |||
|sfx=Punch | |||
|slvl=M | |||
}} | |||
{{SSB64HitboxTableRow | |||
|id=1 | |||
|part=0 | |||
|damage=13% | |||
|angle=70 | |||
|bk=8 | |||
|ks=100 | |||
|fkv=0 | |||
|r=150 | |||
|bn=28 | |||
|xpos=90 | |||
|type=foot | |||
|sfx=Punch | |||
|slvl=M | |||
}} | |||
|} | |||
==Timing== | |||
{|class="wikitable" | |||
!Hitboxes | |||
|8-10 | |||
|- | |||
!Animation length | |||
|29 | |||
|} | |||
{{FrameStripStart}} | |||
{{FrameStrip|t=Lag|c=7}}{{FrameStrip|t=Hitbox|c=3}}{{FrameStrip|t=Lag|c=19}} | |||
{{FrameStripEnd}} | |||
{{FrameIconLegend|lag=y|hitbox=y}} | |||
==Gallery== | ==Gallery== | ||
Latest revision as of 01:08, April 13, 2022
Overview[edit]

Yoshi does a quick kick forward that can be angled. It does below average vertical diagonal knockback with rather high hitstun, being able to easily set up a forward aerial meteor smash at low-mid percentages to mid-high percentages. At low percentages, Yoshi can use a string of forward tilts across the stage and end with a short hop→forward aerial. On fastfallers, a down smash can also be used after, useful for getting the opponent offstage in general. At around 100%, the move can be angled up and followed with a full hop→fair. The latter can also followup into a neutral aerial instead - hitting with its late hitbox can lead into another f-tilt→nair, which can be done repeatedly until the f-tilt→fair is used at the edge of the stage. It can also combo into an up smash, though this cannot be done at the percentages where the up smash will KO. A weakness of the move is that it has subpar range, meaning that it cannot be used effectively for spacing (although Yoshi does have some better options for this such as his down tilt). Also, during a string of forward tilts, if one does the next f-tilt too late, the opponent will be able to tech roll to escape the combo.
Hitboxes[edit]
| ID | Part | Damage | SD | Angle | BK | KS | FKV | Radius | Bone | Offset | Clang | Effect | G | A | Sound | ||
|---|---|---|---|---|---|---|---|---|---|---|---|---|---|---|---|---|---|
| 0 | 0 | 13% | 0 | 8 | 100 | 0 | 150 | 28 | 0 | 0 | 0 | ||||||
| 1 | 0 | 13% | 0 | 8 | 100 | 0 | 150 | 28 | 90 | 0 | 0 | ||||||
Timing[edit]
| Hitboxes | 8-10 |
|---|---|
| Animation length | 29 |
Lag time |
Hitbox |
Gallery[edit]
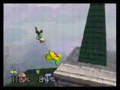
Yoshi's forward tilt to forward aerial combo.

|