SSBU Icon.png

Samus (SSBU)/Forward aerial: Difference between revisions

From SmashWiki, the Super Smash Bros. wiki
Jump to navigationJump to search
Tag: Mobile edit
Tag: Mobile edit
 
(2 intermediate revisions by 2 users not shown)
Line 1: Line 1:
{{ArticleIcons|ssbu=y}}
[[File:SamusFAirSSBU.gif|thumb|380px|Hitbox visualization showing Samus's forward aerial.]]
[[File:SamusFAirSSBU.gif|thumb|380px|Hitbox visualization showing Samus's forward aerial.]]
{{competitive expertise}}
==Overview==
==Overview==
Samus shoots 5 fiery blasts in front of herself starting high and going lower with every blast. Has fast startup at frame 6, large disjointed hitboxes, high damage and KO potential, and an amazing auto cancelling window which when combined with her fast falling speed, makes it an outstanding anti-air option and arguably one of the safest pressuring tools in the game.
Samus shoots 5 fiery blasts in front of herself starting high and going lower with every blast. Has fast startup at frame 6, large disjointed hitboxes, high damage and KO potential, and an amazing  
interruptibility window which when combined with her fast falling speed, makes it an outstanding anti-air option and arguably one of the safest pressuring tools in the game.
 
Forward aerial's effectiveness largely stems from its excellent synergy with her projectiles, [[Charge Shot]] and [[Missile]], its large coverage allowing Samus to catch opponents attempting to maneuver around said projectiles via jumping. Additionally it can be comboed into via down throw at low-mid percentages, typically putting opponents into an awkward position for dealing with further pressure from projectiles. However, due to the move starting above Samus and not being able to hit targets below her until late into its long duration, it is generally ineffective at hitting grounded opponents, not garnering as much reward even if it does connect in this manner. Compounding on this is its poor safety on shield relative to Samus' other aerials (-12 for hits 1-4, -11 for final hit), although the disjointed nature of its hitboxes does allow Samus to space around shields.
 
Overall, while it was ultimately designed to be an anti-air move, it is nevertheless an important move in Samus' arsenal, especially playing a pivotal role in her zoning flowchart as it is a perfect counter to opponents who are jumping to approach her or to evade her projectiles.


==Hitboxes==
==Hitboxes==

Latest revision as of 22:48, March 1, 2024

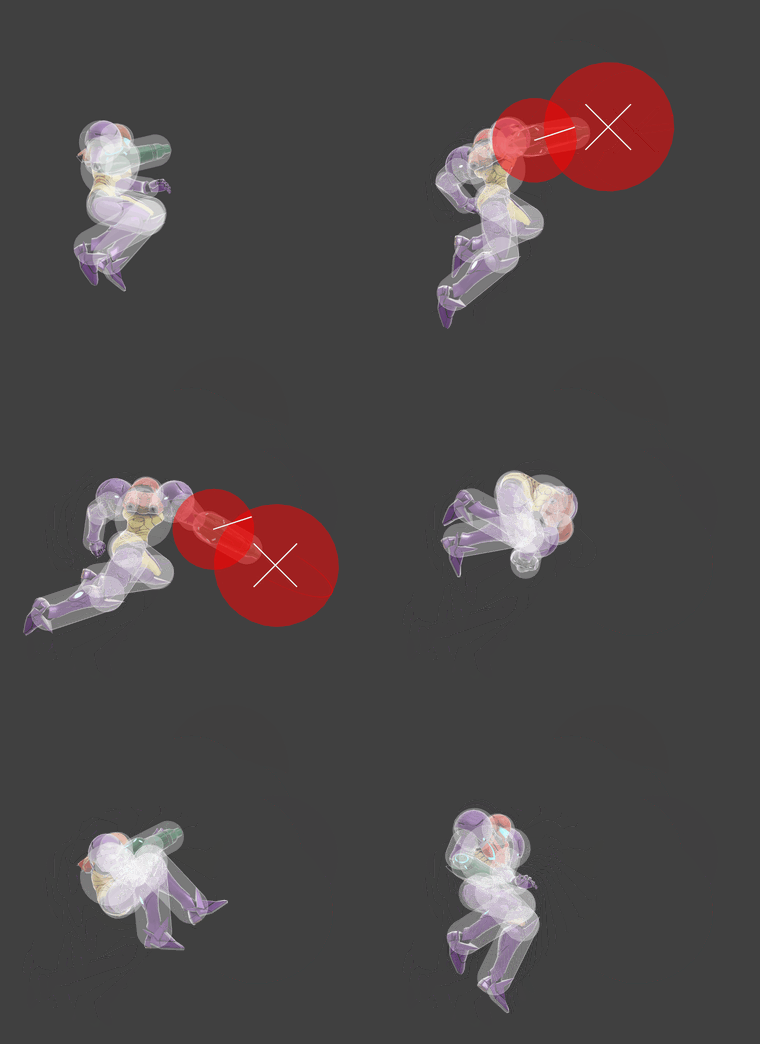
Hitbox visualization showing Samus's forward aerial.

Overview[edit]

Samus shoots 5 fiery blasts in front of herself starting high and going lower with every blast. Has fast startup at frame 6, large disjointed hitboxes, high damage and KO potential, and an amazing interruptibility window which when combined with her fast falling speed, makes it an outstanding anti-air option and arguably one of the safest pressuring tools in the game.

Forward aerial's effectiveness largely stems from its excellent synergy with her projectiles, Charge Shot and Missile, its large coverage allowing Samus to catch opponents attempting to maneuver around said projectiles via jumping. Additionally it can be comboed into via down throw at low-mid percentages, typically putting opponents into an awkward position for dealing with further pressure from projectiles. However, due to the move starting above Samus and not being able to hit targets below her until late into its long duration, it is generally ineffective at hitting grounded opponents, not garnering as much reward even if it does connect in this manner. Compounding on this is its poor safety on shield relative to Samus' other aerials (-12 for hits 1-4, -11 for final hit), although the disjointed nature of its hitboxes does allow Samus to space around shields.

Overall, while it was ultimately designed to be an anti-air move, it is nevertheless an important move in Samus' arsenal, especially playing a pivotal role in her zoning flowchart as it is a perfect counter to opponents who are jumping to approach her or to evade her projectiles.

Hitboxes[edit]

ID Part Rehit rate Damage SD Angle Angle type BK KS FKV Set weight Radius Bone Offset SDI× T% Clang Rebound Effect Type G A Sound Direct Hit bits Hit part Blockable Reflectable Absorbable Flinchless No GFX Heedless
Hit 1
0 0 0 3.0% 0 Autolink angle (367) Forward 0 100 25 HitboxTableIcon(False).png 6.0 armr 9.0 0.0 0.0 0.8× 1.0× 0% HitboxTableIcon(Clang).png HitboxTableIcon(Rebound).png EffectIcon(Flame).png TypeIcon(Explosive).png HitboxTableIcon(GroundedTrue).png HitboxTableIcon(AerialTrue).png L Fire SpecialsDirect.png All All HitboxTableIcon(Blockable).png HitboxTableIcon(Unreflectable).png HitboxTableIcon(Unabsorbable).png HitboxTableIcon(False).png HitboxTableIcon(False).png HitboxTableIcon(False).png
1 0 0 3.0% 0 AngleIcon18.png Forward 0 100 30 HitboxTableIcon(False).png 4.0 armr 2.0 0.0 0.0 0.8× 1.0× 0% HitboxTableIcon(Clang).png HitboxTableIcon(Rebound).png EffectIcon(Flame).png TypeIcon(Explosive).png HitboxTableIcon(GroundedTrue).png HitboxTableIcon(AerialTrue).png L Fire SpecialsDirect.png All All HitboxTableIcon(Blockable).png HitboxTableIcon(Unreflectable).png HitboxTableIcon(Unabsorbable).png HitboxTableIcon(False).png HitboxTableIcon(False).png HitboxTableIcon(False).png
Hits 2-4
0 0 0 1.6% 0 Autolink angle (367) Forward 0 100 35 HitboxTableIcon(False).png 6.0 armr 9.0 0.0 0.0 0.8× 1.0× 0% HitboxTableIcon(Clang).png HitboxTableIcon(Rebound).png EffectIcon(Flame).png TypeIcon(Explosive).png HitboxTableIcon(GroundedTrue).png HitboxTableIcon(AerialTrue).png L Fire SpecialsDirect.png All All HitboxTableIcon(Blockable).png HitboxTableIcon(Unreflectable).png HitboxTableIcon(Unabsorbable).png HitboxTableIcon(False).png HitboxTableIcon(False).png HitboxTableIcon(False).png
1 0 0 1.6% 0 AngleIcon18.png Forward 0 100 40 HitboxTableIcon(False).png 4.0 armr 2.0 0.0 0.0 0.8× 1.0× 0% HitboxTableIcon(Clang).png HitboxTableIcon(Rebound).png EffectIcon(Flame).png TypeIcon(Explosive).png HitboxTableIcon(GroundedTrue).png HitboxTableIcon(AerialTrue).png L Fire SpecialsDirect.png All All HitboxTableIcon(Blockable).png HitboxTableIcon(Unreflectable).png HitboxTableIcon(Unabsorbable).png HitboxTableIcon(False).png HitboxTableIcon(False).png HitboxTableIcon(False).png
Hit 5
0 0 0 5.0% 0 Sakurai angle Standard 40 140 0 HitboxTableIcon(False).png 5.5 armr 2.0 0.0 2.0 2.0× 1.0× 0% HitboxTableIcon(Clang).png HitboxTableIcon(Rebound).png EffectIcon(Flame).png TypeIcon(Explosive).png HitboxTableIcon(GroundedTrue).png HitboxTableIcon(AerialTrue).png L Fire SpecialsDirect.png All All HitboxTableIcon(Blockable).png HitboxTableIcon(Unreflectable).png HitboxTableIcon(Unabsorbable).png HitboxTableIcon(False).png HitboxTableIcon(False).png HitboxTableIcon(False).png
1 0 0 5.0% 0 Sakurai angle Standard 40 140 0 HitboxTableIcon(False).png 7.2 armr 9.0 0.0 2.0 2.0× 1.0× 0% HitboxTableIcon(Clang).png HitboxTableIcon(Rebound).png EffectIcon(Flame).png TypeIcon(Explosive).png HitboxTableIcon(GroundedTrue).png HitboxTableIcon(AerialTrue).png L Fire SpecialsDirect.png All All HitboxTableIcon(Blockable).png HitboxTableIcon(Unreflectable).png HitboxTableIcon(Unabsorbable).png HitboxTableIcon(False).png HitboxTableIcon(False).png HitboxTableIcon(False).png

Timing[edit]

Attack[edit]

Hit 1 6-7
Hits 2-4 12-13, 18-19, 24-25
Hit 5 30-31
Ending autocancel 47-
Interruptible 60
Animation length 63
FrameIcon(Lag).png FrameIcon(Lag).png FrameIcon(Lag).png FrameIcon(Lag).png FrameIcon(Lag).png FrameIcon(Hitbox).png FrameIcon(Hitbox).png FrameIcon(Lag).png FrameIcon(Lag).png FrameIcon(Lag).png FrameIcon(Lag).png FrameIcon(Hitbox).png FrameIcon(Hitbox).png FrameIcon(Lag).png FrameIcon(Lag).png FrameIcon(Lag).png FrameIcon(Lag).png FrameIcon(Hitbox).png FrameIcon(Hitbox).png FrameIcon(Lag).png FrameIcon(Lag).png FrameIcon(Lag).png FrameIcon(Lag).png FrameIcon(Hitbox).png FrameIcon(Hitbox).png FrameIcon(Lag).png FrameIcon(Lag).png FrameIcon(Lag).png FrameIcon(Lag).png FrameIcon(Hitbox).png FrameIcon(Hitbox).png FrameIcon(Lag).png FrameIcon(Lag).png FrameIcon(Lag).png FrameIcon(Lag).png FrameIcon(Lag).png FrameIcon(Lag).png FrameIcon(Lag).png FrameIcon(Lag).png FrameIcon(Lag).png FrameIcon(Lag).png FrameIcon(Lag).png FrameIcon(Lag).png FrameIcon(Lag).png FrameIcon(Lag).png FrameIcon(Lag).png FrameIcon(Lag).png FrameIcon(Lag).png FrameIcon(Lag).png FrameIcon(Lag).png FrameIcon(Lag).png FrameIcon(Lag).png FrameIcon(Lag).png FrameIcon(Lag).png FrameIcon(Lag).png FrameIcon(Lag).png FrameIcon(Lag).png FrameIcon(Lag).png FrameIcon(Lag).png FrameIcon(Interruptible).png FrameIcon(Interruptible).png FrameIcon(Interruptible).png FrameIcon(Interruptible).png
FrameIcon(Blank).png FrameIcon(Blank).png FrameIcon(Blank).png FrameIcon(Blank).png FrameIcon(Blank).png FrameIcon(Blank).png FrameIcon(Blank).png FrameIcon(Blank).png FrameIcon(Blank).png FrameIcon(Blank).png FrameIcon(Blank).png FrameIcon(Blank).png FrameIcon(Blank).png FrameIcon(Blank).png FrameIcon(Blank).png FrameIcon(Blank).png FrameIcon(Blank).png FrameIcon(Blank).png FrameIcon(Blank).png FrameIcon(Blank).png FrameIcon(Blank).png FrameIcon(Blank).png FrameIcon(Blank).png FrameIcon(Blank).png FrameIcon(Blank).png FrameIcon(Blank).png FrameIcon(Blank).png FrameIcon(Blank).png FrameIcon(Blank).png FrameIcon(Blank).png FrameIcon(Blank).png FrameIcon(Blank).png FrameIcon(Blank).png FrameIcon(Blank).png FrameIcon(Blank).png FrameIcon(Blank).png FrameIcon(Blank).png FrameIcon(Blank).png FrameIcon(Blank).png FrameIcon(Blank).png FrameIcon(Blank).png FrameIcon(Blank).png FrameIcon(Blank).png FrameIcon(Blank).png FrameIcon(Blank).png FrameIcon(Blank).png FrameIcon(Autocancel).png FrameIcon(Autocancel).png FrameIcon(Autocancel).png FrameIcon(Autocancel).png FrameIcon(Autocancel).png FrameIcon(Autocancel).png FrameIcon(Autocancel).png FrameIcon(Autocancel).png FrameIcon(Autocancel).png FrameIcon(Autocancel).png FrameIcon(Autocancel).png FrameIcon(Autocancel).png FrameIcon(Autocancel).png FrameIcon(Autocancel).png FrameIcon(Autocancel).png FrameIcon(Autocancel).png FrameIcon(Autocancel).png

Landing lag[edit]

Interruptible 15
Animation length 36
FrameIcon(Lag).png FrameIcon(Lag).png FrameIcon(Lag).png FrameIcon(Lag).png FrameIcon(Lag).png FrameIcon(Lag).png FrameIcon(Lag).png FrameIcon(Lag).png FrameIcon(Lag).png FrameIcon(Lag).png FrameIcon(Lag).png FrameIcon(Lag).png FrameIcon(Lag).png FrameIcon(Lag).png FrameIcon(Interruptible).png FrameIcon(Interruptible).png FrameIcon(Interruptible).png FrameIcon(Interruptible).png FrameIcon(Interruptible).png FrameIcon(Interruptible).png FrameIcon(Interruptible).png FrameIcon(Interruptible).png FrameIcon(Interruptible).png FrameIcon(Interruptible).png FrameIcon(Interruptible).png FrameIcon(Interruptible).png FrameIcon(Interruptible).png FrameIcon(Interruptible).png FrameIcon(Interruptible).png FrameIcon(Interruptible).png FrameIcon(Interruptible).png FrameIcon(Interruptible).png FrameIcon(Interruptible).png FrameIcon(Interruptible).png FrameIcon(Interruptible).png FrameIcon(Interruptible).png
Legend (1 square = 1 frame)
FrameIcon(Lag).png
Lag time
FrameIcon(Hitbox).png
Hitbox
FrameIcon(Autocancel).png
Autocancel
FrameIcon(Interruptible).png
Interruptible