SSBU Icon.png

Marth (SSBU)/Up special: Difference between revisions

From SmashWiki, the Super Smash Bros. wiki
Jump to navigationJump to search
(New Page: {{ArticleIcons|ssbu=y}} {{competitive expertise}} {| class="wikitable" style="float:right; margin:4pt;" |- !colspan=5| Marth Up Special Hitbox Visualizations. |- ! Grounded || Aerial |-...)
 
(Providing a basic description based on the Melee description, but without mention of the Melee-specific aspects and with some commentary on use cases in Ultimate for edgeguarding.)
Line 11: Line 11:
|}
|}
==Overview==
==Overview==
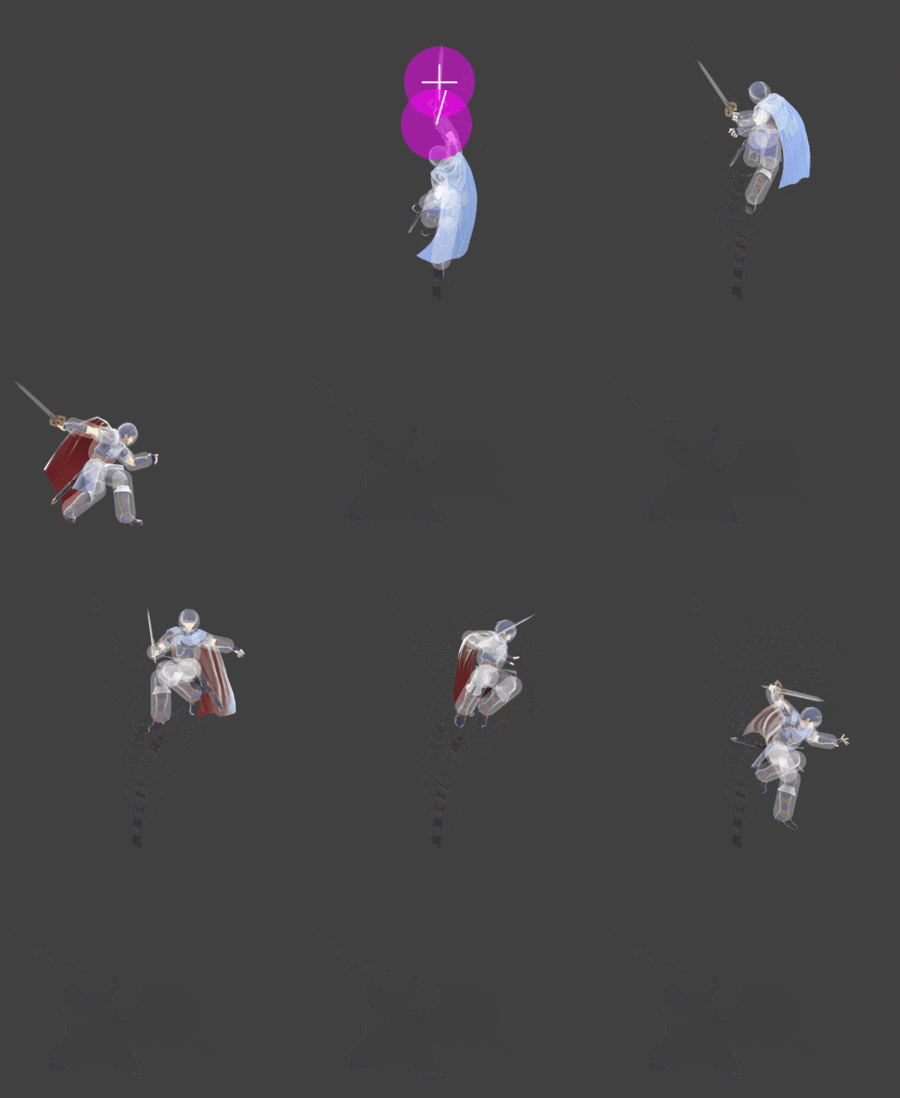
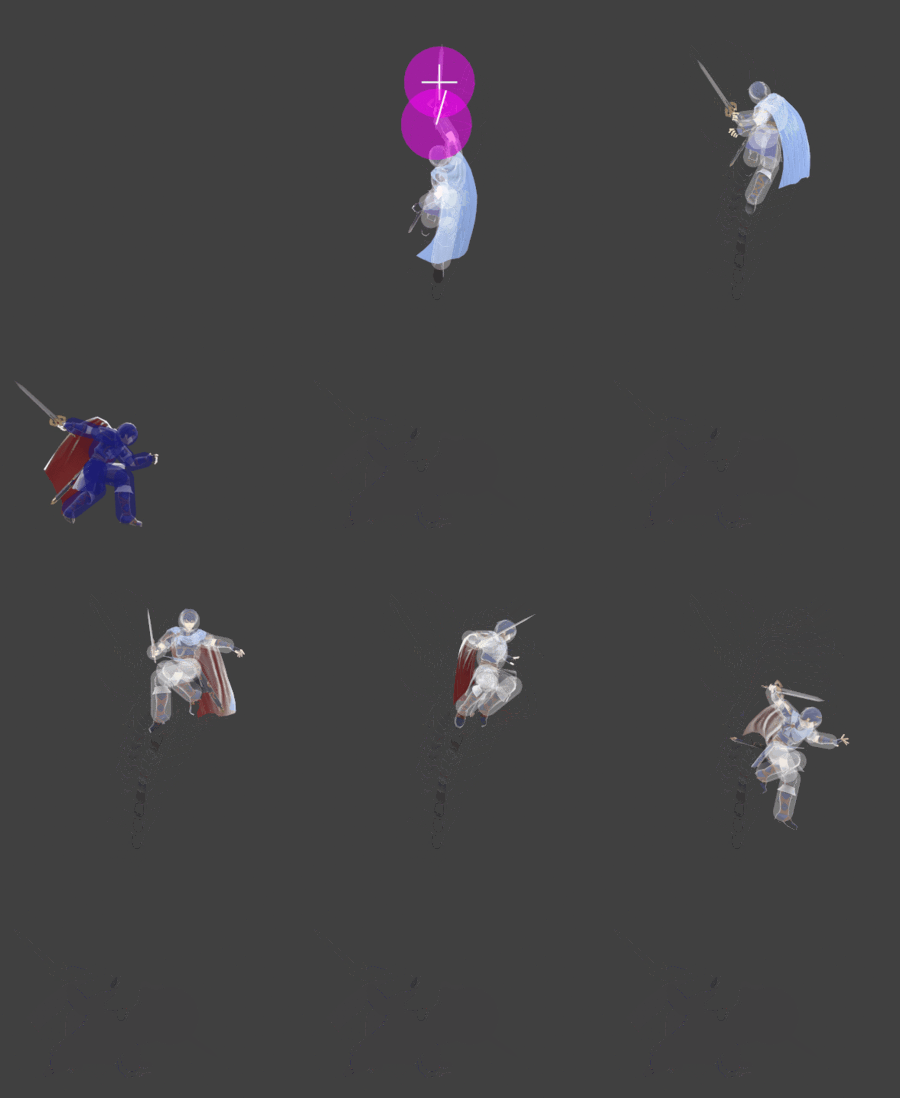
Although relatively situational, '''[[Dolphin Slash]]''' is a highly rewarding move with a strong surprise factor if timed intelligently. The move's active hitboxes start on frame 5 where they hit the strongest and end on frame 10 where they are more disjointed but hit much weaker. With its considerable disjoint, speed (faster than a grab), kill potential, and its frames of invincibility (frames 4-5 on the ground, 1-5 in the air), it is also Marth's best out of shield moves although it is his riskiest. The move's biggest drawback is how [[punish]]able it is when whiffed. The slow falling speed of the descent as well as the move's landing lag often spell death against a competent player. Therefore, a common strategy for Marth players is to strike to stages such as [[Battlefield]], which have a top platform to which Marth can escape.
As a recovery option, Dolphin Slash is considered subpar. Its speed makes it difficult to hit Marth out of without ledge invincibility and has a disjointed hitbox above Marth's head which can hit through the stage and punish people standing near the ledge. However the move doesn't travel far horizontally at all and although it can be angled, the extra horizontal distanced gained often isn't enough.
As an edgeguarding option, Dolphin Slash can be used to punish opponents who ride the wall towards the ledge by testing their ability to stage spike. This is preferable to using a move such as forward air or back air for stage spiking, since Marth will almost always be at the ledge by the time the opponent is actionable after the stage tech, and can subsequently be hit by another back air. On the other hand, the player [[ProtoBanham]] opts to use a Dolphin Slash faced away from the ledge to try and swat opponents away, since Dolphin Slash essentially only requires a reaction and not a careful hitbox placement (given the nature of its large hitbox). However, please be advised that when Marth uses Dolphin Slash facing away from the ledge, Marth must be extremely close to the ledge in order to not lose a stock.
==Hitboxes==
==Hitboxes==
{{UltimateHitboxTableHeader}}

Revision as of 03:28, May 8, 2022

Competitive.png This article or section may require competitive expertise.
You can discuss this issue on the talk page or edit this page to improve it.
Marth Up Special Hitbox Visualizations.
Grounded Aerial
MarthDolphinSlashGroundedSSBU.gif MarthDolphinSlashAerialSSBU.gif

Overview

Although relatively situational, Dolphin Slash is a highly rewarding move with a strong surprise factor if timed intelligently. The move's active hitboxes start on frame 5 where they hit the strongest and end on frame 10 where they are more disjointed but hit much weaker. With its considerable disjoint, speed (faster than a grab), kill potential, and its frames of invincibility (frames 4-5 on the ground, 1-5 in the air), it is also Marth's best out of shield moves although it is his riskiest. The move's biggest drawback is how punishable it is when whiffed. The slow falling speed of the descent as well as the move's landing lag often spell death against a competent player. Therefore, a common strategy for Marth players is to strike to stages such as Battlefield, which have a top platform to which Marth can escape.

As a recovery option, Dolphin Slash is considered subpar. Its speed makes it difficult to hit Marth out of without ledge invincibility and has a disjointed hitbox above Marth's head which can hit through the stage and punish people standing near the ledge. However the move doesn't travel far horizontally at all and although it can be angled, the extra horizontal distanced gained often isn't enough.

As an edgeguarding option, Dolphin Slash can be used to punish opponents who ride the wall towards the ledge by testing their ability to stage spike. This is preferable to using a move such as forward air or back air for stage spiking, since Marth will almost always be at the ledge by the time the opponent is actionable after the stage tech, and can subsequently be hit by another back air. On the other hand, the player ProtoBanham opts to use a Dolphin Slash faced away from the ledge to try and swat opponents away, since Dolphin Slash essentially only requires a reaction and not a careful hitbox placement (given the nature of its large hitbox). However, please be advised that when Marth uses Dolphin Slash facing away from the ledge, Marth must be extremely close to the ledge in order to not lose a stock.

Hitboxes

ID Part Rehit rate Damage SD Angle Angle type BK KS FKV Set weight Radius Bone Offset SDI× T% Clang Rebound Effect Type G A Sound Direct Hit bits Hit part Blockable Reflectable Absorbable Flinchless No GFX Heedless
Clean hit
2 0 0 11.0% 0 Sakurai angle Standard 70 74 0 HitboxTableIcon(False).png 4.0 top 0.0 8.0 8.0 1.0× 1.0× 0% HitboxTableIcon(NoClang).png HitboxTableIcon(NoRebound).png EffectIcon(Slash).png TypeIcon(Sword).png HitboxTableIcon(GroundedTrue).png HitboxTableIcon(AerialTrue).png L Slash SpecialsDirect.png All All HitboxTableIcon(Blockable).png HitboxTableIcon(Unreflectable).png HitboxTableIcon(Unabsorbable).png HitboxTableIcon(False).png HitboxTableIcon(False).png HitboxTableIcon(False).png
3 0 0 11.0% 0 AngleIcon74.png Standard 70 74 0 HitboxTableIcon(False).png 4.0 top 0.0 8.0 4.0 1.0× 1.0× 0% HitboxTableIcon(NoClang).png HitboxTableIcon(NoRebound).png EffectIcon(Slash).png TypeIcon(Sword).png HitboxTableIcon(GroundedTrue).png HitboxTableIcon(AerialTrue).png L Slash SpecialsDirect.png All All HitboxTableIcon(Blockable).png HitboxTableIcon(Unreflectable).png HitboxTableIcon(Unabsorbable).png HitboxTableIcon(False).png HitboxTableIcon(False).png HitboxTableIcon(False).png
Late hit
2 0 0 11.0% 0 Sakurai angle Standard 70 74 0 HitboxTableIcon(False).png 4.0 top 0.0 8.0 8.0 1.0× 1.0× 0% HitboxTableIcon(NoClang).png HitboxTableIcon(NoRebound).png EffectIcon(Slash).png TypeIcon(Sword).png HitboxTableIcon(GroundedTrue).png HitboxTableIcon(AerialTrue).png L Slash SpecialsDirect.png All All HitboxTableIcon(Blockable).png HitboxTableIcon(Unreflectable).png HitboxTableIcon(Unabsorbable).png HitboxTableIcon(False).png HitboxTableIcon(False).png HitboxTableIcon(False).png
3 0 0 11.0% 0 AngleIcon74.png Standard 70 74 0 HitboxTableIcon(False).png 4.0 top 0.0 8.0 4.0 1.0× 1.0× 0% HitboxTableIcon(NoClang).png HitboxTableIcon(NoRebound).png EffectIcon(Slash).png TypeIcon(Sword).png HitboxTableIcon(GroundedTrue).png HitboxTableIcon(AerialTrue).png L Slash SpecialsDirect.png All All HitboxTableIcon(Blockable).png HitboxTableIcon(Unreflectable).png HitboxTableIcon(Unabsorbable).png HitboxTableIcon(False).png HitboxTableIcon(False).png HitboxTableIcon(False).png
0 0 0 7.0% 0 Sakurai angle Standard 20 90 0 HitboxTableIcon(False).png 5.0 sword1 0.0 0.0 4.5 0.9× 1.0× 0% HitboxTableIcon(NoClang).png HitboxTableIcon(NoRebound).png EffectIcon(Slash).png TypeIcon(Sword).png HitboxTableIcon(GroundedTrue).png HitboxTableIcon(AerialTrue).png M Slash SpecialsDirect.png All All HitboxTableIcon(Blockable).png HitboxTableIcon(Unreflectable).png HitboxTableIcon(Unabsorbable).png HitboxTableIcon(False).png HitboxTableIcon(False).png HitboxTableIcon(False).png
1 0 0 7.0% 0 AngleIcon74.png Standard 20 90 0 HitboxTableIcon(False).png 5.0 sword1 0.0 0.0 -1.5 0.9× 1.0× 0% HitboxTableIcon(NoClang).png HitboxTableIcon(NoRebound).png EffectIcon(Slash).png TypeIcon(Sword).png HitboxTableIcon(GroundedTrue).png HitboxTableIcon(AerialTrue).png M Slash SpecialsDirect.png All All HitboxTableIcon(Blockable).png HitboxTableIcon(Unreflectable).png HitboxTableIcon(Unabsorbable).png HitboxTableIcon(False).png HitboxTableIcon(False).png HitboxTableIcon(False).png
Ŀatest hit
0 0 0 7.0% 0 Sakurai angle Standard 20 90 0 HitboxTableIcon(False).png 5.0 sword1 0.0 0.0 4.5 0.9× 1.0× 0% HitboxTableIcon(NoClang).png HitboxTableIcon(NoRebound).png EffectIcon(Slash).png TypeIcon(Sword).png HitboxTableIcon(GroundedTrue).png HitboxTableIcon(AerialTrue).png M Slash SpecialsDirect.png All All HitboxTableIcon(Blockable).png HitboxTableIcon(Unreflectable).png HitboxTableIcon(Unabsorbable).png HitboxTableIcon(False).png HitboxTableIcon(False).png HitboxTableIcon(False).png
1 0 0 7.0% 0 AngleIcon74.png Standard 20 90 0 HitboxTableIcon(False).png 5.0 sword1 0.0 0.0 -1.5 0.9× 1.0× 0% HitboxTableIcon(NoClang).png HitboxTableIcon(NoRebound).png EffectIcon(Slash).png TypeIcon(Sword).png HitboxTableIcon(GroundedTrue).png HitboxTableIcon(AerialTrue).png M Slash SpecialsDirect.png All All HitboxTableIcon(Blockable).png HitboxTableIcon(Unreflectable).png HitboxTableIcon(Unabsorbable).png HitboxTableIcon(False).png HitboxTableIcon(False).png HitboxTableIcon(False).png

Timing

Intangible (grounded, aerial) 4-5, 1-5
Clean hit 5
Late hit 6
Latest hit 7-11
Animation length 39
Hitboxes  FrameIcon(Lag).png FrameIcon(Lag).png FrameIcon(Lag).png FrameIcon(Lag).png FrameIcon(HitboxChangeS).png FrameIcon(HitboxChangeM).png FrameIcon(HitboxChangeE).png FrameIcon(Hitbox).png FrameIcon(Hitbox).png FrameIcon(Hitbox).png FrameIcon(Hitbox).png FrameIcon(Lag).png FrameIcon(Lag).png FrameIcon(Lag).png FrameIcon(Lag).png FrameIcon(Lag).png FrameIcon(Lag).png FrameIcon(Lag).png FrameIcon(Lag).png FrameIcon(Lag).png FrameIcon(Lag).png FrameIcon(Lag).png FrameIcon(Lag).png FrameIcon(Lag).png FrameIcon(Lag).png FrameIcon(Lag).png FrameIcon(Lag).png FrameIcon(Lag).png FrameIcon(Lag).png FrameIcon(Lag).png FrameIcon(Lag).png FrameIcon(Lag).png FrameIcon(Lag).png FrameIcon(Lag).png FrameIcon(Lag).png FrameIcon(Lag).png FrameIcon(Lag).png FrameIcon(Lag).png FrameIcon(Lag).png
Grounded  FrameIcon(Vulnerable).png FrameIcon(Vulnerable).png FrameIcon(Vulnerable).png FrameIcon(Intangible).png FrameIcon(Intangible).png FrameIcon(Vulnerable).png FrameIcon(Vulnerable).png FrameIcon(Vulnerable).png FrameIcon(Vulnerable).png FrameIcon(Vulnerable).png FrameIcon(Vulnerable).png FrameIcon(Vulnerable).png FrameIcon(Vulnerable).png FrameIcon(Vulnerable).png FrameIcon(Vulnerable).png FrameIcon(Vulnerable).png FrameIcon(Vulnerable).png FrameIcon(Vulnerable).png FrameIcon(Vulnerable).png FrameIcon(Vulnerable).png FrameIcon(Vulnerable).png FrameIcon(Vulnerable).png FrameIcon(Vulnerable).png FrameIcon(Vulnerable).png FrameIcon(Vulnerable).png FrameIcon(Vulnerable).png FrameIcon(Vulnerable).png FrameIcon(Vulnerable).png FrameIcon(Vulnerable).png FrameIcon(Vulnerable).png FrameIcon(Vulnerable).png FrameIcon(Vulnerable).png FrameIcon(Vulnerable).png FrameIcon(Vulnerable).png FrameIcon(Vulnerable).png FrameIcon(Vulnerable).png FrameIcon(Vulnerable).png FrameIcon(Vulnerable).png FrameIcon(Vulnerable).png
Aerial  FrameIcon(Intangible).png FrameIcon(Intangible).png FrameIcon(Intangible).png FrameIcon(Intangible).png FrameIcon(Intangible).png FrameIcon(Vulnerable).png FrameIcon(Vulnerable).png FrameIcon(Vulnerable).png FrameIcon(Vulnerable).png FrameIcon(Vulnerable).png FrameIcon(Vulnerable).png FrameIcon(Vulnerable).png FrameIcon(Vulnerable).png FrameIcon(Vulnerable).png FrameIcon(Vulnerable).png FrameIcon(Vulnerable).png FrameIcon(Vulnerable).png FrameIcon(Vulnerable).png FrameIcon(Vulnerable).png FrameIcon(Vulnerable).png FrameIcon(Vulnerable).png FrameIcon(Vulnerable).png FrameIcon(Vulnerable).png FrameIcon(Vulnerable).png FrameIcon(Vulnerable).png FrameIcon(Vulnerable).png FrameIcon(Vulnerable).png FrameIcon(Vulnerable).png FrameIcon(Vulnerable).png FrameIcon(Vulnerable).png FrameIcon(Vulnerable).png FrameIcon(Vulnerable).png FrameIcon(Vulnerable).png FrameIcon(Vulnerable).png FrameIcon(Vulnerable).png FrameIcon(Vulnerable).png FrameIcon(Vulnerable).png FrameIcon(Vulnerable).png FrameIcon(Vulnerable).png
Legend (1 square = 1 frame)
FrameIcon(Lag).png
Lag time
FrameIcon(Hitbox).png
Hitbox
FrameIcon(HitboxChangeS).pngFrameIcon(HitboxChangeE).png
Hitbox change
FrameIcon(Vulnerable).png
Vulnerable
FrameIcon(Intangible).png
Intangible