Mario (SSBB)/Neutral attack/Hit 2: Difference between revisions
From SmashWiki, the Super Smash Bros. wiki
Jump to navigationJump to search
SuperSqank (talk | contribs) No edit summary |
|||
| (One intermediate revision by the same user not shown) | |||
| Line 1: | Line 1: | ||
{{ArticleIcons|ssbb=y}} | {{ArticleIcons|ssbb=y}} | ||
:''For an overview of the overall natural combo, see [[Mario (SSBB)/Neutral attack|here]].'' | :''For an overview of the overall natural combo, see [[Mario (SSBB)/Neutral attack|here]].'' | ||
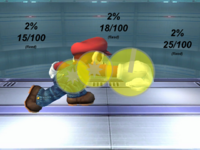
[[File:MarioSSBBNeutral(hit2).png|thumb|Hitbox visualisation showing Mario's second jab.]] | |||
==Overview== | |||
{{competitive expertise}} | |||
==Hitboxes== | ==Hitboxes== | ||
{{BrawlHitboxTableHeader}} | {{BrawlHitboxTableHeader}} | ||
{{BrawlHitboxTableRow | {{BrawlHitboxTableRow | ||
| Line 47: | Line 51: | ||
|2-3 | |2-3 | ||
|- | |- | ||
! | !Earliest continuable | ||
| | |7 | ||
|- | |- | ||
!Animation length | !Animation length | ||
| Line 61: | Line 62: | ||
{{FrameStripStart}} | {{FrameStripStart}} | ||
{{FrameStrip|t=Lag|c=1}}{{FrameStrip|t=Hitbox|c=2}}{{FrameStrip|t=Lag|c= | {{FrameStrip|t=Lag|c=1}}{{FrameStrip|t=Hitbox|c=2}}{{FrameStrip|t=Lag|c=3|e=LagContinuableS}}{{FrameStrip|t=Lag|c=11|s=LagContinuableE}} | ||
{{FrameStripEnd}} | {{FrameStripEnd}} | ||
{{FrameIconLegend|lag=y|hitbox | {{FrameIconLegend|lag=y|hitbox=y|continuable=y}} | ||
{{MvSubNavMario|g=SSBB}} | {{MvSubNavMario|g=SSBB}} | ||
Latest revision as of 14:17, June 6, 2021
- For an overview of the overall natural combo, see here.
Overview[edit]
Hitboxes[edit]
Timing[edit]
| Hitbox | 2-3 |
|---|---|
| Earliest continuable | 7 |
| Animation length | 17 |
| Interruptible | 19 |
Lag time |
Hitbox |
Continuable |
|

