Luigi (SSBB)/Hitboxes: Difference between revisions
From SmashWiki, the Super Smash Bros. wiki
Jump to navigationJump to search
(No pages link here and only Toomai provides the images so yeah.) |
No edit summary |
||
| Line 1: | Line 1: | ||
{|class="messagebox" style="background:#ffffff;border:solid #7f7f7f 2px;text-align:center;" | {| class="messagebox" style="background:#ffffff;border:solid #7f7f7f 2px;text-align:center;" | ||
|- | |- | ||
|width="50px"|[[Image:Hitbox Article. | |width="50px"|[[Image:Hitbox Article.png|50px]] | ||
|'''This is a hitbox repository.''' | |'''This is a hitbox repository.'''<br>It is currently incomplete. | ||
|width="50px"|[[Image:Hitbox Article. | |width="50px"|[[Image:Hitbox Article.png|50px]] | ||
|- | |- | ||
|colspan="3"|Click on any image to view full size. | |colspan="3"|Click on any image to view full size. | ||
|} | |} | ||
{|class="wikitable collapsible collapsed" align="center" style="text-align:center" | {|class="wikitable collapsible collapsed" align="center" style="text-align:center" | ||
!colspan=" | !colspan="9"|Color Legend | ||
|-style="background:# | |- | ||
| | !colspan="7"|Types!!colspan="2"|Effects | ||
| | |- | ||
| | |style="background:#cfcfcf"|{{AttackType|type=Typeless}} | ||
| | |style="background:#ff7f7f"|{{AttackType|type=Head}} | ||
| | |style="background:#dfaf7f"|{{AttackType|type=Butt}} | ||
| | |style="background:#ffff7f"|{{AttackType|type=Hand}} | ||
| | |style="background:#ffbf7f"|{{AttackType|type=Foot}} | ||
| | |style="background:#ff7fff"|{{AttackType|type=Throwing}} | ||
|style="background:#bfff7f"|{{AttackType|type=Spin}} | |||
|-style="background:#ff00ff" | |style="background:#d7d7bf"|{{AttackType|effect=Normal}} | ||
| | |style="background:#ff9f7f"|{{AttackType|effect=Flame}} | ||
|- | |||
|style="background:#9f9f9f"|Typeless | |||
|style="background:#ff0000"|Head | |||
|style="background:#bf5f00"|Butt | |||
|style="background:#ffff00"|Hand | |||
|style="background:#ff7f00"|Foot | |||
|style="background:#ff00ff"|Throwing | |||
|style="background:#7fff00"|Spin | |||
|style="background:#afaf7f"|Normal | |||
|style="background:#ff3f00"|Flame | |||
|} | |} | ||
| Line 34: | Line 40: | ||
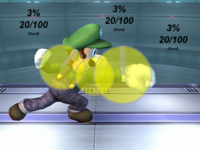
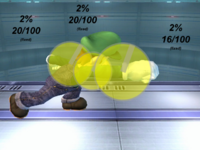
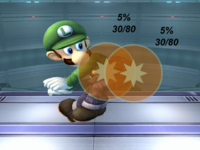
|Neutral<br>Punch/Punch/Butt||colspan="2"|[[Image:LuigiSSBBNeutral(hit1).png|200px]]<br>Hit 1||colspan="2"|[[Image:LuigiSSBBNeutral(hit2).png|200px]]<br>Hit 2||colspan="2"|[[Image:LuigiSSBBNeutral(hit3).png|200px]]<br>Hit 3 | |Neutral<br>Punch/Punch/Butt||colspan="2"|[[Image:LuigiSSBBNeutral(hit1).png|200px]]<br>Hit 1||colspan="2"|[[Image:LuigiSSBBNeutral(hit2).png|200px]]<br>Hit 2||colspan="2"|[[Image:LuigiSSBBNeutral(hit3).png|200px]]<br>Hit 3 | ||
|- | |- | ||
|F-Tilt<br>Power Kick||colspan="2"|[[Image:LuigiSSBBFTilt(angledup).png| | |F-Tilt<br>Power Kick||colspan="2"|[[Image:LuigiSSBBFTilt(angledup).png|100px]]<br>Angled up||colspan="2"|[[Image:LuigiSSBBFTilt(angledside).png|100px]]<br>Angled side||colspan="2"|[[Image:LuigiSSBBFTilt(angleddown).png|100px]]<br>Angled down | ||
|- | |- | ||
|U-Tilt<br>Upper Swipe||colspan="6"|[[Image:LuigiSSBBUTilt.png| | |U-Tilt<br>Upper Swipe||colspan="6"|[[Image:LuigiSSBBUTilt.png|100px]] | ||
|- | |- | ||
|D-Tilt<br>Crouch Kick||colspan="3"|[[Image:LuigiSSBBDTilt(grounded).png| | |D-Tilt<br>Crouch Kick||colspan="3"|[[Image:LuigiSSBBDTilt(grounded).png|100px]]<br>On grounded opponents||colspan="3"|[[Image:LuigiSSBBDTilt(aerial).png|100px]]<br>On aerial opponents | ||
|- | |- | ||
|Dash<br>Frenzy Punches||colspan="3"|[[Image:LuigiSSBBDash(hits1-6).png| | |Dash<br>Frenzy Punches||colspan="3"|[[Image:LuigiSSBBDash(hits1-6).png|100px]]<br>Hits 1-6||colspan="3"|[[Image:LuigiSSBBDash(hit7).png|100px]]<br>Hit 7 | ||
|- | |- | ||
|U-Smash<br>Head Snap||colspan="6"|[[Image:LuigiSSBBUSmash.png| | |U-Smash<br>Head Snap||colspan="6"|[[Image:LuigiSSBBUSmash.png|100px]] | ||
|- | |- | ||
|D-Smash<br>Breakdance Kick||colspan="3"|[[Image:LuigiSSBBDSmash(hit1).png| | |D-Smash<br>Breakdance Kick||colspan="3"|[[Image:LuigiSSBBDSmash(hit1).png|100px]]<br>Hit 1||colspan="3"|[[Image:LuigiSSBBDSmash(hit2).png|100px]]<br>Hit 2 | ||
|- | |- | ||
|F-Smash<br>Palm Poke||colspan="2"|[[Image:LuigiSSBBFSmash(angledup).png| | |F-Smash<br>Palm Poke||colspan="2"|[[Image:LuigiSSBBFSmash(angledup).png|100px]]<br>Angled up||colspan="2"|[[Image:LuigiSSBBFSmash(angledside).png|100px]]<br>Angled side||colspan="2"|[[Image:LuigiSSBBFSmash(angleddown).png|100px]]<br>Angled down | ||
|- | |- | ||
|Nair<br>Drop Kick||colspan="3"|[[Image:LuigiSSBBNair(clean).png| | |Nair<br>Drop Kick||colspan="3"|[[Image:LuigiSSBBNair(clean).png|100px]]<br>Clean||colspan="3"|[[Image:LuigiSSBBNair(late).png|100px]]<br>Late | ||
|- | |- | ||
|Fair<br>Karate Chop||colspan="6"|[[Image:LuigiSSBBFair.png| | |Fair<br>Karate Chop||colspan="6"|[[Image:LuigiSSBBFair.png|100px]] | ||
|- | |- | ||
|Bair<br>Rear Kick||colspan="3"|[[Image:LuigiSSBBBair(clean).png| | |Bair<br>Rear Kick||colspan="3"|[[Image:LuigiSSBBBair(clean).png|100px]]<br>Clean||colspan="3"|[[Image:LuigiSSBBBair(late).png|100px]]<br>Late | ||
|- | |- | ||
|Uair<br>Flip Kick||colspan="3"|[[Image:LuigiSSBBUair(part1).png| | |Uair<br>Flip Kick||colspan="3"|[[Image:LuigiSSBBUair(part1).png|100px]]<br>Part 1||colspan="3"|[[Image:LuigiSSBBUair(part2).png|100px]]<br>Part 2 | ||
|- | |- | ||
|Dair<br>Drill Kick||colspan="6"|[[Image:LuigiSSBBDair.png| | |Dair<br>Drill Kick||colspan="6"|[[Image:LuigiSSBBDair.png|100px]] | ||
|- | |- | ||
|Shield||colspan="6"|[[Image:LuigiSSBBShield.png| | |Shield||colspan="6"|[[Image:LuigiSSBBShield.png|100px]] | ||
|- | |- | ||
|Grab||colspan="2"|[[Image:LuigiSSBBGrab(standing).png| | |Grab||colspan="2"|[[Image:LuigiSSBBGrab(standing).png|100px]]<br>Standing||colspan="2"|[[Image:LuigiSSBBGrab(running).png|100px]]<br>Running||colspan="2"|[[Image:LuigiSSBBGrab(pivot).png|100px]]<br>Pivot | ||
|- | |- | ||
|Pummel<br>(Nosebutt)||colspan="6"|[[Image:LuigiSSBBPummel.png| | |Pummel<br>(Nosebutt)||colspan="6"|[[Image:LuigiSSBBPummel.png|100px]] | ||
|- | |- | ||
|F-Throw<br>(Spin Chuck)||colspan="6"|[[Image:LuigiSSBBFThrow.png| | |F-Throw<br>(Spin Chuck)||colspan="6"|[[Image:LuigiSSBBFThrow.png|100px]] | ||
|- | |- | ||
|B-Throw<br>(Spin Throw)||colspan="3"|[[Image:LuigiSSBBBThrow(swing).png| | |B-Throw<br>(Spin Throw)||colspan="3"|[[Image:LuigiSSBBBThrow(swing).png|100px]]<br>Swing Collision||colspan="3"|[[Image:LuigiSSBBBThrow.png|100px]]<br>Throw | ||
|- | |- | ||
|U-Throw<br>(Vertical Hurl)||colspan="6"|[[Image:LuigiSSBBUThrow.png| | |U-Throw<br>(Vertical Hurl)||colspan="6"|[[Image:LuigiSSBBUThrow.png|100px]] | ||
|- | |- | ||
|D-Throw<br>(Ground Slam)||colspan="6"|[[Image:LuigiSSBBDThrow.png| | |D-Throw<br>(Ground Slam)||colspan="6"|[[Image:LuigiSSBBDThrow.png|100px]] | ||
|- | |- | ||
|Floor (back)<br>(Sweep Kick)||colspan="3"|[[Image:LuigiSSBBFloor(backhit1).png| | |Floor (back)<br>(Sweep Kick)||colspan="3"|[[Image:LuigiSSBBFloor(backhit1).png|100px]]<br>Hit 1||colspan="3"|[[Image:LuigiSSBBFloor(backhit2).png|100px]]<br>Hit 2 | ||
|- | |- | ||
|Floor (front)<br>(Double Punch)||colspan="3"|[[Image:LuigiSSBBFloor(fronthit1).png| | |Floor (front)<br>(Double Punch)||colspan="3"|[[Image:LuigiSSBBFloor(fronthit1).png|100px]]<br>Hit 1||colspan="3"|[[Image:LuigiSSBBFloor(fronthit2).png|100px]]<br>Hit 2 | ||
|- | |- | ||
|Floor (trip)<br>(Double Kick)||colspan="3"|[[Image:LuigiSSBBFloor(triphit1).png| | |Floor (trip)<br>(Double Kick)||colspan="3"|[[Image:LuigiSSBBFloor(triphit1).png|100px]]<br>Hit 1||colspan="3"|[[Image:LuigiSSBBFloor(triphit2).png|100px]]<br>Hit 2 | ||
|- | |- | ||
|Edge (<100%)<br>(Quick Kick)||colspan="6"|[[Image:LuigiSSBBEdge(fast).png| | |Edge (<100%)<br>(Quick Kick)||colspan="6"|[[Image:LuigiSSBBEdge(fast).png|100px]] | ||
|- | |- | ||
|Edge (100%+)<br>(Slow Kick)||colspan="6"|[[Image:LuigiSSBBEdge(slow).png| | |Edge (100%+)<br>(Slow Kick)||colspan="6"|[[Image:LuigiSSBBEdge(slow).png|100px]] | ||
|- | |- | ||
|D-Taunt<br>(Heel Scuff)||colspan="6"|[[Image:LuigiSSBBDTaunt.png| | |D-Taunt<br>(Heel Scuff)||colspan="6"|[[Image:LuigiSSBBDTaunt.png|100px]] | ||
|} | |} | ||
===Notes=== | ===Notes=== | ||
*The angle of a hitbox is displayed as a line. For hitboxes with the [[Sakurai angle]], a star shape (*) is used instead. Note that all angles are based on what side of the attacker the target is on - if the target is on the opposite side of the attacker, they will fly in the opposite direction (but at the same angle). | *The angle of a hitbox is displayed as a line. For hitboxes with the [[Sakurai angle]], a star shape (*) is used instead. Note that all angles are based on what side of the attacker the target is on - if the target is on the opposite side of the attacker, they will fly in the opposite direction (but at the same angle). Most presented angles assume the target is on the right of the attacker, unless the attack is obviously on the attacker's left. | ||
*A transcendent hitbox is denoted by a dashed | **An angle indicated with a dash (-) is another special angle with unconfirmed properties; the best guess right now is that its angle is the same as the direction of travel of the user. | ||
*A transcendent hitbox is denoted by a dashed border. | |||
*The colour of a hitbox is its type; the colour of its angle indicator and border is its effect. | |||
*The numbers represent each hitbox's damage and knockback (base knockback/knockback scaling), as well as whether the knockback is fixed. | |||
[[Category:Hitbox repositories]] | [[Category:Hitbox repositories]] | ||
Revision as of 13:26, January 28, 2011
| Color Legend | ||||||||
|---|---|---|---|---|---|---|---|---|
| Types | Effects | |||||||
| Typeless | Head | Butt | Hand | Foot | Throwing | Spin | Normal | Flame |
| Luigi's Hitboxes | ||||||
|---|---|---|---|---|---|---|
| Neutral Punch/Punch/Butt |
 Hit 1 |
 Hit 2 |
 Hit 3 | |||
| F-Tilt Power Kick |
 Angled up |
 Angled side |
 Angled down | |||
| U-Tilt Upper Swipe |
File:LuigiSSBBUTilt.png | |||||
| D-Tilt Crouch Kick |
 On grounded opponents |
 On aerial opponents | ||||
| Dash Frenzy Punches |
 Hits 1-6 |
 Hit 7 | ||||
| U-Smash Head Snap |
File:LuigiSSBBUSmash.png | |||||
| D-Smash Breakdance Kick |
 Hit 1 |
 Hit 2 | ||||
| F-Smash Palm Poke |
 Angled up |
 Angled side |
 Angled down | |||
| Nair Drop Kick |
 Clean |
 Late | ||||
| Fair Karate Chop |
File:LuigiSSBBFair.png | |||||
| Bair Rear Kick |
 Clean |
 Late | ||||
| Uair Flip Kick |
File:LuigiSSBBUair(part1).png Part 1 |
File:LuigiSSBBUair(part2).png Part 2 | ||||
| Dair Drill Kick |
File:LuigiSSBBDair.png | |||||
| Shield | 
| |||||
| Grab |  Standing |
 Running |
 Pivot | |||
| Pummel (Nosebutt) |

| |||||
| F-Throw (Spin Chuck) |

| |||||
| B-Throw (Spin Throw) |
 Swing Collision |
 Throw | ||||
| U-Throw (Vertical Hurl) |

| |||||
| D-Throw (Ground Slam) |

| |||||
| Floor (back) (Sweep Kick) |
 Hit 1 |
 Hit 2 | ||||
| Floor (front) (Double Punch) |
 Hit 1 |
 Hit 2 | ||||
| Floor (trip) (Double Kick) |
 Hit 1 |
 Hit 2 | ||||
| Edge (<100%) (Quick Kick) |

| |||||
| Edge (100%+) (Slow Kick) |

| |||||
| D-Taunt (Heel Scuff) |

| |||||
Notes
- The angle of a hitbox is displayed as a line. For hitboxes with the Sakurai angle, a star shape (*) is used instead. Note that all angles are based on what side of the attacker the target is on - if the target is on the opposite side of the attacker, they will fly in the opposite direction (but at the same angle). Most presented angles assume the target is on the right of the attacker, unless the attack is obviously on the attacker's left.
- An angle indicated with a dash (-) is another special angle with unconfirmed properties; the best guess right now is that its angle is the same as the direction of travel of the user.
- A transcendent hitbox is denoted by a dashed border.
- The colour of a hitbox is its type; the colour of its angle indicator and border is its effect.
- The numbers represent each hitbox's damage and knockback (base knockback/knockback scaling), as well as whether the knockback is fixed.
