Super Smash Bros. Ultimate

Lucina (SSBU)/Neutral aerial: Difference between revisions

From SmashWiki, the Super Smash Bros. wiki
Jump to navigationJump to search
(New Page: {{ArticleIcons|ssbu=y}} {{competitive expertise}} thumb|500px|Hitbox visualization showing Lucina's neutral aerial. ==Overview== ==Hitboxes== {{UltimateHitbo...)
 
(Added info on the strengths and weaknesses of this move (redone while being logged in for traceability))
 
(3 intermediate revisions by 3 users not shown)
Line 3: Line 3:
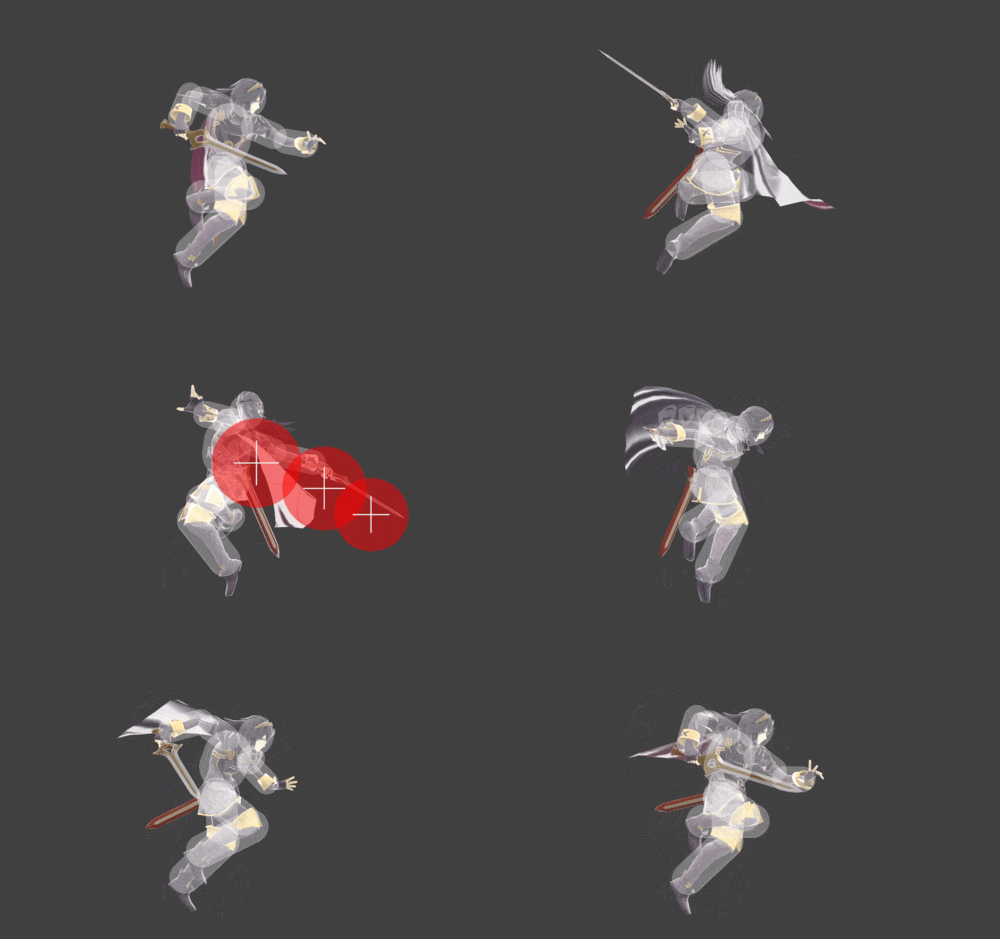
[[File:LucinaNAirSSBU.gif|thumb|500px|Hitbox visualization showing Lucina's neutral aerial.]]
[[File:LucinaNAirSSBU.gif|thumb|500px|Hitbox visualization showing Lucina's neutral aerial.]]
==Overview==
==Overview==
Lucina's Neutral Aerial is one of her fastest aerials and a very fast move overall (out at frame 6).
It is also one of her most versatile moves, with excellent shield safety (hits are -4 and -3 on shield respectively), but also great KO potential compared to the rest of her kit (killing a midweight like {{SSBU|Chrom}} around 100% at Battlefield's ledge) ; on top of that, if hit while falling, the first hit can confirm into a {{mvsub|Lucina|SSBU|forward tilt}} and even a {{mvsub|Lucina|SSBU|forward smash}} at all percents, which might be her best kill confirm overall.
However, this move can be a bit unreliable in some situations, most importantly when used while rising from a full hop opponents can fall out of hit (get hit by the first hit but not the second one). Less importantly, the hitboxes behind lucina hit pretty high up, making it almost impossible to hit a grounded opponent with them, making the move less useful [[out of shield]] (specifially against crossups) than it may seem.
==Hitboxes==
==Hitboxes==
{{UltimateHitboxTableHeader}}
Line 13: Line 18:
|ks=50
|ks=50
|fkv=0
|fkv=0
|setweight=t
|r=3.8
|r=3.8
|bn=sword1
|bn=sword1
Line 31: Line 37:
|ks=50
|ks=50
|fkv=0
|fkv=0
|setweight=t
|r=4.0
|r=4.0
|bn=armr
|bn=armr
Line 49: Line 56:
|ks=50
|ks=50
|fkv=0
|fkv=0
|setweight=t
|r=3.3
|r=3.3
|bn=sword1
|bn=sword1
Line 150: Line 158:
|-
|-
!Animation length
!Animation length
|71
|27
|}
|}


{{FrameStripStart}}
{{FrameStripStart}}
{{FrameStrip|t=Lag|c=7}}{{FrameStrip|t=Interruptible|c=64}}
{{FrameStrip|t=Lag|c=7}}{{FrameStrip|t=Interruptible|c=20}}
{{FrameStripEnd}}
{{FrameStripEnd}}


Latest revision as of 10:58, May 26, 2023

Competitive.png This article or section may require competitive expertise.
You can discuss this issue on the talk page or edit this page to improve it.
Hitbox visualization showing Lucina's neutral aerial.

Overview[edit]

Lucina's Neutral Aerial is one of her fastest aerials and a very fast move overall (out at frame 6).

It is also one of her most versatile moves, with excellent shield safety (hits are -4 and -3 on shield respectively), but also great KO potential compared to the rest of her kit (killing a midweight like Chrom around 100% at Battlefield's ledge) ; on top of that, if hit while falling, the first hit can confirm into a forward tilt and even a forward smash at all percents, which might be her best kill confirm overall.

However, this move can be a bit unreliable in some situations, most importantly when used while rising from a full hop opponents can fall out of hit (get hit by the first hit but not the second one). Less importantly, the hitboxes behind lucina hit pretty high up, making it almost impossible to hit a grounded opponent with them, making the move less useful out of shield (specifially against crossups) than it may seem.

Hitboxes[edit]

ID Part Rehit rate Damage SD Angle Angle type BK KS FKV Set weight Radius Bone Offset SDI× T% Clang Rebound Effect Type G A Sound Direct Hit bits Hit part Blockable Reflectable Absorbable Flinchless No GFX Heedless
Hit 1
0 0 0 4.275% 0 AngleIcon75.png Standard 45 50 0 HitboxTableIcon(True).png 3.8 sword1 1.0 -1.3 1.6 1.0× 1.0× 0% HitboxTableIcon(Clang).png HitboxTableIcon(Rebound).png Slash (effect) Sword (type) HitboxTableIcon(GroundedTrue).png HitboxTableIcon(AerialTrue).png S Slash SpecialsDirect.png All All HitboxTableIcon(Blockable).png HitboxTableIcon(Unreflectable).png HitboxTableIcon(Unabsorbable).png HitboxTableIcon(False).png HitboxTableIcon(False).png HitboxTableIcon(False).png
1 0 0 4.275% 0 AngleIcon80.png Standard 45 50 0 HitboxTableIcon(True).png 4.0 armr -1.5 1.0 -1.5 1.0× 1.0× 0% HitboxTableIcon(Clang).png HitboxTableIcon(Rebound).png Slash (effect) Sword (type) HitboxTableIcon(GroundedTrue).png HitboxTableIcon(AerialTrue).png S Slash SpecialsDirect.png All All HitboxTableIcon(Blockable).png HitboxTableIcon(Unreflectable).png HitboxTableIcon(Unabsorbable).png HitboxTableIcon(False).png HitboxTableIcon(False).png HitboxTableIcon(False).png
2 0 0 4.275% 0 AngleIcon90.png Standard 35 50 0 HitboxTableIcon(True).png 3.3 sword1 1.0 -1.3 7.2 1.0× 1.0× 0% HitboxTableIcon(Clang).png HitboxTableIcon(Rebound).png Slash (effect) Sword (type) HitboxTableIcon(GroundedTrue).png HitboxTableIcon(AerialTrue).png S Slash SpecialsDirect.png All All HitboxTableIcon(Blockable).png HitboxTableIcon(Unreflectable).png HitboxTableIcon(Unabsorbable).png HitboxTableIcon(False).png HitboxTableIcon(False).png HitboxTableIcon(False).png
Hit 2
0 0 0 8.55% 0 Sakurai angle Standard 55 95 0 HitboxTableIcon(False).png 3.8 sword1 1.2 -1.1 1.5 1.0× 1.0× 0% HitboxTableIcon(Clang).png HitboxTableIcon(Rebound).png Slash (effect) Sword (type) HitboxTableIcon(GroundedTrue).png HitboxTableIcon(AerialTrue).png M Slash SpecialsDirect.png All All HitboxTableIcon(Blockable).png HitboxTableIcon(Unreflectable).png HitboxTableIcon(Unabsorbable).png HitboxTableIcon(False).png HitboxTableIcon(False).png HitboxTableIcon(False).png
1 0 0 8.55% 0 Sakurai angle Standard 55 95 0 HitboxTableIcon(False).png 4.0 armr -2.0 1.0 -1.6 1.0× 1.0× 0% HitboxTableIcon(Clang).png HitboxTableIcon(Rebound).png Slash (effect) Sword (type) HitboxTableIcon(GroundedTrue).png HitboxTableIcon(AerialTrue).png M Slash SpecialsDirect.png All All HitboxTableIcon(Blockable).png HitboxTableIcon(Unreflectable).png HitboxTableIcon(Unabsorbable).png HitboxTableIcon(False).png HitboxTableIcon(False).png HitboxTableIcon(False).png
2 0 0 8.55% 0 Sakurai angle Standard 55 95 0 HitboxTableIcon(False).png 3.4 sword1 0.8 -1.1 7.0 1.0× 1.0× 0% HitboxTableIcon(Clang).png HitboxTableIcon(Rebound).png Slash (effect) Sword (type) HitboxTableIcon(GroundedTrue).png HitboxTableIcon(AerialTrue).png M Slash SpecialsDirect.png All All HitboxTableIcon(Blockable).png HitboxTableIcon(Unreflectable).png HitboxTableIcon(Unabsorbable).png HitboxTableIcon(False).png HitboxTableIcon(False).png HitboxTableIcon(False).png

Timing[edit]

Attack[edit]

Initial autocancel 1
Hit 1 6-7
Hit 2 15-21
Ending autocancel 47-
Interruptible 50
Animation length 49
FrameIcon(Lag).png FrameIcon(Lag).png FrameIcon(Lag).png FrameIcon(Lag).png FrameIcon(Lag).png FrameIcon(Hitbox).png FrameIcon(Hitbox).png FrameIcon(Lag).png FrameIcon(Lag).png FrameIcon(Lag).png FrameIcon(Lag).png FrameIcon(Lag).png FrameIcon(Lag).png FrameIcon(Lag).png FrameIcon(Hitbox).png FrameIcon(Hitbox).png FrameIcon(Hitbox).png FrameIcon(Hitbox).png FrameIcon(Hitbox).png FrameIcon(Hitbox).png FrameIcon(Hitbox).png FrameIcon(Lag).png FrameIcon(Lag).png FrameIcon(Lag).png FrameIcon(Lag).png FrameIcon(Lag).png FrameIcon(Lag).png FrameIcon(Lag).png FrameIcon(Lag).png FrameIcon(Lag).png FrameIcon(Lag).png FrameIcon(Lag).png FrameIcon(Lag).png FrameIcon(Lag).png FrameIcon(Lag).png FrameIcon(Lag).png FrameIcon(Lag).png FrameIcon(Lag).png FrameIcon(Lag).png FrameIcon(Lag).png FrameIcon(Lag).png FrameIcon(Lag).png FrameIcon(Lag).png FrameIcon(Lag).png FrameIcon(Lag).png FrameIcon(Lag).png FrameIcon(Lag).png FrameIcon(Lag).png FrameIcon(Lag).png
FrameIcon(Autocancel).png FrameIcon(Blank).png FrameIcon(Blank).png FrameIcon(Blank).png FrameIcon(Blank).png FrameIcon(Blank).png FrameIcon(Blank).png FrameIcon(Blank).png FrameIcon(Blank).png FrameIcon(Blank).png FrameIcon(Blank).png FrameIcon(Blank).png FrameIcon(Blank).png FrameIcon(Blank).png FrameIcon(Blank).png FrameIcon(Blank).png FrameIcon(Blank).png FrameIcon(Blank).png FrameIcon(Blank).png FrameIcon(Blank).png FrameIcon(Blank).png FrameIcon(Blank).png FrameIcon(Blank).png FrameIcon(Blank).png FrameIcon(Blank).png FrameIcon(Blank).png FrameIcon(Blank).png FrameIcon(Blank).png FrameIcon(Blank).png FrameIcon(Blank).png FrameIcon(Blank).png FrameIcon(Blank).png FrameIcon(Blank).png FrameIcon(Blank).png FrameIcon(Blank).png FrameIcon(Blank).png FrameIcon(Blank).png FrameIcon(Blank).png FrameIcon(Blank).png FrameIcon(Blank).png FrameIcon(Blank).png FrameIcon(Blank).png FrameIcon(Blank).png FrameIcon(Blank).png FrameIcon(Blank).png FrameIcon(Blank).png FrameIcon(Autocancel).png FrameIcon(Autocancel).png FrameIcon(Autocancel).png

Landing lag[edit]

Interruptible 8
Animation length 27
FrameIcon(Lag).png FrameIcon(Lag).png FrameIcon(Lag).png FrameIcon(Lag).png FrameIcon(Lag).png FrameIcon(Lag).png FrameIcon(Lag).png FrameIcon(Interruptible).png FrameIcon(Interruptible).png FrameIcon(Interruptible).png FrameIcon(Interruptible).png FrameIcon(Interruptible).png FrameIcon(Interruptible).png FrameIcon(Interruptible).png FrameIcon(Interruptible).png FrameIcon(Interruptible).png FrameIcon(Interruptible).png FrameIcon(Interruptible).png FrameIcon(Interruptible).png FrameIcon(Interruptible).png FrameIcon(Interruptible).png FrameIcon(Interruptible).png FrameIcon(Interruptible).png FrameIcon(Interruptible).png FrameIcon(Interruptible).png FrameIcon(Interruptible).png FrameIcon(Interruptible).png
Legend (1 square = 1 frame)
Lag
Lag time
Hitbox
Hitbox
Auto-canceling
Autocancel
Interruptibility
Interruptible