SSBU Icon.png

Squirtle (SSBU)/Neutral attack/Hit 1: Difference between revisions

From SmashWiki, the Super Smash Bros. wiki
Jump to navigationJump to search
(New Page: {{ArticleIcons|ssbu=y}} thumb|550px|Hitbox visualization showing Squirtle's first jab. {{competitive expertise}} ==Overview== ==Hitboxes== {{UltimateHitbox...)
 
No edit summary
Line 1: Line 1:
{{ArticleIcons|ssbu=y}}
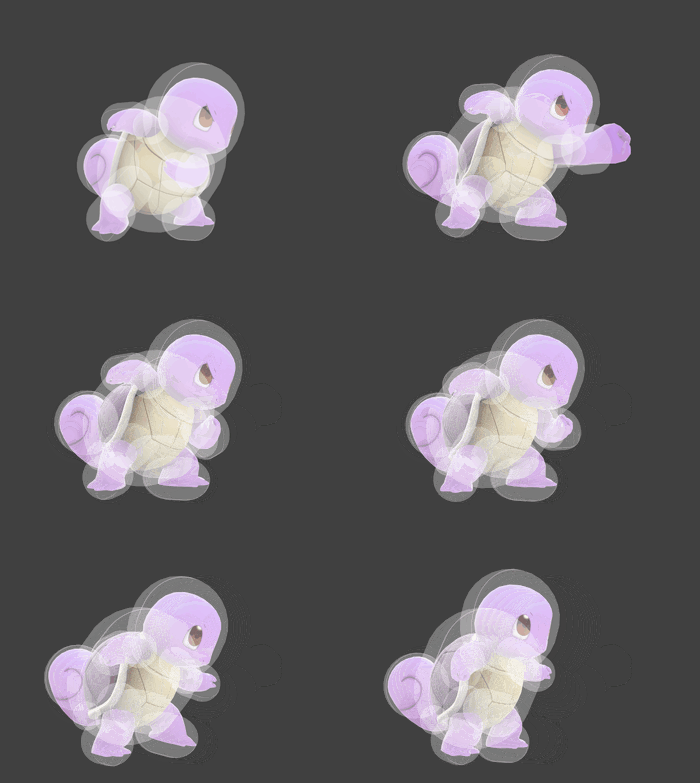
[[File:SquirtleJab1SSBU.gif|thumb|550px|Hitbox visualization showing Squirtle's first jab.]]
[[File:SquirtleJab1SSBU.gif|thumb|350px|Hitbox visualization showing Squirtle's first jab.]]
{{competitive expertise}}
==Overview==
==Overview==
Line 9: Line 9:
|damage=2.0%
|damage=2.0%
|angle=361
|angle=361
|af=3
|bk=25
|bk=25
|ks=20
|ks=20
Line 27: Line 28:
|damage=2.0%
|damage=2.0%
|angle=361
|angle=361
|af=3
|bk=25
|bk=25
|ks=20
|ks=20
Line 45: Line 47:
|damage=2.0%
|damage=2.0%
|angle=180
|angle=180
|af=3
|hitbits=Fighter Only
|bk=20
|bk=20
|ks=15
|ks=15
Line 63: Line 67:
|damage=2.0%
|damage=2.0%
|angle=361
|angle=361
|af=3
|bk=20
|bk=20
|ks=15
|ks=15

Revision as of 03:44, January 23, 2022

Hitbox visualization showing Squirtle's first jab.
Competitive.png This article or section may require competitive expertise.
You can discuss this issue on the talk page or edit this page to improve it.

Overview

Hitboxes

ID Part Rehit rate Damage SD Angle Angle type BK KS FKV Set weight Radius Bone Offset SDI× T% Clang Rebound Effect Type G A Sound Direct Hit bits Hit part Blockable Reflectable Absorbable Flinchless No GFX Heedless
0 0 0 2.0% 0 Sakurai angle Forward 25 20 0 HitboxTableIcon(False).png 1.5 top 0.0 5.0 5.0 1.6× 1.0× 0% HitboxTableIcon(Clang).png HitboxTableIcon(Rebound).png EffectIcon(Normal).png TypeIcon(Hand).png HitboxTableIcon(GroundedTrue).png HitboxTableIcon(AerialTrue).png S Punch SpecialsDirect.png All All HitboxTableIcon(Blockable).png HitboxTableIcon(Unreflectable).png HitboxTableIcon(Unabsorbable).png HitboxTableIcon(False).png HitboxTableIcon(False).png HitboxTableIcon(False).png
1 0 0 2.0% 0 Sakurai angle Forward 25 20 0 HitboxTableIcon(False).png 1.8 top 0.0 5.0 7.2 1.6× 1.0× 0% HitboxTableIcon(Clang).png HitboxTableIcon(Rebound).png EffectIcon(Normal).png TypeIcon(Hand).png HitboxTableIcon(GroundedTrue).png HitboxTableIcon(AerialTrue).png S Punch SpecialsDirect.png All All HitboxTableIcon(Blockable).png HitboxTableIcon(Unreflectable).png HitboxTableIcon(Unabsorbable).png HitboxTableIcon(False).png HitboxTableIcon(False).png HitboxTableIcon(False).png
2 0 0 2.0% 0 AngleIcon180.png Forward 20 15 0 HitboxTableIcon(False).png 2.2 top 0.0 5.0 9.5 1.6× 1.0× 0% HitboxTableIcon(Clang).png HitboxTableIcon(Rebound).png EffectIcon(Normal).png TypeIcon(Hand).png HitboxTableIcon(GroundedTrue).png HitboxTableIcon(AerialTrue).png S Punch SpecialsDirect.png Fighter Only All HitboxTableIcon(Blockable).png HitboxTableIcon(Unreflectable).png HitboxTableIcon(Unabsorbable).png HitboxTableIcon(False).png HitboxTableIcon(False).png HitboxTableIcon(False).png
3 0 0 2.0% 0 Sakurai angle Forward 20 15 0 HitboxTableIcon(False).png 2.2 top 0.0 5.0 9.5 1.6× 1.0× 0% HitboxTableIcon(Clang).png HitboxTableIcon(Rebound).png EffectIcon(Normal).png TypeIcon(Hand).png HitboxTableIcon(GroundedTrue).png HitboxTableIcon(AerialTrue).png S Punch SpecialsDirect.png All All HitboxTableIcon(Blockable).png HitboxTableIcon(Unreflectable).png HitboxTableIcon(Unabsorbable).png HitboxTableIcon(False).png HitboxTableIcon(False).png HitboxTableIcon(False).png

Timing

Hitboxes 2-3
Earliest continuable 5
Interruptible 17
Animation length 26
FrameIcon(Lag).png FrameIcon(Hitbox).png FrameIcon(Hitbox).png FrameIcon(LagContinuableS).png FrameIcon(LagContinuableE).png FrameIcon(Lag).png FrameIcon(Lag).png FrameIcon(Lag).png FrameIcon(Lag).png FrameIcon(Lag).png FrameIcon(Lag).png FrameIcon(Lag).png FrameIcon(Lag).png FrameIcon(Lag).png FrameIcon(Lag).png FrameIcon(Lag).png FrameIcon(Interruptible).png FrameIcon(Interruptible).png FrameIcon(Interruptible).png FrameIcon(Interruptible).png FrameIcon(Interruptible).png FrameIcon(Interruptible).png FrameIcon(Interruptible).png FrameIcon(Interruptible).png FrameIcon(Interruptible).png FrameIcon(Interruptible).png
Legend (1 square = 1 frame)
FrameIcon(Lag).png
Lag time
FrameIcon(Hitbox).png
Hitbox
FrameIcon(BlankContinuableS).pngFrameIcon(BlankContinuableE).png
Earliest continuable point
FrameIcon(Interruptible).png
Interruptible