Pikachu (SSBM)/Up aerial: Difference between revisions
From SmashWiki, the Super Smash Bros. wiki
Jump to navigationJump to search
m (generally a more correct term) |
No edit summary |
||
| Line 3: | Line 3: | ||
==Overview== | ==Overview== | ||
[[File:Pikachu Up Aerial Hitbox Melee.gif|thumb|The hitbox of Pikachu's uair.]] | [[File:Pikachu Up Aerial Hitbox Melee.gif|thumb|The hitbox of Pikachu's uair.]] | ||
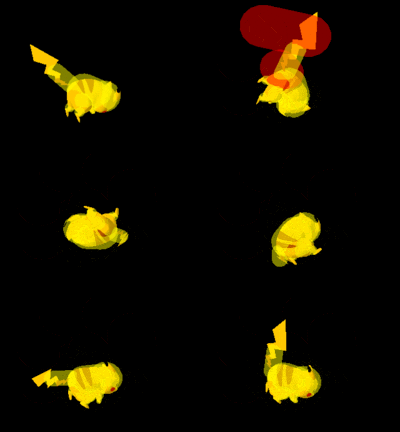
Pikachu does a flip while swinging its tail in an arc above itself, dealing 4% damage. The move is extremely quick and has low knockback, making it an excellent move for [[juggling]] and [[spacing]]. It has a [[disjointed]] [[hitbox]] as well, increasing its spacing capabilities. If the | Pikachu does a flip while swinging its tail in an arc above itself, dealing 4% damage. The move is extremely quick and has low knockback, making it an excellent move for [[juggling]] and [[spacing]]. It has a [[disjointed]] [[hitbox]] as well, increasing its spacing capabilities. If the middle of the move hits, the opponent will instead be sent down on a [[semi-spike]] trajectory, which is useful for [[gimp]]ing and can be deadly against characters with poor recoveries if spaced correctly. The move can [[edgeguard]] reliably even at lower percentages. The move is essential in certain [[matchup]]s, particularly against {{SSBM|Jigglypuff}}, who is floaty and has limited options for attacking below itself, making it vulnerable to the move's juggling ability. | ||
{{competitive expertise}} | {{competitive expertise}} | ||
{{ | |||
==Hitboxes== | |||
{{MeleeHitboxTableHeader}} | |||
{{HitboxTableTitle|Clean|19}} | |||
{{MeleeHitboxTableRow | |||
|id=0 | |||
|damage=4% | |||
|angle=80 | |||
|bk=100 | |||
|ks=60 | |||
|fkv=0 | |||
|r=4.0 | |||
|bn=47 | |||
|effect=Normal | |||
|slvl=S | |||
|sfx=Kick | |||
}} | |||
{{MeleeHitboxTableRow | |||
|id=1 | |||
|damage=4% | |||
|angle=80 | |||
|bk=100 | |||
|ks=60 | |||
|fkv=0 | |||
|r=4.8 | |||
|bn=50 | |||
|effect=Normal | |||
|slvl=S | |||
|sfx=Kick | |||
}} | |||
{{HitboxTableTitle|Mid|19}} | |||
{{MeleeHitboxTableRow | |||
|id=0 | |||
|damage=4% | |||
|angle=0 | |||
|bk=60 | |||
|ks=60 | |||
|fkv=0 | |||
|r=4.0 | |||
|bn=47 | |||
|effect=Normal | |||
|slvl=S | |||
|sfx=Kick | |||
}} | |||
{{MeleeHitboxTableRow | |||
|id=1 | |||
|damage=4% | |||
|angle=0 | |||
|bk=60 | |||
|ks=60 | |||
|fkv=0 | |||
|r=4.8 | |||
|bn=50 | |||
|xpos=1.2 | |||
|ypos=1.2 | |||
|effect=Normal | |||
|slvl=S | |||
|sfx=Kick | |||
}} | |||
{{HitboxTableTitle|Late|19}} | |||
{{MeleeHitboxTableRow | |||
|id=0 | |||
|damage=4% | |||
|angle=130 | |||
|bk=80 | |||
|ks=60 | |||
|fkv=0 | |||
|r=4.0 | |||
|bn=47 | |||
|effect=Normal | |||
|slvl=S | |||
|sfx=Kick | |||
}} | |||
{{MeleeHitboxTableRow | |||
|id=1 | |||
|damage=4% | |||
|angle=130 | |||
|bk=80 | |||
|ks=60 | |||
|fkv=0 | |||
|r=4.8 | |||
|bn=50 | |||
|xpos=1.2 | |||
|ypos=1.2 | |||
|effect=Normal | |||
|slvl=S | |||
|sfx=Kick | |||
}} | |||
|} | |||
==Timing== | |||
===Attack=== | |||
{|class="wikitable" | |||
|- | |||
!Initial autocancel | |||
|1-2 | |||
|- | |||
!Clean hitbox | |||
|3-4 | |||
|- | |||
!Mid hitbox | |||
|5-6 | |||
|- | |||
!Late hitbox | |||
|7-8 | |||
|- | |||
!Ending autocancel | |||
|18- | |||
|- | |||
!Animation length | |||
|27 | |||
|- | |||
!Interruptible | |||
|28 | |||
|} | |||
{{FrameStripStart}} | |||
{{FrameStrip|t=Lag|c=2}}{{FrameStrip|t=Hitbox|c=2|e=HitboxChangeS}}{{FrameStrip|t=Hitbox|c=2|s=HitboxChangeE|e=HitboxChangeS}}{{FrameStrip|t=Hitbox|c=2|s=HitboxChangeE}}{{FrameStrip|t=Lag|c=19}} | |||
|- | |||
{{FrameStrip|t=Autocancel|c=2}}{{FrameStrip|t=Blank|c=15}}{{FrameStrip|t=Autocancel|c=10}} | |||
|} | |||
===Landing lag=== | |||
{|class="wikitable" | |||
|- | |||
!Animation length | |||
|26 | |||
|- | |||
!L-cancelled animation length | |||
|13 | |||
|} | |||
{{FrameStripStart}} | |||
|Normal {{FrameStrip|t=Lag|c=26}} | |||
|- | |||
|L-cancelled {{FrameStrip|t=Lag|c=13}}{{FrameStrip|t=Blank|c=13}} | |||
|} | |||
{{FrameIconLegend|lag=y|hitbox=y|hitboxchange=y|autocancel=y}} | |||
==Similar moves== | ==Similar moves== | ||
*[[Pichu (SSBM)/Up aerial]] | *[[Pichu (SSBM)/Up aerial]] | ||
[[Category:Pikachu (SSBM)]] | [[Category:Pikachu (SSBM)]] | ||
[[Category:Up aerials]] | [[Category:Up aerials]] | ||
Revision as of 22:29, August 28, 2013
Overview
Pikachu does a flip while swinging its tail in an arc above itself, dealing 4% damage. The move is extremely quick and has low knockback, making it an excellent move for juggling and spacing. It has a disjointed hitbox as well, increasing its spacing capabilities. If the middle of the move hits, the opponent will instead be sent down on a semi-spike trajectory, which is useful for gimping and can be deadly against characters with poor recoveries if spaced correctly. The move can edgeguard reliably even at lower percentages. The move is essential in certain matchups, particularly against Jigglypuff, who is floaty and has limited options for attacking below itself, making it vulnerable to the move's juggling ability.
Hitboxes
Timing
Attack
| Initial autocancel | 1-2 |
|---|---|
| Clean hitbox | 3-4 |
| Mid hitbox | 5-6 |
| Late hitbox | 7-8 |
| Ending autocancel | 18- |
| Animation length | 27 |
| Interruptible | 28 |
Landing lag
| Animation length | 26 |
|---|---|
| L-cancelled animation length | 13 |
| Normal | ||||||||||||||||||||||||||
| L-cancelled |
Lag time |
Hitbox |
Hitbox change |
Autocancel |

