Super Smash Bros. Melee

Ness (SSBM)/Forward smash: Difference between revisions

From SmashWiki, the Super Smash Bros. wiki
Jump to navigationJump to search
No edit summary
Line 3: Line 3:
==Overview==
==Overview==
[[File:Ness Forward Smash Hitbox Melee.gif|thumb|Hitbox of Ness' forward smash.]]
[[File:Ness Forward Smash Hitbox Melee.gif|thumb|Hitbox of Ness' forward smash.]]
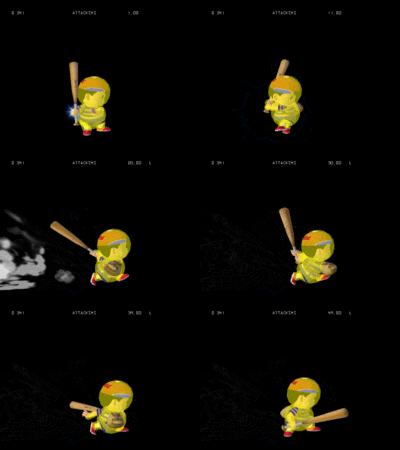
Ness brings out a baseball bat and swings it. This attack deals high knockback and damage when tipped but it is one of the weakest forward smashes in the game when untippered. It has a bit of [[start-up]] lag. The attack is unique among forward smashes that it can [[reflect]] projectiles when timed correctly. The move does more damage the further away the opponent is, with a reasonably fast hitbox; the reflection aspect mostly goes unused in competitive play due to the lag afterwards. Considered one of the worst forward smashes in the game due to its lag and the fact that it need to be sweetspotted for it to actually have high power.  
Ness brings out a baseball bat and swings it. This attack deals high knockback and damage when tipped but it is one of the weakest forward smashes in the game when untippered. It has a bit of [[start-up]] lag. The attack is unique among forward smashes that it can [[reflect]] projectiles when timed correctly. The move does more damage the further away the opponent is, with a reasonably fast hitbox; the reflection aspect mostly goes unused in competitive play due to the lag afterwards. Considered one of the worst forward smashes in the game due to its lag and the fact that it needs to be sweetspotted for it to actually have high power.


==Hitboxes==
==Hitboxes==

Revision as of 10:27, July 28, 2018

Overview

Hitbox of Ness' forward smash.

Ness brings out a baseball bat and swings it. This attack deals high knockback and damage when tipped but it is one of the weakest forward smashes in the game when untippered. It has a bit of start-up lag. The attack is unique among forward smashes that it can reflect projectiles when timed correctly. The move does more damage the further away the opponent is, with a reasonably fast hitbox; the reflection aspect mostly goes unused in competitive play due to the lag afterwards. Considered one of the worst forward smashes in the game due to its lag and the fact that it needs to be sweetspotted for it to actually have high power.

Hitboxes

ID Part Damage SD Angle BK KS FKV Radius Bone Offset Clang Rebound Effect G A Sound
0 0 18% 0 Sakurai angle 50 62 0 2.3436 0 0.0 3.5154 4.2966 HitboxTableIcon(Clang).png HitboxTableIcon(Rebound).png Normal (effect) HitboxTableIcon(GroundedTrue).png HitboxTableIcon(AerialTrue).png L Bat
1 0 20% 0 Sakurai angle 50 62 0 2.9295 42 0.0 0.0 0.0 HitboxTableIcon(Clang).png HitboxTableIcon(Rebound).png Normal (effect) HitboxTableIcon(GroundedTrue).png HitboxTableIcon(AerialTrue).png L Bat
2 0 22% 0 Sakurai angle 50 62 0 3.1248 42 0.0 4.4919 0.0 HitboxTableIcon(Clang).png HitboxTableIcon(Rebound).png Normal (effect) HitboxTableIcon(GroundedTrue).png HitboxTableIcon(AerialTrue).png L Bat
3 0 24% 0 Sakurai angle 50 62 0 3.3201 42 0.0 8.9838 0.0 HitboxTableIcon(Clang).png HitboxTableIcon(Rebound).png Normal (effect) HitboxTableIcon(GroundedTrue).png HitboxTableIcon(AerialTrue).png L Bat

Timing

Charges between 10-11
Hitbox 16-17
Reflects 16-17
Animation length 49
Interruptible 50
FrameIcon(Lag).png FrameIcon(Lag).png FrameIcon(Lag).png FrameIcon(Lag).png FrameIcon(Lag).png FrameIcon(Lag).png FrameIcon(Lag).png FrameIcon(Lag).png FrameIcon(Lag).png FrameIcon(LagChargeS).png FrameIcon(LagChargeE).png FrameIcon(Lag).png FrameIcon(Lag).png FrameIcon(Lag).png FrameIcon(Lag).png FrameIcon(Hitbox).png FrameIcon(Hitbox).png FrameIcon(Lag).png FrameIcon(Lag).png FrameIcon(Lag).png FrameIcon(Lag).png FrameIcon(Lag).png FrameIcon(Lag).png FrameIcon(Lag).png FrameIcon(Lag).png FrameIcon(Lag).png FrameIcon(Lag).png FrameIcon(Lag).png FrameIcon(Lag).png FrameIcon(Lag).png FrameIcon(Lag).png FrameIcon(Lag).png FrameIcon(Lag).png FrameIcon(Lag).png FrameIcon(Lag).png FrameIcon(Lag).png FrameIcon(Lag).png FrameIcon(Lag).png FrameIcon(Lag).png FrameIcon(Lag).png FrameIcon(Lag).png FrameIcon(Lag).png FrameIcon(Lag).png FrameIcon(Lag).png FrameIcon(Lag).png FrameIcon(Lag).png FrameIcon(Lag).png FrameIcon(Lag).png FrameIcon(Lag).png
FrameIcon(Blank).png FrameIcon(Blank).png FrameIcon(Blank).png FrameIcon(Blank).png FrameIcon(Blank).png FrameIcon(Blank).png FrameIcon(Blank).png FrameIcon(Blank).png FrameIcon(Blank).png FrameIcon(BlankChargeS).png FrameIcon(BlankChargeE).png FrameIcon(Blank).png FrameIcon(Blank).png FrameIcon(Blank).png FrameIcon(Blank).png FrameIcon(Reflect).png FrameIcon(Reflect).png FrameIcon(Blank).png FrameIcon(Blank).png FrameIcon(Blank).png FrameIcon(Blank).png FrameIcon(Blank).png FrameIcon(Blank).png FrameIcon(Blank).png FrameIcon(Blank).png FrameIcon(Blank).png FrameIcon(Blank).png FrameIcon(Blank).png FrameIcon(Blank).png FrameIcon(Blank).png FrameIcon(Blank).png FrameIcon(Blank).png FrameIcon(Blank).png FrameIcon(Blank).png FrameIcon(Blank).png FrameIcon(Blank).png FrameIcon(Blank).png FrameIcon(Blank).png FrameIcon(Blank).png FrameIcon(Blank).png FrameIcon(Blank).png FrameIcon(Blank).png FrameIcon(Blank).png FrameIcon(Blank).png FrameIcon(Blank).png FrameIcon(Blank).png FrameIcon(Blank).png FrameIcon(Blank).png FrameIcon(Blank).png
Legend (1 square = 1 frame)
Lag
Lag time
ChargeCharge
Charge interval
Hitbox
Hitbox
Reflection
Reflect

Properties

Reflection radius 6.5
Reflection damage 1.5x
Reflection speed 1.0x
Max reflectable damage 50