Sample stages: Difference between revisions
(→Sample L: Maze: Bit uncyclopaedic. Also no one used these stages lol) |
m (Text replacement - " *\| *hometo *= *[^\n]*\n" to "") |
||
| (17 intermediate revisions by 10 users not shown) | |||
| Line 1: | Line 1: | ||
{{ArticleIcons|ssbb=y}} | {{ArticleIcons|ssbb=y}} | ||
''[[Super Smash Bros. Brawl]] | The '''sample stages''' are the 3 stages built within the [[Stage Builder]] in ''[[Super Smash Bros. Brawl]]'', used to demonstrate how the function works. All three stages can be freely edited by players and changed from their default forms. | ||
While the | While the sample stages are just as consistent across every copy of the game as the "regular" stages, and are thus arguably just as valid to fight on as any other stage, they have never been considered official stages as part of the {{SSBB|tournament rulesets}}. As such, all three of them are [[banned stage|banned]] by default in tournament play, even without taking their bannable properties into consideration. Nevertheless, it is very easy to reason why the stages would be banned even if they were to be competitively considered. | ||
If the player edits the stage and saves their changes, a separate stage with those changes will be made, while the original versions of the | If the player edits the stage and saves their changes, a separate stage with those changes will be made, while the original versions of the sample stages will remain. Even the original versions of the stages, however, can be deleted by the player. | ||
==Stages== | ==Stages== | ||
===Sample S: Hole=== | ===Sample S: Hole=== | ||
{{Infobox Stage | {{Infobox Stage | ||
| | |subtitle = ''[[Super Smash Bros. Brawl]]'' | ||
|name = Sample S: Hole | |name = Sample S: Hole | ||
|image = [[ | |image = [[File:Sample S Hole.jpg|300px]] | ||
|caption = | |caption = | ||
|universe = {{uv|Super Smash Bros.}} | |universe = {{uv|Super Smash Bros.}} | ||
|games = ''[[ | |games = ''[[Super Smash Bros. Brawl|Brawl]]'' | ||
|availability = [[Starter stage|Starter]] | |||
|availability = [[Starter]] | |||
|brawlsingles = | |brawlsingles = | ||
|brawldoubles = | |brawldoubles = | ||
| Line 29: | Line 28: | ||
The left side features a spiked pit near the bottom blast line which can be used to stall. | The left side features a spiked pit near the bottom blast line which can be used to stall. | ||
If | If {{SSBB|Olimar}} uses his [[Final Smash]], [[End of Day]], on this stage, then as his ship descends from the sky, it falls directly through the hole in the center of the stage, and causes Olimar to [[self-destruct]]. This also occurs in the diving slash for {{SSBB|Ike}}'s [[Great Aether]]. | ||
A level 9 | A level 9 {{SSBB|Fox}} or {{SSBB|Wolf}} will KO itself on this stage if Player 1 does not move. This is an example of [[Flaws in artificial intelligence#Super Smash Bros. Brawl|flawed AI]]. | ||
The stage's description in Stage Builder makes reference to the [[meteor smash]] mechanic, and it is the first time the mechanic was officially mentioned in ''Smash''. | |||
{{clr}} | {{clr}} | ||
===Sample M: Bath=== | ===Sample M: Bath=== | ||
{{Infobox Stage | {{Infobox Stage | ||
| | |subtitle = ''[[Super Smash Bros. Brawl]]'' | ||
|name = Sample M: Bath | |name = Sample M: Bath | ||
|image = [[ | |image = [[File:Sample M Bath.jpg|300px]] | ||
|caption = | |caption = | ||
|universe = {{uv|Super Smash Bros.}} | |universe = {{uv|Super Smash Bros.}} | ||
|games = '' | |games = ''Brawl'' | ||
|availability = [[Starter stage|Starter]] | |||
|availability = [[Starter]] | |||
|brawlsingles = | |brawlsingles = | ||
|brawldoubles = | |brawldoubles = | ||
| Line 48: | Line 49: | ||
}} | }} | ||
'''Sample M: Bath''' is mainly a U-shape, with the only exits being the top opening and a lone [[Drop Block]] on the left side. The right side is slightly elevated. It is the medium size example. | '''Sample M: Bath''' is mainly a U-shape, with the only exits being the top opening and a lone [[Drop Block]] on the left side, which is supposed to act as a bathtub drain. The right side is slightly elevated. It is the medium size example. | ||
There is a [[glitch]] where if | There is a [[glitch]] where if {{SSBB|Peach}} uses her [[recovery | recovery move]] and floats into one of the blocks underneath the stage, she will remain floating until she is hit or the player moves her in another direction. This is known as the [[parasol glitch]]. | ||
{{clr}} | {{clr}} | ||
===Sample L: Maze=== | ===Sample L: Maze=== | ||
{{Infobox Stage | {{Infobox Stage | ||
| | |subtitle = ''[[Super Smash Bros. Brawl]]'' | ||
|name = Sample L: Maze | |name = Sample L: Maze | ||
|image = [[ | |image = [[File:Sample L Maze.jpg|300px]] | ||
|caption = | |caption = | ||
|universe = {{uv|Super Smash Bros.}} | |universe = {{uv|Super Smash Bros.}} | ||
|games = '' | |games = ''Brawl'' | ||
|availability = [[Starter stage|Starter]] | |||
|availability = [[Starter]] | |||
|brawlsingles = | |brawlsingles = | ||
|brawldoubles = | |brawldoubles = | ||
| Line 70: | Line 70: | ||
'''Sample L: Maze''' is the example of a large stage. It is a very complex stage, with many moving platforms and a few [[Drop Block]]s. | '''Sample L: Maze''' is the example of a large stage. It is a very complex stage, with many moving platforms and a few [[Drop Block]]s. | ||
The maze structure occupies the upper half of this stage | The maze structure occupies the upper half of this stage, with the top of this structure being a flat roof, where all characters spawn. The roof is close to the top [[blast line]], so it is easy to launch characters upward for the [[KO]] and for survivors to take [[hoop damage]]. The flatness of the roof also aids the use of horizontal [[projectile]]s, like Falco's [[Blaster (Falco)|Blaster]]. To escape the roof, a player can drop their character into the maze below. The presence of [[item]]s may encourage players to leave the roof and visit other parts of the stage. | ||
The roof is close to the top [[blast line]], so it is easy to launch characters upward for the [[KO]] | |||
Below the maze, there are only a few floating platforms, with the risk of missing a platform and falling off the stage being significant. The lower right area contains only a pair of small, moving platforms. If a character rides a Drop Block into this area, they might need to [[jumping|jump]] accurately onto either of these two platforms to [[recovery|recover]] from the fall. The tree bark and small platform are also very close to the blast line, making it a dangerous camping spot. | |||
{{SSBBStages}} | {{SSBBStages}} | ||
Latest revision as of 14:01, June 29, 2023
The sample stages are the 3 stages built within the Stage Builder in Super Smash Bros. Brawl, used to demonstrate how the function works. All three stages can be freely edited by players and changed from their default forms.
While the sample stages are just as consistent across every copy of the game as the "regular" stages, and are thus arguably just as valid to fight on as any other stage, they have never been considered official stages as part of the tournament rulesets. As such, all three of them are banned by default in tournament play, even without taking their bannable properties into consideration. Nevertheless, it is very easy to reason why the stages would be banned even if they were to be competitively considered.
If the player edits the stage and saves their changes, a separate stage with those changes will be made, while the original versions of the sample stages will remain. Even the original versions of the stages, however, can be deleted by the player.
Stages[edit]
Sample S: Hole[edit]
| Super Smash Bros. Brawl Sample S: Hole | |
|---|---|

| |
| Universe | Super Smash Bros. |
| Appears in | Brawl |
| Availability | Starter |
| Tracks available | Boss Battle Song 1 |
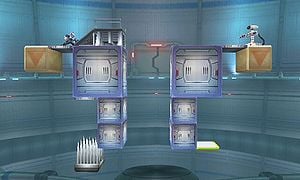
Sample S: Hole is the small size example. Its layout consists of two main towers with a hole in the middle, owing to its name.
This stage features ledges that characters cannot grab, thus recovery becomes more difficult. Characters should fight to remain on the stage. There is a small moving platform below the right tower, positioned to move between the left and right side. A character, with luck to find the platform at the same side, may use it to recover.
The left side features a spiked pit near the bottom blast line which can be used to stall.
If Olimar uses his Final Smash, End of Day, on this stage, then as his ship descends from the sky, it falls directly through the hole in the center of the stage, and causes Olimar to self-destruct. This also occurs in the diving slash for Ike's Great Aether.
A level 9 Fox or Wolf will KO itself on this stage if Player 1 does not move. This is an example of flawed AI.
The stage's description in Stage Builder makes reference to the meteor smash mechanic, and it is the first time the mechanic was officially mentioned in Smash.
Sample M: Bath[edit]
| Super Smash Bros. Brawl Sample M: Bath | |
|---|---|

| |
| Universe | Super Smash Bros. |
| Appears in | Brawl |
| Availability | Starter |
| Tracks available | Attack |
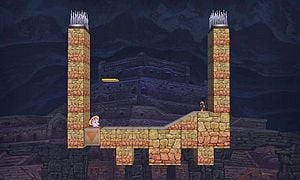
Sample M: Bath is mainly a U-shape, with the only exits being the top opening and a lone Drop Block on the left side, which is supposed to act as a bathtub drain. The right side is slightly elevated. It is the medium size example.
There is a glitch where if Peach uses her recovery move and floats into one of the blocks underneath the stage, she will remain floating until she is hit or the player moves her in another direction. This is known as the parasol glitch.
Sample L: Maze[edit]
| Super Smash Bros. Brawl Sample L: Maze | |
|---|---|

| |
| Universe | Super Smash Bros. |
| Appears in | Brawl |
| Availability | Starter |
| Tracks available | Skyworld |
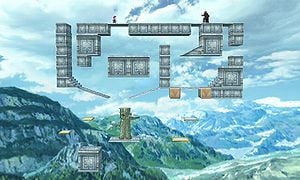
Sample L: Maze is the example of a large stage. It is a very complex stage, with many moving platforms and a few Drop Blocks.
The maze structure occupies the upper half of this stage, with the top of this structure being a flat roof, where all characters spawn. The roof is close to the top blast line, so it is easy to launch characters upward for the KO and for survivors to take hoop damage. The flatness of the roof also aids the use of horizontal projectiles, like Falco's Blaster. To escape the roof, a player can drop their character into the maze below. The presence of items may encourage players to leave the roof and visit other parts of the stage.
Below the maze, there are only a few floating platforms, with the risk of missing a platform and falling off the stage being significant. The lower right area contains only a pair of small, moving platforms. If a character rides a Drop Block into this area, they might need to jump accurately onto either of these two platforms to recover from the fall. The tree bark and small platform are also very close to the blast line, making it a dangerous camping spot.