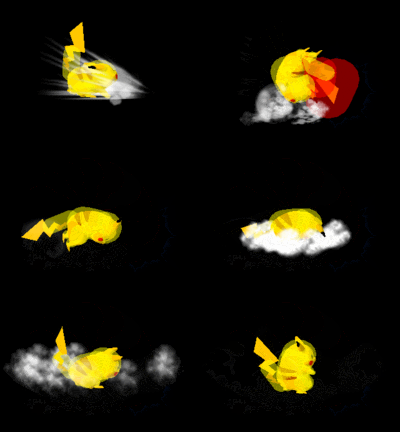
Pikachu (SSBM)/Up smash: Difference between revisions
MHStarCraft (talk | contribs) (:|) |
|||
| Line 3: | Line 3: | ||
==Overview== | ==Overview== | ||
[[File:Pikachu Up Smash Hitbox Melee.gif|thumb|Hitboxes of Pikachu's up smash.]] | [[File:Pikachu Up Smash Hitbox Melee.gif|thumb|Hitboxes of Pikachu's up smash.]] | ||
Pikachu does a back flip with its tail sticking out, doing extremely high vertical knockback. It is the strongest [[up smash]] in ''Melee'' in terms of knockback, and is also very quick, with some [[range]] as well. Like in any ''Smash Bros.'' game, this is one of Pikachu's most versatile moves, as it can [[combo]] many characters at low percentages, [[juggle]] [[fastfaller]]s at lower percentages, and is a very effective way to finish a combo, followup a move such as an {{mvsub|Pikachu|SSBM|up throw}} or {{mvsub|Pikachu|SSBM|down throw}} (depending on the opponent's [[falling speed]]), or just to KO an opponent period. The move can also be used effectively for [[shield stabbing]]. Pikachu can also use the move to combo straight into [[Thunder]] for a [[Star KO]], referred to as a "[[Thunderspike]]", though this is much less effective than in ''Smash 64'' due to Thunder having much slower speed in terms of both [[startup]] and [[ending lag]], and no longer having infinite vertical range (now striking from a fixed height from a thundercloud), as well as the generally faster falling speeds in ''Melee''. | Pikachu does a back flip with its tail sticking out, doing 17% damage, around 24% damage when fully charged, and extremely high vertical knockback. It is the strongest [[up smash]] in ''Melee'' in terms of knockback, and is also very quick, with some [[range]] as well. Like in any ''Smash Bros.'' game, this is one of Pikachu's most versatile moves, as it can [[combo]] many characters at low percentages, [[juggle]] [[fastfaller]]s at lower percentages, and is a very effective way to finish a combo, followup a move such as an {{mvsub|Pikachu|SSBM|up throw}} or {{mvsub|Pikachu|SSBM|down throw}} (depending on the opponent's [[falling speed]]), or just to KO an opponent period. The move can also be used effectively for [[shield stabbing]]. Pikachu can also use the move to combo straight into [[Thunder]] for a [[Star KO]], referred to as a "[[Thunderspike]]", though this is much less effective than in ''Smash 64'' due to Thunder having much slower speed in terms of both [[startup]] and [[ending lag]], and no longer having infinite vertical range (now striking from a fixed height from a thundercloud), as well as the generally faster falling speeds in ''Melee''. | ||
==Hitboxes== | ==Hitboxes== | ||
Revision as of 14:43, October 7, 2013
Overview
Pikachu does a back flip with its tail sticking out, doing 17% damage, around 24% damage when fully charged, and extremely high vertical knockback. It is the strongest up smash in Melee in terms of knockback, and is also very quick, with some range as well. Like in any Smash Bros. game, this is one of Pikachu's most versatile moves, as it can combo many characters at low percentages, juggle fastfallers at lower percentages, and is a very effective way to finish a combo, followup a move such as an up throw or down throw (depending on the opponent's falling speed), or just to KO an opponent period. The move can also be used effectively for shield stabbing. Pikachu can also use the move to combo straight into Thunder for a Star KO, referred to as a "Thunderspike", though this is much less effective than in Smash 64 due to Thunder having much slower speed in terms of both startup and ending lag, and no longer having infinite vertical range (now striking from a fixed height from a thundercloud), as well as the generally faster falling speeds in Melee.
Hitboxes
| ID | Part | Damage | SD | Angle | BK | KS | FKV | Radius | Bone | Offset | Clang | Rebound | Effect | G | A | Sound | ||
|---|---|---|---|---|---|---|---|---|---|---|---|---|---|---|---|---|---|---|
| Clean | ||||||||||||||||||
| 0 | 0 | Template:DamageWhenCharged | 0 | 40 | 110 | 0 | 0.007812 | 47 | 0.0 | 0.0 | 0.0 | |||||||
| 1 | 0 | Template:DamageWhenCharged | 0 | 40 | 110 | 0 | 0.0124992 | 47 | 0.007812 | 0.0109368 | -0.0031248 | |||||||
| 2 | 0 | Template:DamageWhenCharged | 0 | 40 | 100 | 0 | 0.0187488 | 47 | 0.015624 | 0.023951592 | -0.007983864 | |||||||
| Mid | ||||||||||||||||||
| 0 | 0 | Template:DamageWhenCharged | 0 | 30 | 110 | 0 | 0.007812 | 47 | 0.0 | 0.0 | 0.0 | |||||||
| 1 | 0 | Template:DamageWhenCharged | 0 | 30 | 110 | 0 | 0.0109368 | 47 | 0.007812 | 0.0109368 | -0.0031248 | |||||||
| 2 | 0 | Template:DamageWhenCharged | 0 | 30 | 110 | 0 | 0.0140616 | 47 | 0.015624 | 0.023951592 | -0.007983864 | |||||||
| Late | ||||||||||||||||||
| 0 | 0 | Template:DamageWhenCharged | 0 | 5 | 48 | 0 | 0.007812 | 47 | 0.0 | 0.0 | 0.0 | |||||||
| 1 | 0 | Template:DamageWhenCharged | 0 | 5 | 48 | 0 | 0.0109368 | 47 | 0.007812 | 0.0109368 | -0.0031248 | |||||||
| 2 | 0 | Template:DamageWhenCharged | 0 | 5 | 48 | 0 | 0.0140616 | 47 | 0.015624 | 0.023951592 | -0.007983864 | |||||||
Timing
| Charge interval | 5-6 |
|---|---|
| Clean hit | 8-10 |
| Mid hit | 11-13 |
| Late hit | 14-17 |
| Interruptible | 41 |
| Animation length | 43 |
Lag time |
Charge interval |
Hitbox |
Hitbox change |
Interruptible |
