Bowser (SSBB)/Down smash: Difference between revisions
From SmashWiki, the Super Smash Bros. wiki
Jump to navigationJump to search
SuperSqank (talk | contribs) |
SuperSqank (talk | contribs) m (→Timing) |
||
| Line 141: | Line 141: | ||
|- | |- | ||
!Interruptible | !Interruptible | ||
| | |67 | ||
|- | |- | ||
!Animation length | !Animation length | ||
| Line 148: | Line 148: | ||
{{FrameStripStart}} | {{FrameStripStart}} | ||
{{FrameStrip|t=Lag|c=4|e=LagChargeS}}{{FrameStrip|t=Lag|c=9|s=LagChargeE}}{{Repeat|6|{{FrameStrip|t=Hitbox|c=2}}{{FrameStrip|t=Lag|c=1}}}}{{FrameStrip|t=Hitbox|c=1}}{{FrameStrip|t=Lag|c= | {{FrameStrip|t=Lag|c=4|e=LagChargeS}}{{FrameStrip|t=Lag|c=9|s=LagChargeE}}{{Repeat|6|{{FrameStrip|t=Hitbox|c=2}}{{FrameStrip|t=Lag|c=1}}}}{{FrameStrip|t=Hitbox|c=1}}{{FrameStrip|t=Lag|c=34}}{{FrameStrip|t=Interruptible|c=3}} | ||
{{FrameStripEnd}} | {{FrameStripEnd}} | ||
Revision as of 08:42, October 13, 2020
Overview
Known as the Shell Blender, it involves Bowser spinning around in his shell for seven hits. The first hits draw the opponent into the attack, so it is extremely difficult to DI out of, and the final hit does moderately high knockback, and can KO reliably under 125%. This move is inferior to his Whirling Fortress as an OoS move, however, it can be used as a longer lasting and more powerful alternative. This is one of Bowser's more feared moves, as it comes out quickly, unlike the vast majority of his moves, and can be difficult to escape.
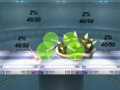
The six leadup hits.
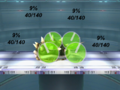
The finishing hit.
.png)
.png)
Hitboxes
| ID | Part | Damage | SD | Angle | BK | KS | FKV | Radius | Bone | Offset | SDIx | H× | T% | Clang | Rebound | Type | Effect | G | A | Sound | Direct | ||
|---|---|---|---|---|---|---|---|---|---|---|---|---|---|---|---|---|---|---|---|---|---|---|---|
| Hits 1-6 | |||||||||||||||||||||||
| 0 | 0 | 2% | 0 | 40 | 50 | 0 | 5.5 | Root | 0.0 | 4.0 | -9.0 | 1.0x | 1.0x | 0% | |||||||||
| 1 | 0 | 2% | 0 | 40 | 50 | 0 | 5.5 | Root | 0.0 | 4.0 | 9.0 | 1.0x | 1.0x | 0% | |||||||||
| 2 | 0 | 2% | 0 | 40 | 50 | 0 | 4.4 | Root | 0.0 | 11.0 | -6.0 | 1.0x | 1.0x | 0% | |||||||||
| 3 | 0 | 2% | 0 | 40 | 50 | 0 | 4.4 | Root | 0.0 | 11.0 | 6.0 | 1.0x | 1.0x | 0% | |||||||||
| Hit 7 | |||||||||||||||||||||||
| 0 | 0 | 9% | 0 | 40 | 140 | 0 | 7.0 | Root | 0.0 | 4.0 | -9.0 | 1.0x | 1.0x | 0% | |||||||||
| 1 | 0 | 9% | 0 | 40 | 140 | 0 | 7.0 | Root | 0.0 | 4.0 | 9.0 | 1.0x | 1.0x | 0% | |||||||||
| 2 | 0 | 9% | 0 | 40 | 140 | 0 | 6.0 | Root | 0.0 | 12.0 | -6.0 | 1.0x | 1.0x | 0% | |||||||||
| 3 | 0 | 9% | 0 | 40 | 140 | 0 | 6.0 | Root | 0.0 | 12.0 | 6.0 | 1.0x | 1.0x | 0% | |||||||||
Timing
| Charge interval | 4-5 |
|---|---|
| Hits 1-6 | 14-15, 17-18, 20-21, 23-24, 26-27, 29-30 |
| Hit 7 | 32 |
| Interruptible | 67 |
| Animation length | 69 |
Lag time |
Charge interval |
Hitbox |
Interruptible |