Super Smash Bros. 4

Wario (SSB4)/Down smash: Difference between revisions

From SmashWiki, the Super Smash Bros. wiki
Jump to navigationJump to search
(The description is a bit overkill, so I scaled it back quite a bit.)
(→‎Overview: added more info)
Line 3: Line 3:


==Overview==
==Overview==
Wario spins on his rear thrice to attack opponents. This move is relatively weak, being one of the weakest down smashes in the game, and the later hits get even weaker, but can still KO at reasonable percentages. Coupled with the mediocre hitbox that gets even smaller throughout and the lack of a multi-hit, it is rather unsafe on shield. It does however possess the ability to hit most characters hanging on the ledge, but Wario has better and safer options for hitting opponents on the ledge, such as dash attack or waft. Relative to Wario's other attacks, it also comes out fairly quickly, especially for a smash attack.
Wario spins on his rear thrice to attack opponents. This move is relatively weak, being one of the weakest down smashes in the game, and the later hits get even weaker, but can still KO at reasonable percentages, barring the latest possible hit. Coupled with the mediocre hitbox that gets even smaller throughout and the lack of a multi-hit, it is extremely unsafe on shield or even on hit, due to its low knockback. It does however possess the ability to hit most characters hanging on the ledge, but Wario has better and safer options for hitting opponents on the ledge, such as dash attack or Waft. Relative to Wario's other attacks, it also comes out fairly quickly, especially for a smash attack.


==Hitboxes==
==Hitboxes==

Revision as of 01:46, July 11, 2019

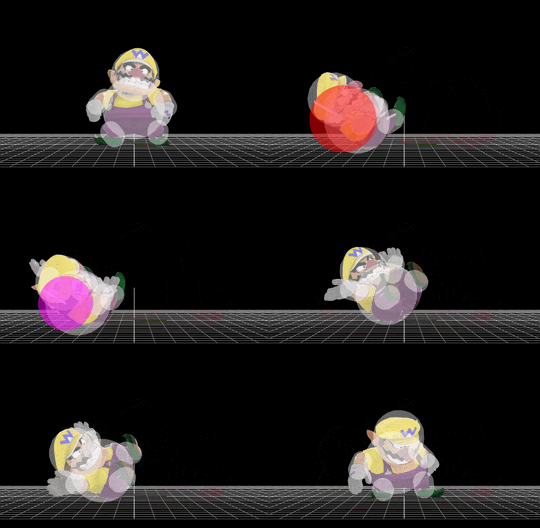
Hitbox visualization showing Wario's down smash.

Overview

Wario spins on his rear thrice to attack opponents. This move is relatively weak, being one of the weakest down smashes in the game, and the later hits get even weaker, but can still KO at reasonable percentages, barring the latest possible hit. Coupled with the mediocre hitbox that gets even smaller throughout and the lack of a multi-hit, it is extremely unsafe on shield or even on hit, due to its low knockback. It does however possess the ability to hit most characters hanging on the ledge, but Wario has better and safer options for hitting opponents on the ledge, such as dash attack or Waft. Relative to Wario's other attacks, it also comes out fairly quickly, especially for a smash attack.

Hitboxes

ID Part Damage SD Angle BK KS FKV Radius Bone Offset SDIx T% Clang Rebound Type Effect G A Sound Direct
Hit 1
0 0 13% 0 AngleIcon30.png 30 80 0 5.0 3 5.0 0.0 0.0 1.0x 1.0x 30% HitboxTableIcon(Clang).png HitboxTableIcon(Rebound).png Spin (type) Normal (effect) HitboxTableIcon(GroundedTrue).png HitboxTableIcon(AerialTrue).png L Punch SpecialsDirect.png
Hit 2
0 0 10% 0 AngleIcon30.png 20 84 0 4.0 3 5.0 0.0 0.0 1.0x 1.0x 30% HitboxTableIcon(Clang).png HitboxTableIcon(Rebound).png Spin (type) Normal (effect) HitboxTableIcon(GroundedTrue).png HitboxTableIcon(AerialTrue).png M Punch SpecialsDirect.png
Hit 3
0 0 5% 0 AngleIcon30.png 10 88 0 2.5 3 5.0 0.0 0.0 1.0x 1.0x 0% HitboxTableIcon(Clang).png HitboxTableIcon(Rebound).png Spin (type) Normal (effect) HitboxTableIcon(GroundedTrue).png HitboxTableIcon(AerialTrue).png S Punch SpecialsDirect.png

Timing

Charges between 2-3
Early hit 8-17
Clean hit 18-27
Late hit 28-36
Interruptible 68
Animation length 71
FrameIcon(Lag).png FrameIcon(LagChargeS).png FrameIcon(LagChargeE).png FrameIcon(Lag).png FrameIcon(Lag).png FrameIcon(Lag).png FrameIcon(Lag).png FrameIcon(Hitbox).png FrameIcon(Hitbox).png FrameIcon(Hitbox).png FrameIcon(Hitbox).png FrameIcon(Hitbox).png FrameIcon(Hitbox).png FrameIcon(Hitbox).png FrameIcon(Hitbox).png FrameIcon(Hitbox).png FrameIcon(HitboxChangeS).png FrameIcon(HitboxChangeE).png FrameIcon(Hitbox).png FrameIcon(Hitbox).png FrameIcon(Hitbox).png FrameIcon(Hitbox).png FrameIcon(Hitbox).png FrameIcon(Hitbox).png FrameIcon(Hitbox).png FrameIcon(Hitbox).png FrameIcon(HitboxChangeS).png FrameIcon(HitboxChangeE).png FrameIcon(Hitbox).png FrameIcon(Hitbox).png FrameIcon(Hitbox).png FrameIcon(Hitbox).png FrameIcon(Hitbox).png FrameIcon(Hitbox).png FrameIcon(Hitbox).png FrameIcon(Hitbox).png FrameIcon(Lag).png FrameIcon(Lag).png FrameIcon(Lag).png FrameIcon(Lag).png FrameIcon(Lag).png FrameIcon(Lag).png FrameIcon(Lag).png FrameIcon(Lag).png FrameIcon(Lag).png FrameIcon(Lag).png FrameIcon(Lag).png FrameIcon(Lag).png FrameIcon(Lag).png FrameIcon(Lag).png FrameIcon(Lag).png FrameIcon(Lag).png FrameIcon(Lag).png FrameIcon(Lag).png FrameIcon(Lag).png FrameIcon(Lag).png FrameIcon(Lag).png FrameIcon(Lag).png FrameIcon(Lag).png FrameIcon(Lag).png FrameIcon(Lag).png FrameIcon(Lag).png FrameIcon(Lag).png FrameIcon(Lag).png FrameIcon(Lag).png FrameIcon(Lag).png FrameIcon(Lag).png FrameIcon(Interruptible).png FrameIcon(Interruptible).png FrameIcon(Interruptible).png FrameIcon(Interruptible).png
Legend (1 square = 1 frame)
Lag
Lag time
ChargeCharge
Charge interval
Hitbox
Hitbox
FrameIcon(HitboxChangeS).pngFrameIcon(HitboxChangeE).png
Hitbox change
Interruptibility
Interruptible