Little Mac (SSB4)/Up smash: Difference between revisions
From SmashWiki, the Super Smash Bros. wiki
Jump to navigationJump to search
m (→Hitboxes: It's actually easy to mix them up if you're not wearing headphones...) |
m (Text replacement - "== ([^=])" to "== $1") |
||
| (11 intermediate revisions by 7 users not shown) | |||
| Line 1: | Line 1: | ||
{{ArticleIcons|ssb4=y}} | {{ArticleIcons|ssb4=y}} | ||
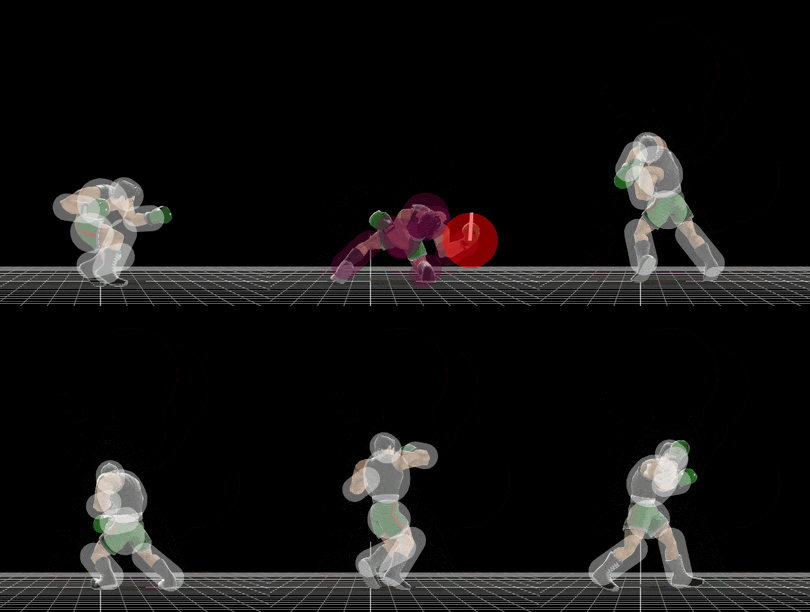
[[File:LittleMacUpSmash.gif|thumb|270px|Hitbox visualization showing Little Mac's up smash.]] | |||
==Overview== | ==Overview== | ||
{{competitive expertise}} | {{competitive expertise}} | ||
| Line 9: | Line 10: | ||
{{SSB4HitboxTableRow | {{SSB4HitboxTableRow | ||
|id=0 | |id=0 | ||
|damage=21 | |damage={{ChargedSmashDmgSSB4|21}} | ||
|sd=0 | |sd=0 | ||
|angle=86 | |angle=86 | ||
| Line 23: | Line 24: | ||
|type=Hand | |type=Hand | ||
|effect=Flame | |effect=Flame | ||
|g=1 | |||
|a=0 | |||
|ff=1.8 | |ff=1.8 | ||
|clang=t | |clang=t | ||
|slvl=L | |slvl=L | ||
|sfx= | |sfx=Kick | ||
|rebound=1 | |||
}} | }} | ||
{{HitboxTableTitle|Late hit|24}} | {{HitboxTableTitle|Late hit|24}} | ||
{{SSB4HitboxTableRow | {{SSB4HitboxTableRow | ||
|id=0 | |id=0 | ||
|damage=16 | |damage={{ChargedSmashDmgSSB4|16}} | ||
|sd=0 | |sd=0 | ||
|angle=85 | |angle=85 | ||
| Line 49: | Line 53: | ||
|slvl=L | |slvl=L | ||
|sfx=Punch | |sfx=Punch | ||
|rebound=1 | |||
}} | }} | ||
{{SSB4HitboxTableRow | {{SSB4HitboxTableRow | ||
|id=1 | |id=1 | ||
|damage=16 | |damage={{ChargedSmashDmgSSB4|16}} | ||
|sd=0 | |sd=0 | ||
|angle=85 | |angle=85 | ||
| Line 70: | Line 75: | ||
|slvl=L | |slvl=L | ||
|sfx=Punch | |sfx=Punch | ||
|rebound=1 | |||
}} | }} | ||
{{SSB4HitboxTableRow | {{SSB4HitboxTableRow | ||
|id=2 | |id=2 | ||
|damage=16 | |damage={{ChargedSmashDmgSSB4|16}} | ||
|sd=0 | |sd=0 | ||
|angle=85 | |angle=85 | ||
| Line 91: | Line 97: | ||
|slvl=L | |slvl=L | ||
|sfx=Punch | |sfx=Punch | ||
|rebound=1 | |||
}} | }} | ||
|} | |} | ||
==Timing== | ==Timing== | ||
{|class="wikitable" | {|class="wikitable" | ||
|- | |- | ||
! | !Charges between | ||
| | |6-7 | ||
|- | |- | ||
!Clean hit | !Clean hit | ||
| Line 106: | Line 112: | ||
!Late hit | !Late hit | ||
|11-14 | |11-14 | ||
|- | |||
!Super armor | |||
|8-11 | |||
|- | |- | ||
!Interruptible | !Interruptible | ||
| Line 111: | Line 120: | ||
|- | |- | ||
!Animation length | !Animation length | ||
| | |52 | ||
|} | |} | ||
{{FrameStripStart}} | {{FrameStripStart}} | ||
{{FrameStrip|t=Lag|c= | |Hitboxes {{FrameStrip|t=Lag|c=6|e=LagChargeS}}{{FrameStrip|t=Lag|c=3|s=LagChargeE}}{{FrameStrip|t=Hitbox|c=1|e=HitboxChangeS}}{{FrameStrip|t=Hitbox|c=4|s=HitboxChangeE}}{{FrameStrip|t=Lag|c=33}}{{FrameStrip|t=Interruptible|c=5}} | ||
|- | |- | ||
{{FrameStrip|t=Vulnerable|c=7}}{{FrameStrip|t= | |Armor {{FrameStrip|t=Vulnerable|c=7}}{{FrameStrip|t=Armour|c=4}}{{FrameStrip|t=Vulnerable|c=41}} | ||
{{FrameStripEnd}} | {{FrameStripEnd}} | ||
{{FrameIconLegend|lag=y|hitbox=y|hitboxchange=y|vulnerable=y| | |||
{{FrameIconLegend|lag=y|hitbox=y|hitboxchange=y|charge=y|vulnerable=y|armour=y|interruptible=y}} | |||
{{MvSubNavLittleMac|g=SSB4}} | {{MvSubNavLittleMac|g=SSB4}} | ||
[[Category:Little Mac (SSB4)]] | [[Category:Little Mac (SSB4)]] | ||
[[Category:Up smashes (SSB4)]] | [[Category:Up smashes (SSB4)]] | ||
Latest revision as of 22:23, April 12, 2022
Overview[edit]
Little Mac performs a circling uppercut. This is Little Mac's overall slowest non-special move, but also his most powerful if hit clean. It can tank any hit during startup, making it a great anti-air and KO move in general.
Hitboxes[edit]
Timing[edit]
| Charges between | 6-7 |
|---|---|
| Clean hit | 10 |
| Late hit | 11-14 |
| Super armor | 8-11 |
| Interruptible | 48 |
| Animation length | 52 |
| Hitboxes | ||||||||||||||||||||||||||||||||||||||||||||||||||||
| Armor |
Lag time |
Charge interval |
Hitbox |
Hitbox change |
Vulnerable |
Armour |
Interruptible |
|

