SSB4 Icon.png

Mr. Game & Watch (SSB4)/Up tilt: Difference between revisions

From SmashWiki, the Super Smash Bros. wiki
Jump to navigationJump to search
(New Page: {{competitive expertise}} ==Hitboxes== {{SSB4HitboxTableHeader}} {{HitboxTableTitle|Hit 1|42}} {{SSB4HitboxTableRow |id=0 |part=0 |damage=7% |angle=100 |bk=20 |ks=127 |fkv=0 |r=5.5 |b...)
 
m (Text replacement - "== ([^=])" to "== $1")
 
(6 intermediate revisions by 5 users not shown)
Line 1: Line 1:
{{ArticleIcons|ssb4=y}}
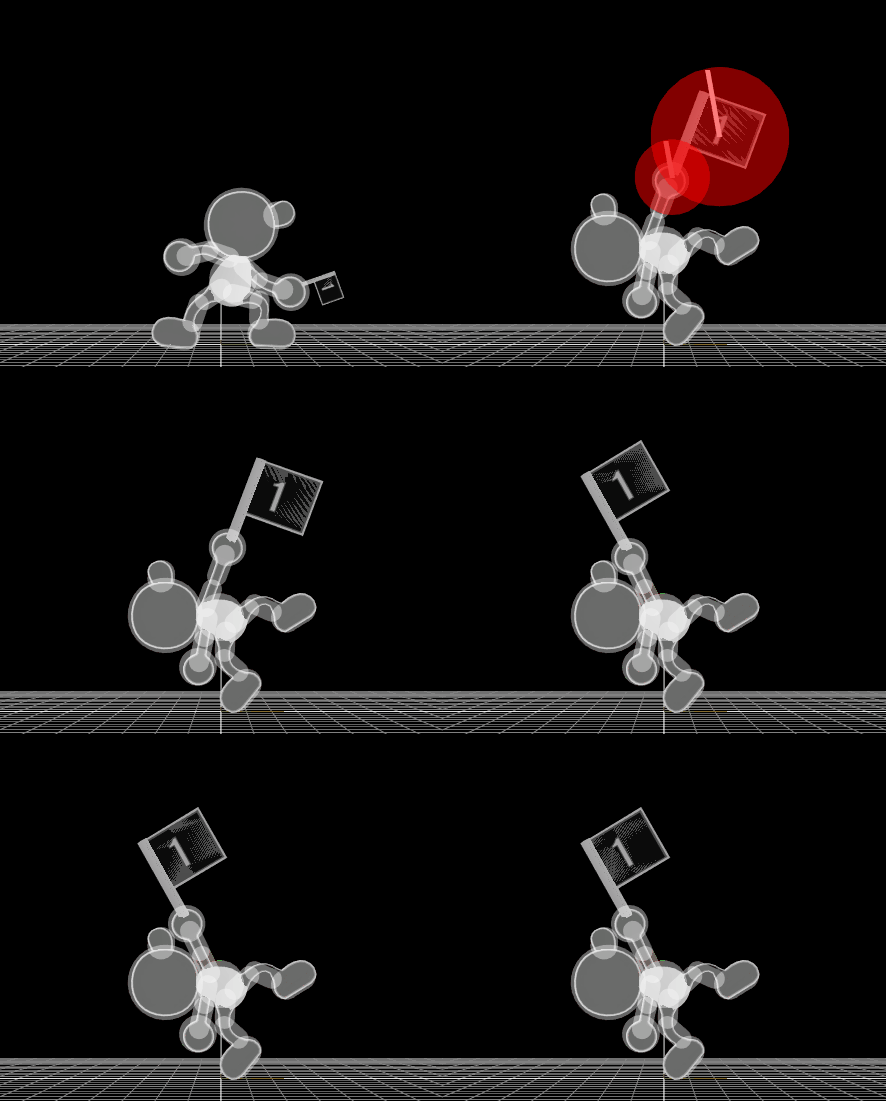
[[File:MrG&WUpTilt.gif|thumb|270px|Hitbox visualization showing Mr. Game & Watch's up tilt.]]
{{competitive expertise}}
{{technical data}}
==Update history==
{{GameIcon|ssb4}} [[1.0.6]]
*{{nerf|Up tilt's second hit's angle altered|100°|115°, hindering its combo potential.}}


==Hitboxes==
==Hitboxes==
{{SSB4HitboxTableHeader}}
{{HitboxTableTitle|Hit 1|42}}
Line 84: Line 90:
|}
|}


==Timing==
{|class="wikitable"
!Hit 1
|10-12
|-
!Hit 2
|20-22
|-
!Animation length
|35
|}
{{FrameStripStart}}
{{FrameStrip|t=Lag|c=9}}{{FrameStrip|t=Hitbox|c=3}}{{FrameStrip|t=Lag|c=7}}{{FrameStrip|t=Hitbox|c=3}}{{FrameStrip|t=Lag|c=13}}
{{FrameStripEnd}}
{{FrameIconLegend|lag=y|hitbox=y}}


{{MvSubNavMrGame&Watch|g=SSB4}}
[[Category:Mr. Game & Watch (SSB4)]]
[[Category:Up tilts (SSB4)]]

Latest revision as of 02:17, April 13, 2022

Hitbox visualization showing Mr. Game & Watch's up tilt.
Competitive.png This article or section may require competitive expertise.
You can discuss this issue on the talk page or edit this page to improve it.
Data.png This article or section may require additional technical data.
You can discuss this issue on the talk page or edit this page to improve it.

Update history[edit]

Super Smash Bros. 4 1.0.6

  • Nerf Up tilt's second hit's angle altered: 100° → 115°, hindering its combo potential.

Hitboxes[edit]

ID Part Damage SD Angle BK KS FKV Radius Bone Offset SDIx T% Clang Rebound Type Effect G A Sound Direct
Hit 1
0 0 7% 0 AngleIcon100.png 20 127 0 5.5 26 0.0 2.8 2.4 1.0x 1.0x 0% HitboxTableIcon(Clang).png HitboxTableIcon(Rebound).png TypeIcon(Weapon).png EffectIcon(Normal).png HitboxTableIcon(GroundedTrue).png HitboxTableIcon(AerialTrue).png M Kick SpecialsDirect.png
1 0 7% 0 AngleIcon100.png 20 125 0 3.0 26 0.0 -1.5 0.0 1.0x 1.0x 0% HitboxTableIcon(Clang).png HitboxTableIcon(Rebound).png TypeIcon(Weapon).png EffectIcon(Normal).png HitboxTableIcon(GroundedTrue).png HitboxTableIcon(AerialTrue).png M Kick SpecialsDirect.png
Hit 2
0 0 7% 0 AngleIcon115.png 30 125 0 5.5 26 0.0 2.8 2.4 1.0x 1.0x 0% HitboxTableIcon(Clang).png HitboxTableIcon(Rebound).png TypeIcon(Weapon).png EffectIcon(Normal).png HitboxTableIcon(GroundedTrue).png HitboxTableIcon(AerialTrue).png M Kick SpecialsDirect.png
1 0 7% 0 AngleIcon115.png 30 127 0 3.0 26 0.0 -1.5 0.0 1.0x 1.0x 0% HitboxTableIcon(Clang).png HitboxTableIcon(Rebound).png TypeIcon(Weapon).png EffectIcon(Normal).png HitboxTableIcon(GroundedTrue).png HitboxTableIcon(AerialTrue).png M Kick SpecialsDirect.png

Timing[edit]

Hit 1 10-12
Hit 2 20-22
Animation length 35
FrameIcon(Lag).png FrameIcon(Lag).png FrameIcon(Lag).png FrameIcon(Lag).png FrameIcon(Lag).png FrameIcon(Lag).png FrameIcon(Lag).png FrameIcon(Lag).png FrameIcon(Lag).png FrameIcon(Hitbox).png FrameIcon(Hitbox).png FrameIcon(Hitbox).png FrameIcon(Lag).png FrameIcon(Lag).png FrameIcon(Lag).png FrameIcon(Lag).png FrameIcon(Lag).png FrameIcon(Lag).png FrameIcon(Lag).png FrameIcon(Hitbox).png FrameIcon(Hitbox).png FrameIcon(Hitbox).png FrameIcon(Lag).png FrameIcon(Lag).png FrameIcon(Lag).png FrameIcon(Lag).png FrameIcon(Lag).png FrameIcon(Lag).png FrameIcon(Lag).png FrameIcon(Lag).png FrameIcon(Lag).png FrameIcon(Lag).png FrameIcon(Lag).png FrameIcon(Lag).png FrameIcon(Lag).png
Legend (1 square = 1 frame)
FrameIcon(Lag).png
Lag time
FrameIcon(Hitbox).png
Hitbox