Super Smash Bros. Brawl

R.O.B. (SSBB)/Back aerial

From SmashWiki, the Super Smash Bros. wiki
Jump to navigationJump to search
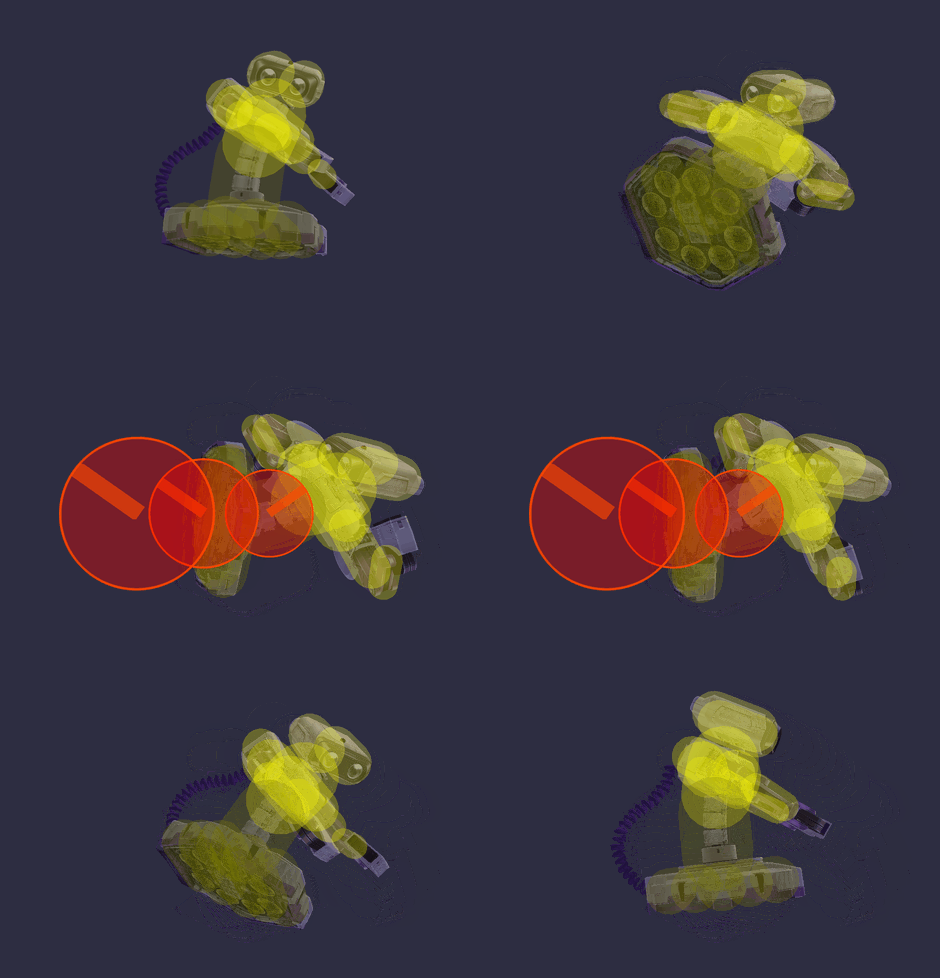
Hitbox visualization showing R.O.B.'s back aerial.

Overview[edit]

R.O.B, in midair, leans to the side, raises his base up, then releases a fiery blast from his boosters. The move, officially known as AirB, is one of R.O.B.'s best aerials: it boasts amazing range, as well as as decent KO power, and is fully disjointed. It has above-average startup for a back aerial, with the hitbox not coming out until after ⅙ of a second, but more than makes up for it with a massive autocancel window, being able to autocancel during the entirety of the move's end lag, and an absurd 15 active frames, the 7th-highest amount in the game, during which the move is at full power, unlike every other move with more active frames (with the exception of Pikachu's, which is a multi-hit), since it lacks a late hit. In addition to all these traits, AirB has the unique property of giving R.O.B a large amount of horizontal momentum in the direction opposite the blast when the hitboxes come out.

This is arguably R.O.B's best aerial in the neutral game, since the move automatically spaces itself upon use, thanks to propelling him away from the blast. This, along with the move's aforementioned range and disjoint, makes it exceedingly difficult to whiff punish. It's also very rewarding to land, as it launches opponents back with a semi-spike angle of 35° and the potential to KO Meta Knight starting at ~130% from the sides of Smashville. It's also a great edgeguarding tool: few recovery moves have the ability to challenge its incredible range, oftentimes outright losing to it. Even Mach Tornado will lose to it if the Meta Knight is unable to maneuver away. In addition, it sees use as a horizontal recovery tool due to the aforementioned push it gives R.O.B opposite the blast, potentially allowing him to get back to stage without having to use any Robo Burner fuel.

Despite these powerful traits, the move still has a few issues: the move will always apply the horizontal boost to R.O.B, even in cases where it's undesirable. This renders some potential follow-ups impossible and can lead to him cornering himself in neutral if he continually whiffs against the opponent. In addition, the move's strengths as both a neutral tool and KO option work against one another due to staling being incredibly overtuned in Brawl; however, this can be partially negated by substituting in neutral aerial, which is also a disjointed KO move. Overall, even taking these negatives into account, the move is an amazing tool for R.O.B, with a ton of use cases, and is arguably at its strongest in Brawl, as it would see a multitude of nerfs in the transition to Smash 4.

Hitboxes[edit]

ID Part Damage SD Angle BK KS FKV Radius Bone Offset SDIx T% Clang Rebound Type Effect G A Sound Direct
0 0 11% 0 AngleIcon35.png 30 100 0 7.0 0 0.0 6.0 -10.0 1.0x 1.0x 0% HitboxTableIcon(Clang).png HitboxTableIcon(Rebound).png Explosive (type) Flame (effect) HitboxTableIcon(GroundedTrue).png HitboxTableIcon(AerialTrue).png L Burn SpecialsIndirect.png
1 0 11% 0 AngleIcon35.png 30 100 0 5.0 0 0.0 6.0 -4.0 1.0x 1.0x 0% HitboxTableIcon(Clang).png HitboxTableIcon(Rebound).png Explosive (type) Flame (effect) HitboxTableIcon(GroundedTrue).png HitboxTableIcon(AerialTrue).png L Burn SpecialsIndirect.png
2 0 11% 0 AngleIcon35.png 30 100 0 4.0 0 0.0 6.0 2.0 1.0x 1.0x 0% HitboxTableIcon(Clang).png HitboxTableIcon(Rebound).png Explosive (type) Flame (effect) HitboxTableIcon(GroundedTrue).png HitboxTableIcon(AerialTrue).png L Burn SpecialsIndirect.png

Timing[edit]

Hitboxes 11-25
Ending autocancel 26-
Animation length 39
FrameIcon(Lag).png FrameIcon(Lag).png FrameIcon(Lag).png FrameIcon(Lag).png FrameIcon(Lag).png FrameIcon(Lag).png FrameIcon(Lag).png FrameIcon(Lag).png FrameIcon(Lag).png FrameIcon(Lag).png FrameIcon(Hitbox).png FrameIcon(Hitbox).png FrameIcon(Hitbox).png FrameIcon(Hitbox).png FrameIcon(Hitbox).png FrameIcon(Hitbox).png FrameIcon(Hitbox).png FrameIcon(Hitbox).png FrameIcon(Hitbox).png FrameIcon(Hitbox).png FrameIcon(Hitbox).png FrameIcon(Hitbox).png FrameIcon(Hitbox).png FrameIcon(Hitbox).png FrameIcon(Hitbox).png FrameIcon(Lag).png FrameIcon(Lag).png FrameIcon(Lag).png FrameIcon(Lag).png FrameIcon(Lag).png FrameIcon(Lag).png FrameIcon(Lag).png FrameIcon(Lag).png FrameIcon(Lag).png FrameIcon(Lag).png FrameIcon(Lag).png FrameIcon(Lag).png FrameIcon(Lag).png FrameIcon(Lag).png
FrameIcon(Blank).png FrameIcon(Blank).png FrameIcon(Blank).png FrameIcon(Blank).png FrameIcon(Blank).png FrameIcon(Blank).png FrameIcon(Blank).png FrameIcon(Blank).png FrameIcon(Blank).png FrameIcon(Blank).png FrameIcon(Blank).png FrameIcon(Blank).png FrameIcon(Blank).png FrameIcon(Blank).png FrameIcon(Blank).png FrameIcon(Blank).png FrameIcon(Blank).png FrameIcon(Blank).png FrameIcon(Blank).png FrameIcon(Blank).png FrameIcon(Blank).png FrameIcon(Blank).png FrameIcon(Blank).png FrameIcon(Blank).png FrameIcon(Blank).png FrameIcon(Autocancel).png FrameIcon(Autocancel).png FrameIcon(Autocancel).png FrameIcon(Autocancel).png FrameIcon(Autocancel).png FrameIcon(Autocancel).png FrameIcon(Autocancel).png FrameIcon(Autocancel).png FrameIcon(Autocancel).png FrameIcon(Autocancel).png FrameIcon(Autocancel).png FrameIcon(Autocancel).png FrameIcon(Autocancel).png FrameIcon(Autocancel).png

Landing lag[edit]

Animation length 12
FrameIcon(Lag).png FrameIcon(Lag).png FrameIcon(Lag).png FrameIcon(Lag).png FrameIcon(Lag).png FrameIcon(Lag).png FrameIcon(Lag).png FrameIcon(Lag).png FrameIcon(Lag).png FrameIcon(Lag).png FrameIcon(Lag).png FrameIcon(Lag).png
Legend (1 square = 1 frame)
Lag
Lag time
Hitbox
Hitbox
Auto-canceling
Autocancel