SSB4 Icon.png

Ness (SSB4)/Up special/Default: Difference between revisions

From SmashWiki, the Super Smash Bros. wiki
Jump to navigationJump to search
(added small overview)
mNo edit summary
 
(4 intermediate revisions by 3 users not shown)
Line 1: Line 1:
{{ArticleIcons|ssb4=y}}
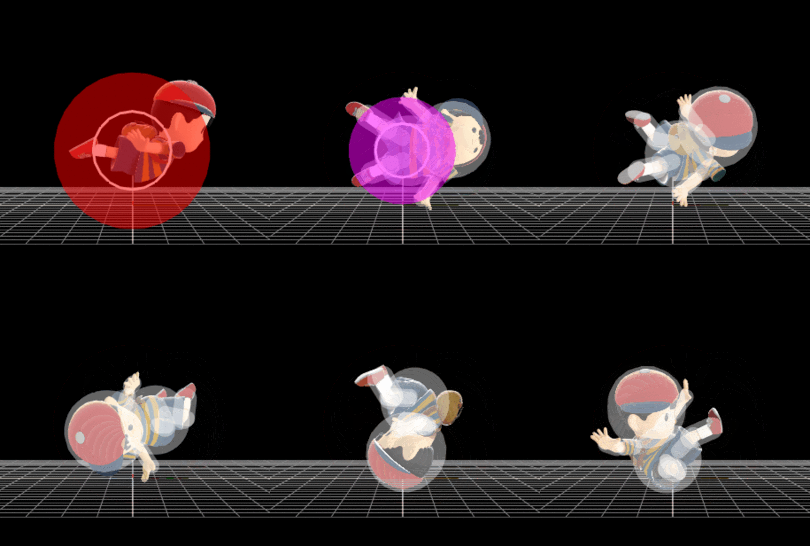
[[File:NussPKThunder2.gif|thumb|270px|Hitbox visualization showing Ness's PK Thunder 2.]]
{{disambig2|the hitbox visualization in ''[[Super Smash Bros. 4]]''|the move itself|PK Thunder}}[[File:NussPKThunder2.gif|thumb|270px|Hitbox visualization showing Ness's PK Thunder 2.]]
{{competitive expertise}}
{{technical data}}
{{technical data}}
==Overview==
==Overview==
 
Ness's only recovery move and a decent attack. [[PK Thunder]] will disappear if it hits with the head after a short period of time, however if the attack hits with the tail it will be a much weaker hit. If Ness hits himself with PK Thunder, he will be launched in the opposite direction in which he hit himself; PK Thunder 2 is a very strong move dealing a large amount of damage and KOing as early as 30% when sweetspotted. It also grants [[intangibility]] for a few frames after Ness is launched.
Ness's only recovery move and a decent attack. PK thunder will disappear if it hits with the head after a short period of time, however if the attack hits with the tail it will be a much weaker hit. If Ness hits himself with PK thunder, he will be launched in the opposite direction in which he hit himself. PK thunder 2 is a very strong move dealing lots of damage and killing as early as 30 percent when sweet spotted. PK thunder 2 also grants intangibility for a few frames after Ness is launched.


==Hitboxes==
==Hitboxes==
Line 33: Line 31:
{{MvSubNavNess|g=SSB4}}
[[Category:Ness (SSB4)]]
[[Category:Ness (SSB4)]]
[[Category:Special moves (SSB4)]]
[[Category:Up special moves (SSB4)]]
[[Category:Up special moves (SSB4)]]

Latest revision as of 14:49, May 17, 2020

This article is about the hitbox visualization in Super Smash Bros. 4. For the move itself, see PK Thunder.
Hitbox visualization showing Ness's PK Thunder 2.
Data.png This article or section may require additional technical data.
You can discuss this issue on the talk page or edit this page to improve it.

Overview[edit]

Ness's only recovery move and a decent attack. PK Thunder will disappear if it hits with the head after a short period of time, however if the attack hits with the tail it will be a much weaker hit. If Ness hits himself with PK Thunder, he will be launched in the opposite direction in which he hit himself; PK Thunder 2 is a very strong move dealing a large amount of damage and KOing as early as 30% when sweetspotted. It also grants intangibility for a few frames after Ness is launched.

Hitboxes[edit]

Timing[edit]

PK Thunder 2[edit]

Clean hit 1-10
Late hit 11-32
Intangibility 1-9
Animation length 62
FrameIcon(Hitbox).png FrameIcon(Hitbox).png FrameIcon(Hitbox).png FrameIcon(Hitbox).png FrameIcon(Hitbox).png FrameIcon(Hitbox).png FrameIcon(Hitbox).png FrameIcon(Hitbox).png FrameIcon(Hitbox).png FrameIcon(HitboxChangeS).png FrameIcon(HitboxChangeE).png FrameIcon(Hitbox).png FrameIcon(Hitbox).png FrameIcon(Hitbox).png FrameIcon(Hitbox).png FrameIcon(Hitbox).png FrameIcon(Hitbox).png FrameIcon(Hitbox).png FrameIcon(Hitbox).png FrameIcon(Hitbox).png FrameIcon(Hitbox).png FrameIcon(Hitbox).png FrameIcon(Hitbox).png FrameIcon(Hitbox).png FrameIcon(Hitbox).png FrameIcon(Hitbox).png FrameIcon(Hitbox).png FrameIcon(Hitbox).png FrameIcon(Hitbox).png FrameIcon(Hitbox).png FrameIcon(Hitbox).png FrameIcon(Hitbox).png FrameIcon(Lag).png FrameIcon(Lag).png FrameIcon(Lag).png FrameIcon(Lag).png FrameIcon(Lag).png FrameIcon(Lag).png FrameIcon(Lag).png FrameIcon(Lag).png FrameIcon(Lag).png FrameIcon(Lag).png FrameIcon(Lag).png FrameIcon(Lag).png FrameIcon(Lag).png FrameIcon(Lag).png FrameIcon(Lag).png FrameIcon(Lag).png FrameIcon(Lag).png FrameIcon(Lag).png FrameIcon(Lag).png FrameIcon(Lag).png FrameIcon(Lag).png FrameIcon(Lag).png FrameIcon(Lag).png FrameIcon(Lag).png FrameIcon(Lag).png FrameIcon(Lag).png FrameIcon(Lag).png FrameIcon(Lag).png FrameIcon(Lag).png FrameIcon(Lag).png
FrameIcon(Intangible).png FrameIcon(Intangible).png FrameIcon(Intangible).png FrameIcon(Intangible).png FrameIcon(Intangible).png FrameIcon(Intangible).png FrameIcon(Intangible).png FrameIcon(Intangible).png FrameIcon(Intangible).png FrameIcon(Vulnerable).png FrameIcon(Vulnerable).png FrameIcon(Vulnerable).png FrameIcon(Vulnerable).png FrameIcon(Vulnerable).png FrameIcon(Vulnerable).png FrameIcon(Vulnerable).png FrameIcon(Vulnerable).png FrameIcon(Vulnerable).png FrameIcon(Vulnerable).png FrameIcon(Vulnerable).png FrameIcon(Vulnerable).png FrameIcon(Vulnerable).png FrameIcon(Vulnerable).png FrameIcon(Vulnerable).png FrameIcon(Vulnerable).png FrameIcon(Vulnerable).png FrameIcon(Vulnerable).png FrameIcon(Vulnerable).png FrameIcon(Vulnerable).png FrameIcon(Vulnerable).png FrameIcon(Vulnerable).png FrameIcon(Vulnerable).png FrameIcon(Vulnerable).png FrameIcon(Vulnerable).png FrameIcon(Vulnerable).png FrameIcon(Vulnerable).png FrameIcon(Vulnerable).png FrameIcon(Vulnerable).png FrameIcon(Vulnerable).png FrameIcon(Vulnerable).png FrameIcon(Vulnerable).png FrameIcon(Vulnerable).png FrameIcon(Vulnerable).png FrameIcon(Vulnerable).png FrameIcon(Vulnerable).png FrameIcon(Vulnerable).png FrameIcon(Vulnerable).png FrameIcon(Vulnerable).png FrameIcon(Vulnerable).png FrameIcon(Vulnerable).png FrameIcon(Vulnerable).png FrameIcon(Vulnerable).png FrameIcon(Vulnerable).png FrameIcon(Vulnerable).png FrameIcon(Vulnerable).png FrameIcon(Vulnerable).png FrameIcon(Vulnerable).png FrameIcon(Vulnerable).png FrameIcon(Vulnerable).png FrameIcon(Vulnerable).png FrameIcon(Vulnerable).png FrameIcon(Vulnerable).png
Legend (1 square = 1 frame)
FrameIcon(Lag).png
Lag time
FrameIcon(Hitbox).png
Hitbox
FrameIcon(HitboxChangeS).pngFrameIcon(HitboxChangeE).png
Hitbox change
FrameIcon(Vulnerable).png
Vulnerable
FrameIcon(Intangible).png
Intangible
FrameIcon(Interruptible).png
Interruptible