Ness (SSB)/Down aerial: Difference between revisions
m (excuse me) |
m (→Gallery) |
||
| Line 12: | Line 12: | ||
==Gallery== | ==Gallery== | ||
<gallery> | <gallery> | ||
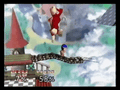
File:SSB64 Ness DJC Combo.gif|The move used to finish a combo. | File:SSB64 Ness DJC Combo.gif|The move used to finish a combo. | ||
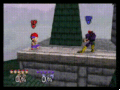
File:SSB64 Ness Shield Break Combo.gif|The move chained for a [[shield break combo]]. | File:SSB64 Ness Shield Break Combo.gif|The move chained for a [[shield break combo]]. | ||
</gallery> | </gallery> | ||
[[Category:Ness (SSB)]] | [[Category:Ness (SSB)]] | ||
Revision as of 14:01, October 3, 2013
Overview

Ness does a a stomp kick while airborne, doing 15% and very powerful knockback, while being a meteor smash, so it is great for edgeguarding. It comes out quickly despite its short range. When used with the technique double jump cancel, this move is very deadly and the technique itself plays an important role in Ness's metagame. With his down aerial, up aerial and other aerials, as well as some other moves like up tilt, Ness can potentially rack up extreme damage on opponents, and it's even possible to perform quick zero-to-death combos on them. However, this technique has since lost its known effectiveness in competitive play due to Ness's short range of his attacks, though it is, nonetheless, an excellent combo finisher and edgeguarder.
The move, when chained into itself repeatedly while DJC'd and Z-cancelled, can perform a shield break combo, though this is exceptionally difficult to perform.
The move also makes a hard "Ping!" cartoon sound effect when Ness hits an opponent with this move in the NTSC version of the game.

Gallery
The move used to finish a combo.
The move chained for a shield break combo.

