Mr. Game & Watch (SSB4)/Forward tilt: Difference between revisions
From SmashWiki, the Super Smash Bros. wiki
Jump to navigationJump to search
BrawlMatt202 (talk | contribs) No edit summary |
m (Text replacement - "== ([^=])" to "== $1") |
||
| (4 intermediate revisions by 3 users not shown) | |||
| Line 1: | Line 1: | ||
{{ArticleIcons|ssb4=y}} | {{ArticleIcons|ssb4=y}} | ||
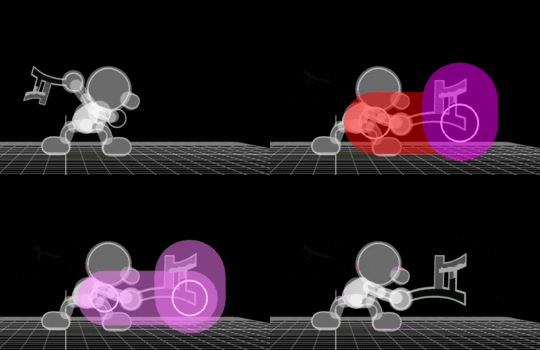
[[File:MrG&WFTilt.gif|thumb|270px|Hitbox visualization showing Mr. Game & Watch's forward tilt.]] | |||
{{competitive expertise}} | {{competitive expertise}} | ||
{{technical data}} | {{technical data}} | ||
==Overview== | |||
==Hitboxes== | ==Hitboxes== | ||
{{SSB4HitboxTableHeader|stretch=y}} | |||
{{SSB4HitboxTableHeader}} | |||
{{HitboxTableTitle|Clean hit|42}} | {{HitboxTableTitle|Clean hit|42}} | ||
{{SSB4HitboxTableRow | {{SSB4HitboxTableRow | ||
| Line 19: | Line 19: | ||
|xpos=0.0 | |xpos=0.0 | ||
|ypos=4.0 | |ypos=4.0 | ||
|ystretch=7.0 | |||
|zpos=16.0 | |zpos=16.0 | ||
|zstretch=16.0 | |||
|type=Weapon | |type=Weapon | ||
|sdi=1.0 | |sdi=1.0 | ||
| Line 38: | Line 40: | ||
|xpos=0.0 | |xpos=0.0 | ||
|ypos=4.0 | |ypos=4.0 | ||
|ystretch=4.0 | |||
|zpos=5.0 | |zpos=5.0 | ||
|zstretch=16.0 | |||
|type=Weapon | |type=Weapon | ||
|sdi=1.0 | |sdi=1.0 | ||
| Line 58: | Line 62: | ||
|xpos=0.0 | |xpos=0.0 | ||
|ypos=4.0 | |ypos=4.0 | ||
|ystretch=7.0 | |||
|zpos=16.0 | |zpos=16.0 | ||
|zstretch=16.0 | |||
|type=Weapon | |type=Weapon | ||
|sdi=1.0 | |sdi=1.0 | ||
| Line 77: | Line 83: | ||
|xpos=0.0 | |xpos=0.0 | ||
|ypos=4.0 | |ypos=4.0 | ||
|ystretch=4.0 | |||
|zpos=5.0 | |zpos=5.0 | ||
|zstretch=16.0 | |||
|type=Weapon | |type=Weapon | ||
|sdi=1.0 | |sdi=1.0 | ||
| Line 86: | Line 94: | ||
|} | |} | ||
==Timing== | |||
{|class="wikitable" | |||
!Clean hit | |||
|10 | |||
|- | |||
!Late hit | |||
|11-17 | |||
|- | |||
!Interruptible | |||
|38 | |||
|- | |||
!Animation length | |||
|44 | |||
|} | |||
{{FrameStripStart}} | |||
{{FrameStrip|t=Lag|c=9}}{{FrameStrip|t=Hitbox|c=1|e=HitboxChangeS}}{{FrameStrip|t=Hitbox|c=7|s=HitboxChangeE}}{{FrameStrip|t=Lag|c=20}}{{FrameStrip|t=Interruptible|c=7}} | |||
{{FrameStripEnd}} | |||
{{FrameIconLegend|lag=y|hitbox=y|hitboxchange=y|interruptible=y}} | |||
{{MvSubNavMrGame&Watch|g=SSB4}} | {{MvSubNavMrGame&Watch|g=SSB4}} | ||
[[Category:Mr. Game & Watch (SSB4)]] | [[Category:Mr. Game & Watch (SSB4)]] | ||
[[Category:Forward tilts (SSB4)]] | [[Category:Forward tilts (SSB4)]] | ||
Latest revision as of 00:21, April 13, 2022
Overview[edit]
Hitboxes[edit]
Timing[edit]
| Clean hit | 10 |
|---|---|
| Late hit | 11-17 |
| Interruptible | 38 |
| Animation length | 44 |
Lag time |
Hitbox |
Hitbox change |
Interruptible |
|


