Mario (SSB)/Back throw: Difference between revisions
From SmashWiki, the Super Smash Bros. wiki
Jump to navigationJump to search
MHStarCraft (talk | contribs) mNo edit summary |
(→Timing) |
||
| (17 intermediate revisions by 9 users not shown) | |||
| Line 3: | Line 3: | ||
==Overview== | ==Overview== | ||
[[File:Mario Back Throw Hitbox Smash 64.gif|thumb|The hitbox of Mario's b-throw.]] | [[File:Mario Back Throw Hitbox Smash 64.gif|thumb|The hitbox of Mario's b-throw.]] | ||
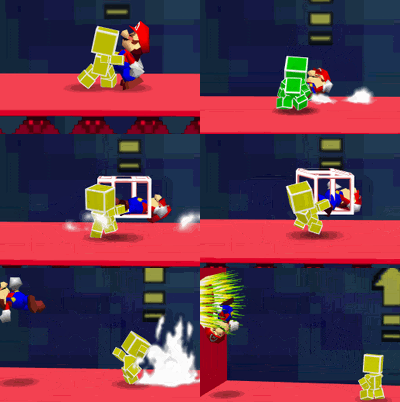
Mario grabs the opponent by the legs, swings them multiple times, and then throws them back. It is | Mario grabs the opponent by the legs, swings them multiple times, and then throws them back. It is a fairly standard back throw, dealing 16%, having high knockback and being a reliable KO move. It can KO Mario at 124% at the center of {{SSB|Dream Land}} and at 91% when used at the ledge. The throw is rather slow, although it has a collateral hitbox while Mario is swinging his opponent, which deals 10% to bystanders. This hitbox is not particularly powerful although it does grant Mario some protection while performing the throw. Considered Mario's second most useful KO move, behind his {{mvsub|Mario|SSB|up smash}}. | ||
{{ | ==Throw and Hitbox Data== | ||
{{SSB64HitboxTableHeader}} | |||
{{HitboxTableTitle|Collateral hit|24}} | |||
{{SSB64HitboxTableRow | |||
|id=0 | |||
|damage=10% | |||
|angle=361 | |||
|bk=30 | |||
|ks=80 | |||
|fkv=0 | |||
|r=150 | |||
|bn=10 | |||
|xpos=120 | |||
|ypos=0 | |||
|zpos=0 | |||
|type=Throwing | |||
|sfx=Punch | |||
|slvl=L | |||
|clang=f | |||
|rebound=f | |||
}} | |||
|} | |||
{{SSB64ThrowTableHeader}} | |||
{{HitboxTableTitle|Throw|24}} | |||
{{SSB64ThrowTableRow | |||
|id=0 | |||
|type=Throw | |||
|damage=16% | |||
|angle=45 | |||
|bk=70 | |||
|ks=70 | |||
|fkv=0 | |||
|sfx=None | |||
|slvl=S | |||
}} | |||
{{SSB64ThrowTableRow | |||
|type=Release | |||
|damage=6% | |||
|angle=361 | |||
|bk=10 | |||
|ks=100 | |||
|fkv=0 | |||
}} | |||
|} | |||
==Timing== | |||
{|class="wikitable" | |||
!Invincibility | |||
|4-17 | |||
|- | |||
!Hitbox | |||
|18-45 | |||
|- | |||
!Turnaround | |||
|46 | |||
|- | |||
!Throw release | |||
|46 | |||
|- | |||
!Animation length | |||
|66 | |||
|} | |||
{{FrameStripStart}} | |||
{{FrameStrip|t=Lag|c=17}}{{FrameStrip|t=Hitbox|c=28|e=HitboxThrowS}}{{FrameStrip|t=Lag|c=21|s=LagThrowE}} | |||
|- | |||
{{FrameStrip|t=Vulnerable|c=3}}{{FrameStrip|t=Invincible|c=14}}{{FrameStrip|t=Vulnerable|c=28|e=VulnerableStateS}}{{FrameStrip|t=Vulnerable|c=21|s=VulnerableStateE}} | |||
{{FrameStripEnd}} | |||
{{FrameIconLegend|lag=y|throw=y|vulnerable=y|state=y|invincible=y}} | |||
==Trivia== | ==Trivia== | ||
*This is a throw taken directly from {{s|mariowiki|Super Mario 64}}, where during the [[Bowser]] battles, Mario must throw Bowser into one of the explosive spiked pillars surrounding the arena. | *This is a throw taken directly from ''{{s|mariowiki|Super Mario 64}}'', where during the [[Bowser]] battles, Mario must throw Bowser into one of the explosive spiked pillars surrounding the arena. | ||
==Similar moves== | ==Similar moves== | ||
*[[Luigi (SSB)/Back throw]] | *[[Luigi (SSB)/Back throw]] | ||
{{MvSubNavMario|g=SSB}} | |||
[[Category:Mario (SSB)]] | [[Category:Mario (SSB)]] | ||
[[Category:Back throws]] | [[Category:Back throws (SSB)]] | ||
Latest revision as of 21:53, April 18, 2024
Overview[edit]
Mario grabs the opponent by the legs, swings them multiple times, and then throws them back. It is a fairly standard back throw, dealing 16%, having high knockback and being a reliable KO move. It can KO Mario at 124% at the center of Dream Land and at 91% when used at the ledge. The throw is rather slow, although it has a collateral hitbox while Mario is swinging his opponent, which deals 10% to bystanders. This hitbox is not particularly powerful although it does grant Mario some protection while performing the throw. Considered Mario's second most useful KO move, behind his up smash.
Throw and Hitbox Data[edit]
| ID | Part | Damage | SD | Angle | BK | KS | FKV | Radius | Bone | Offset | Clang | Effect | G | A | Sound | ||||||||
|---|---|---|---|---|---|---|---|---|---|---|---|---|---|---|---|---|---|---|---|---|---|---|---|
| Collateral hit | |||||||||||||||||||||||
| 0 | 0 | 10% | 0 | 30 | 80 | 0 | 150 | 10 | 120 | 0 | 0 | ||||||||||||
| Bone | Damage | Angle | BK | KS | FKV | Effect | |||||||||||||||||
|---|---|---|---|---|---|---|---|---|---|---|---|---|---|---|---|---|---|---|---|---|---|---|---|
| Throw | |||||||||||||||||||||||
| Throw | bn! | 16% | 70 | 70 | 0 | ||||||||||||||||||
| Release | bn! | 6% | 10 | 100 | 0 | ||||||||||||||||||
Timing[edit]
| Invincibility | 4-17 |
|---|---|
| Hitbox | 18-45 |
| Turnaround | 46 |
| Throw release | 46 |
| Animation length | 66 |
Lag time |
Vulnerable |
Invincible |
State change |
Throw point |
Trivia[edit]
- This is a throw taken directly from Super Mario 64, where during the Bowser battles, Mario must throw Bowser into one of the explosive spiked pillars surrounding the arena.
Similar moves[edit]
|
