SSB4 Icon.png

Little Mac (SSB4)/Side special/Default: Difference between revisions

From SmashWiki, the Super Smash Bros. wiki
Jump to navigationJump to search
m (turning some unknowns into knowns)
mNo edit summary
Line 1: Line 1:
{{ArticleIcons|ssb4=y}}
{{disambig2|the hitbox visualization in ''[[Super Smash Bros. 4]]''|the move itself|Jolt Haymaker}}
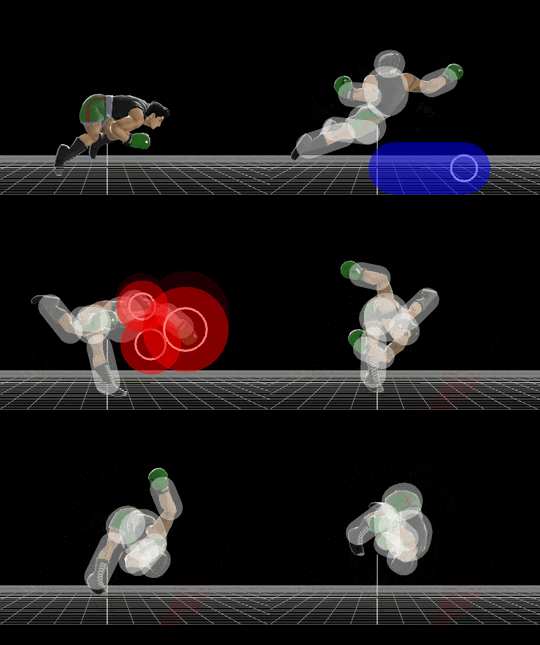
[[File:LittleMacJoltHaymaker.gif|thumb|270px|Hitbox visualization showing Little Mac's Jolt Haymaker.]]
[[File:LittleMacJoltHaymaker.gif|thumb|270px|Hitbox visualization showing Little Mac's Jolt Haymaker.]]
{{competitive expertise}}
Line 121: Line 122:
{{MvSubNavLittleMac|g=SSB4}}
[[Category:Little Mac (SSB4)]]
[[Category:Little Mac (SSB4)]]
[[Category:Special attacks (SSB4)]]
[[Category:Special moves (SSB4)]]
[[Category:Side special moves (SSB4)]]
[[Category:Side special moves (SSB4)]]

Revision as of 16:48, May 17, 2020

This article is about the hitbox visualization in Super Smash Bros. 4. For the move itself, see Jolt Haymaker.
Hitbox visualization showing Little Mac's Jolt Haymaker.
Competitive.png This article or section may require competitive expertise.
You can discuss this issue on the talk page or edit this page to improve it.
Data.png This article or section may require additional technical data.
You can discuss this issue on the talk page or edit this page to improve it.

Hitboxes

ID Part Rehit rate Damage SD Angle BK KS FKV Radius Bone Offset SDIx T% Clang Rebound Type Effect G A Sound Direct Hit bits Blockable Reflectable Absorbable Piercing Heedless No GFX Flinchless Stretch
Windbox
0 0 0 0% 0 Sakurai angle Standard 0 100 23 3.0 0 0.0 0.0 10.0 0x None 0% HitboxTableIcon(NoClang).png HitboxTableIcon(Rebound).png TypeIcon(Typeless).png EffectIcon(Normal).png HitboxTableIcon(GroundedTrue).png HitboxTableIcon(AerialFalse).png M None SpecialsIndirect.png 63 HitboxTableIcon(Blockable).png HitboxTableIcon(Unreflectable).png HitboxTableIcon(Unabsorbable).png HitboxTableIcon(False).png HitboxTableIcon(False).png HitboxTableIcon(True).png HitboxTableIcon(True).png 0.0 0.0 2.0
ID Part Damage SD Angle BK KS FKV Radius Bone Offset SDIx T% Clang Rebound Type Effect G A Sound Direct
Hit
0 0 14% 0 Sakurai angle 33 98 0 5.0 16 3.0 0.0 0.0 1.0x 1.2x 0% HitboxTableIcon(Clang).png HitboxTableIcon(Rebound).png TypeIcon(Hand).png EffectIcon(Normal).png HitboxTableIcon(GroundedTrue).png HitboxTableIcon(AerialTrue).png L Punch SpecialsDirect.png
1 0 14% 0 Sakurai angle 33 98 0 3.0 15 0.0 0.0 0.0 1.0x 1.2x 0% HitboxTableIcon(Clang).png HitboxTableIcon(Rebound).png TypeIcon(Hand).png EffectIcon(Normal).png HitboxTableIcon(GroundedTrue).png HitboxTableIcon(AerialTrue).png L Punch SpecialsDirect.png
2 0 14% 0 Sakurai angle 33 98 0 3.5 0 0.0 4.5 5.0 1.0x 1.2x 0% HitboxTableIcon(Clang).png HitboxTableIcon(Rebound).png TypeIcon(Hand).png EffectIcon(Normal).png HitboxTableIcon(GroundedTrue).png HitboxTableIcon(AerialTrue).png L Punch SpecialsDirect.png