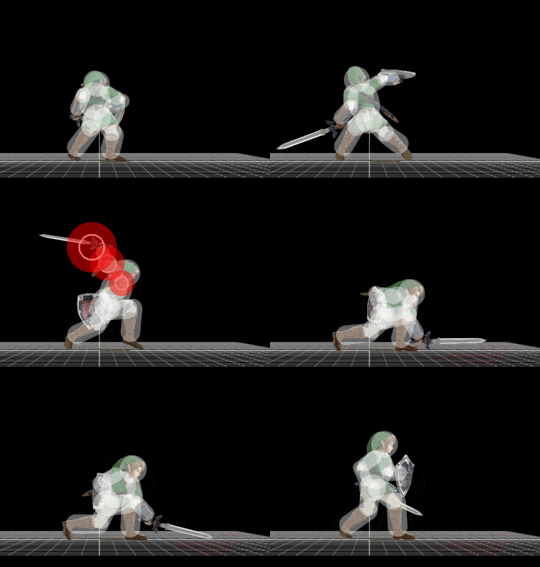
Link (SSB4)/Forward tilt: Difference between revisions
From SmashWiki, the Super Smash Bros. wiki
Jump to navigationJump to search
mNo edit summary |
m (Fixed navigation bug) |
||
| (5 intermediate revisions by 4 users not shown) | |||
| Line 1: | Line 1: | ||
{{ArticleIcons|ssb4=y}} | {{ArticleIcons|ssb4=y}} | ||
[[File:LinkFTilt.gif|thumb|270px|Hitbox visualization showing Link's forward tilt.]] | |||
==Overview== | ==Overview== | ||
{{competitive expertise}} | {{competitive expertise}} | ||
Link does an overhead strike with the Master Sword, similar to the standard vertical slash attack he performs while targeting or walking forward in most 3D ''Zelda'' games. | Link does an overhead strike with the Master Sword, similar to the standard vertical slash attack he performs while targeting or walking forward in most 3D ''Zelda'' games. Its somewhat slow startup is made up by its high damage (13%) and KOing power, and good range, but it also has moderate lag. It is safe on shield if spaced correctly. | ||
==Hitboxes== | ==Hitboxes== | ||
| Line 24: | Line 25: | ||
|ff=1.0 | |ff=1.0 | ||
|clang=t | |clang=t | ||
|slvl= | |slvl=M | ||
|sfx=Slash | |sfx=Slash | ||
}} | }} | ||
| Line 45: | Line 46: | ||
|ff=1.0 | |ff=1.0 | ||
|clang=t | |clang=t | ||
|slvl= | |slvl=M | ||
|sfx=Slash | |sfx=Slash | ||
}} | }} | ||
| Line 66: | Line 67: | ||
|ff=1.0 | |ff=1.0 | ||
|clang=f | |clang=f | ||
|slvl= | |slvl=M | ||
|sfx=Slash | |sfx=Slash | ||
}} | }} | ||
| Line 87: | Line 88: | ||
|ff=1.0 | |ff=1.0 | ||
|clang=f | |clang=f | ||
|slvl= | |slvl=M | ||
|sfx=Slash | |sfx=Slash | ||
}} | }} | ||
| Line 93: | Line 94: | ||
==Timing== | ==Timing== | ||
{|class="wikitable" | {|class="wikitable" | ||
!Hitboxes | !Hitboxes | ||
|15-19 | |15-19 | ||
|- | |||
!Tip hitbox | |||
|16-19 | |||
|- | |- | ||
!Interruptible | !Interruptible | ||
| Line 103: | Line 105: | ||
|- | |- | ||
!Animation length | !Animation length | ||
| | |39 | ||
|} | |} | ||
{{FrameStripStart}} | {{FrameStripStart}} | ||
{{FrameStrip|t=Lag|c=14}}{{FrameStrip|t=Hitbox|c= | {{FrameStrip|t=Lag|c=14}}{{FrameStrip|t=Hitbox|c=1|e=HitboxChangeS}}{{FrameStrip|t=Hitbox|c=4|s=HitboxChangeE}}{{FrameStrip|t=Lag|c=18}}{{FrameStrip|t=Interruptible|c=2}} | ||
{{FrameStripEnd}} | {{FrameStripEnd}} | ||
{{FrameIconLegend|lag=y|hitbox=y|hitboxchange=y|interruptible=y}} | |||
{{ | {{MvSubNavLink|g=SSB4}} | ||
[[Category:Link (SSB4)]] | [[Category:Link (SSB4)]] | ||
[[Category:Forward tilts (SSB4)]] | [[Category:Forward tilts (SSB4)]] | ||
Latest revision as of 14:54, December 19, 2020
Overview[edit]
Link does an overhead strike with the Master Sword, similar to the standard vertical slash attack he performs while targeting or walking forward in most 3D Zelda games. Its somewhat slow startup is made up by its high damage (13%) and KOing power, and good range, but it also has moderate lag. It is safe on shield if spaced correctly.
Hitboxes[edit]
Timing[edit]
| Hitboxes | 15-19 |
|---|---|
| Tip hitbox | 16-19 |
| Interruptible | 38 |
| Animation length | 39 |
Lag time |
Hitbox |
Hitbox change |
Interruptible |
|

