King K. Rool (SSBU)/Forward tilt

From SmashWiki, the Super Smash Bros. wiki
< King K. Rool (SSBU)
Revision as of 17:52, November 25, 2019 by Little Warrior (talk | contribs) (New Page: {{Technical data|Needs hitbox info and Belly Super Armor frames.}} {|class="wikitable" style="float:right; margin:4pt;" !colspan=5|King K. Rool forward tilt hitbox visualizations |- !...)
(diff) ← Older revision | Latest revision (diff) | Newer revision → (diff)
Jump to navigationJump to search
Data.png This article or section may require additional technical data.
The editor who added this tag elaborates: Needs hitbox info and Belly Super Armor frames.
You can discuss this issue on the talk page or edit this page to improve it.
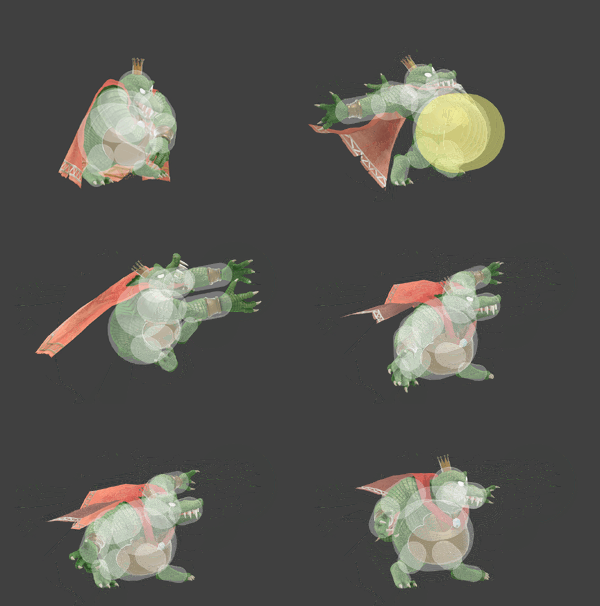
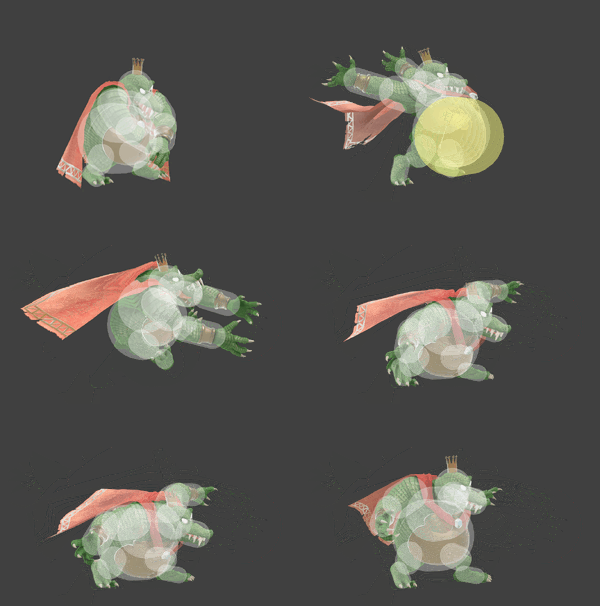
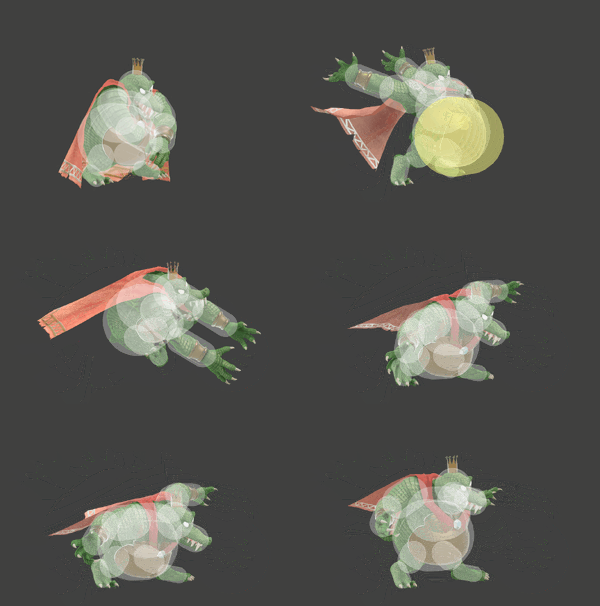
King K. Rool forward tilt hitbox visualizations
KingKRoolFTiltUpSSBU.gif
KingKRoolFtiltSSBU.gif
KingKRoolFTiltDownSSBU.gif

Overview

King K. Rool rears back and performs a lunging clap attack, similar to Donkey Kong's forward smash. Gains Belly Super Armor when he rears back to clap, making it a highly effective approach option with pivot cancelling. Sends at a semi-spike angle and is decently fast for its power (comes out on frame 12), KOing at 107% at the edge of Final Destination. It can be angled up and down, making it a decent anti-air tool when angled up, and it is capable of hitting opponents on the ledge when angled down. This move has impressive range due to a massive, disjointed hitbox surrounding K. Rool's hands. It does suffer from moderately high ending lag, though this flaw can be partially mitigated when spaced correctly. The combination of its range, Belly Super Armor, KO potential and ability to angle it up or down makes it not only one of the best moves in King K. Rool's kit, but also arguably one of the best forward tilts in the game.

Hitboxes

Timing

Hitboxes 12-13
Interruptible ?
Animation length 60
Hitboxes  FrameIcon(Lag).png FrameIcon(Lag).png FrameIcon(Lag).png FrameIcon(Lag).png FrameIcon(Lag).png FrameIcon(Lag).png FrameIcon(Lag).png FrameIcon(Lag).png FrameIcon(Lag).png FrameIcon(Lag).png FrameIcon(Lag).png FrameIcon(Lag).png FrameIcon(Hitbox).png FrameIcon(Hitbox).png FrameIcon(Lag).png FrameIcon(Lag).png FrameIcon(Lag).png FrameIcon(Lag).png FrameIcon(Lag).png FrameIcon(Lag).png FrameIcon(Lag).png FrameIcon(Lag).png FrameIcon(Lag).png FrameIcon(Lag).png FrameIcon(Lag).png FrameIcon(Lag).png FrameIcon(Lag).png FrameIcon(Lag).png FrameIcon(Lag).png FrameIcon(Lag).png FrameIcon(Lag).png FrameIcon(Lag).png FrameIcon(Lag).png FrameIcon(Lag).png FrameIcon(Lag).png FrameIcon(Lag).png FrameIcon(Lag).png FrameIcon(Lag).png FrameIcon(Lag).png FrameIcon(Lag).png FrameIcon(Lag).png FrameIcon(Lag).png FrameIcon(Lag).png FrameIcon(Lag).png FrameIcon(Lag).png FrameIcon(Lag).png FrameIcon(Lag).png FrameIcon(Lag).png FrameIcon(Lag).png FrameIcon(Lag).png FrameIcon(Lag).png FrameIcon(Lag).png FrameIcon(Lag).png FrameIcon(Lag).png FrameIcon(Lag).png FrameIcon(Lag).png FrameIcon(Lag).png FrameIcon(Lag).png FrameIcon(Lag).png
Legend (1 square = 1 frame)
FrameIcon(Lag).png
Lag time
FrameIcon(Hitbox).png
Hitbox
FrameIcon(Interruptible).png
Interruptible