Captain Falcon (SSBM)/Down aerial: Difference between revisions
m (→Related moves) |
MHStarCraft (talk | contribs) m (→Overview: bold) |
||
| Line 3: | Line 3: | ||
==Overview== | ==Overview== | ||
[[File:Captain Falcon Down Aerial Hitbox Melee.gif|thumb|Hitboxes of Captain Falcon's dair]] | [[File:Captain Falcon Down Aerial Hitbox Melee.gif|thumb|Hitboxes of Captain Falcon's dair]] | ||
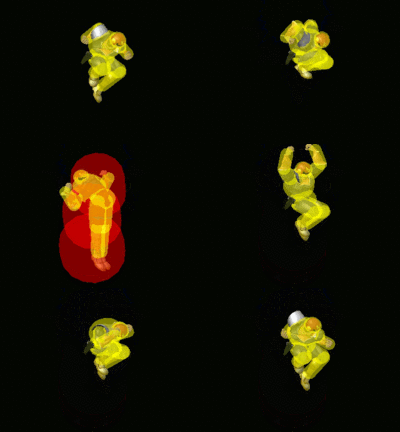
Captain Falcon does a [[stomp]] attack. This attack has two [[hitbox]]es - the lower one on the legs, and the upper one in the torso region. The lower hitbox is a powerful [[meteor smash]] (fourth strongest in the game) with some high [[hitstun]] as well, while the upper hitbox is an extremely powerful [[spike]] known as the [[Nipple Spike]] - it is the strongest spike in the game, but is also notoriously difficult to land. It can KO at low percentages, and can be combo'd into with moves such as a down aerial on a grounded opponent, [[Captain Falcon (SSBM)/Side special|Raptor Boost]], a [[Captain Falcon (SSBM)/Neutral aerial|neutral aerial]], or a [[Captain Falcon (SSBM)/Down throw|down throw]]/[[Captain Falcon (SSBM)/Up throw|up throw]] (depending on the [[falling speed]] of the opponent). When used on a grounded opponent, the move is also a great [[combo]] starter, being able to lead into an aerial, including a [[Captain Falcon (SSBM)/Forward aerial|Knee Smash]] as a finisher or another down aerial to get the opponent back onto the ground, with potential to start a [[tech-chase]]. | Captain Falcon does a [[stomp]] attack. This attack has two [[hitbox]]es - the lower one on the legs, and the upper one in the torso region. The lower hitbox is a powerful [[meteor smash]] (fourth strongest in the game) with some high [[hitstun]] as well, while the upper hitbox is an extremely powerful [[spike]] known as the '''[[Nipple Spike]]''' - it is the strongest spike in the game, but is also notoriously difficult to land. It can KO at low percentages, and can be combo'd into with moves such as a down aerial on a grounded opponent, [[Captain Falcon (SSBM)/Side special|Raptor Boost]], a [[Captain Falcon (SSBM)/Neutral aerial|neutral aerial]], or a [[Captain Falcon (SSBM)/Down throw|down throw]]/[[Captain Falcon (SSBM)/Up throw|up throw]] (depending on the [[falling speed]] of the opponent). When used on a grounded opponent, the move is also a great [[combo]] starter, being able to lead into an aerial, including a [[Captain Falcon (SSBM)/Forward aerial|Knee Smash]] as a finisher or another down aerial to get the opponent back onto the ground, with potential to start a [[tech-chase]]. | ||
<center> | <center> | ||
| Line 55: | Line 55: | ||
{{FrameIconLegend|lag=y|hitbox=y|autocancel=y|interruptible=y}} | {{FrameIconLegend|lag=y|hitbox=y|autocancel=y|interruptible=y}} | ||
==Related moves== | ==Related moves== | ||
Revision as of 19:34, August 26, 2013
Overview
Captain Falcon does a stomp attack. This attack has two hitboxes - the lower one on the legs, and the upper one in the torso region. The lower hitbox is a powerful meteor smash (fourth strongest in the game) with some high hitstun as well, while the upper hitbox is an extremely powerful spike known as the Nipple Spike - it is the strongest spike in the game, but is also notoriously difficult to land. It can KO at low percentages, and can be combo'd into with moves such as a down aerial on a grounded opponent, Raptor Boost, a neutral aerial, or a down throw/up throw (depending on the falling speed of the opponent). When used on a grounded opponent, the move is also a great combo starter, being able to lead into an aerial, including a Knee Smash as a finisher or another down aerial to get the opponent back onto the ground, with potential to start a tech-chase.
Attack data
| Animation length | 44 |
|---|---|
| Hits on frames | 16-20 |
| IASA frames | 38 |
| Autocancel frames | Before 3, after 36 |
Landing lag
| Animation length | 24 |
|---|---|
| Animation length when not L-cancelled | 12 |
| Normal | ||||||||||||||||||||||||
| L-cancelled |
Lag time |
Hitbox |
Autocancel |
Interruptible |


