Debug menu (SSBM)/DEVELOP mode: Difference between revisions
Serpent King (talk | contribs) (→Special Stage: Target Test: Mario, Link, Pikachu, Kirby.) |
Serpent King (talk | contribs) (→Special Stage: Target Test: Falcon, Fox, Falco, Luigi, Ness, Climbers, Pichu, Marth, Roy, Young Link, Samus, Game & Watch) |
||
| Line 1,281: | Line 1,281: | ||
<gallery widths=250px heights=250px perrow=4> | <gallery widths=250px heights=250px perrow=4> | ||
TFLCN-NRML-SSBM.jpg|Falcon's Target Test | |||
TFLCN-STRUCT-SSBM.png|Falcon's Target Test showing Structure | |||
TFLCN-TERRA-SSBM.png|Falcon's Target Test showing Terrain | |||
TFLCN-PLATF-SSBM.png|Falcon's Target Test showing Platforms | |||
</gallery> | </gallery> | ||
| Line 1,288: | Line 1,291: | ||
<gallery widths=250px heights=250px perrow=4> | <gallery widths=250px heights=250px perrow=4> | ||
TYLNK-NRML-SSBM.jpg|Young Link's Target Test | |||
TYLNK-STRUCT-SSBM.png|Young Link's Target Test showing Structure | |||
TYLNK-TERRA-SSBM.png|Young Link's Target Test showing Terrain | |||
TYLNK-PLATF-SSBM.png|Young Link's Target Test showing Platforms | |||
</gallery> | </gallery> | ||
| Line 1,309: | Line 1,315: | ||
<gallery widths=250px heights=250px perrow=4> | <gallery widths=250px heights=250px perrow=4> | ||
TFLCO-NRML-SSBM.jpg|Falco's Target Test | |||
TFLCO-STRUCT-SSBM.png|Falco's Target Test showing Structure | |||
TFLCO-TERRA-SSBM.png|Falco's Target Test showing Terrain | |||
TFLCO-PLATF-SSBM.png|Falco's Target Test showing Platforms | |||
</gallery> | </gallery> | ||
| Line 1,316: | Line 1,325: | ||
<gallery widths=250px heights=250px perrow=4> | <gallery widths=250px heights=250px perrow=4> | ||
TFOX-NRML-SSBM.jpg|Fox's Target Test | |||
TFOX-STRUCT-SSBM.png|Fox's Target Test showing Structure | |||
TFOX-TERRA-SSBM.png|Fox's Target Test showing Terrain | |||
TFOX-PLATF-SSBM.png|Fox's Target Test showing Platforms | |||
</gallery> | </gallery> | ||
| Line 1,323: | Line 1,335: | ||
<gallery widths=250px heights=250px perrow=4> | <gallery widths=250px heights=250px perrow=4> | ||
TCLMB-NRML-SSBM.png|Ice Climbers' Target Test | |||
TCLMB-STRUCT-SSBM.png|Ice Climbers' Target Test showing Structure | |||
TCLMB-TERRA-SSBM.png|Ice Climbers' Target Test showing Terrain | |||
TCLMB-PLATF-SSBM.png|Ice Climbers' Target Test showing Platforms | |||
</gallery> | </gallery> | ||
| Line 1,357: | Line 1,372: | ||
<gallery widths=250px heights=250px perrow=4> | <gallery widths=250px heights=250px perrow=4> | ||
TLUIG-NRML-SSBM.jpg|Luigi's Target Test | |||
TLUIG-STRUCT-SSBM.png|Luigi's Target Test showing Structure | |||
TLUIG-TERRA-SSBM.png|Luigi's Target Test showing Terrain | |||
TLUIG-PLATF-SSBM.png|Luigi's Target Test showing Platforms | |||
</gallery> | </gallery> | ||
| Line 1,364: | Line 1,382: | ||
<gallery widths=250px heights=250px perrow=4> | <gallery widths=250px heights=250px perrow=4> | ||
TMRTH-NRML-SSBM.jpg|Marth's Target Test | |||
TMRTH-STRUCT-SSBM.png|Marth's Target Test showing Structure | |||
TMRTH-TERRA-SSBM.png|Marth's Target Test showing Terrain | |||
TMRTH-PLATF-SSBM.png|Marth's Target Test showing Platforms | |||
</gallery> | </gallery> | ||
| Line 1,378: | Line 1,399: | ||
<gallery widths=250px heights=250px perrow=4> | <gallery widths=250px heights=250px perrow=4> | ||
TNESS-NRML-SSBM.jpg|Ness's Target Test | |||
TNESS-STRUCT-SSBM.png|Ness's Target Test showing Structure | |||
TNESS-TERRA-SSBM.png|Ness's Target Test showing Terrain | |||
TNESS-PLATF-SSBM.png|Ness's Target Test showing Platforms | |||
</gallery> | </gallery> | ||
| Line 1,392: | Line 1,416: | ||
<gallery widths=250px heights=250px perrow=4> | <gallery widths=250px heights=250px perrow=4> | ||
TPCHU-NRML-SSBM.jpg|Pichu's Target Test | |||
TPCHU-STRUCT-SSBM.png|Pichu's Target Test showing Structure | |||
TPCHU-TERRA-SSBM.png|Pichu's Target Test showing Terrain | |||
TPCHU-PLATF-SSBM.png|Pichu's Target Test showing Platforms | |||
</gallery> | </gallery> | ||
| Line 1,416: | Line 1,443: | ||
<gallery widths=250px heights=250px perrow=4> | <gallery widths=250px heights=250px perrow=4> | ||
TSMUS-NRML-SSBM.jpg|Samus's Target Test | |||
TSMUS-STRUCT-SSBM.png|Samus's Target Test showing Structure | |||
TSMUS-TERRA-SSBM.png|Samus's Target Test showing Terrain | |||
TSMUS-PLATF-SSBM.png|Samus's Target Test showing Platforms | |||
</gallery> | </gallery> | ||
| Line 1,444: | Line 1,474: | ||
<gallery widths=250px heights=250px perrow=4> | <gallery widths=250px heights=250px perrow=4> | ||
TMRGW-NRML-SSBM.png|Mr. Game & Watch's Target Test | |||
TMRGW-STRUCT-SSBM.png|Mr. Game & Watch's Target Test showing Structure | |||
TMRGW-TERRA-SSBM.png|Mr. Game & Watch's Target Test showing Terrain | |||
TMRGW-PLATF-SSBM.png|Mr. Game & Watch's Target Test showing Platforms | |||
</gallery> | </gallery> | ||
| Line 1,451: | Line 1,484: | ||
<gallery widths=250px heights=250px perrow=4> | <gallery widths=250px heights=250px perrow=4> | ||
TROY-NRML-SSBM.jpg|Roy's Target Test | |||
TROY-STRUCT-SSBM.png|Roy's Target Test showing Structure | |||
TROY-TERRA-SSBM.png|Roy's Target Test showing Terrain | |||
TROY-PLATF-SSBM.png|Roy's Target Test showing Platforms | |||
</gallery> | </gallery> | ||
Revision as of 22:51, May 25, 2015
DEVELOP mode is a debug mode found in Super Smash Bros. Melee accessed through its Debug Menu. The mode is activated by changing the DBLEVEL setting to DEVELOP. This will give the player extra control over matches, including free camera, visual hitbox, and frame advance.
Control
Below is a table detailing the controls for the DEVELOP mode extra controls. Through these controls, one can obtain free control over the camera, see character and stage hitboxes, frame advance the match, see the parts of the stage, and drop items (similar to Training Mode).
| Controls | Effect |
|---|---|
| Pauses the game, but without the usual pause interface. | |
| Hard Pause + |
Frame advances the match. |
| Speeds up gameplay. | |
| Shrinks the player. | |
Displays a list of statistics for each player:
| |
| Shows the current score and any bonuses won. | |
| Pauses the game normally. | |
Rotates through multiple visual effects.
| |
Toggles sound effects and music.
| |
| Displays a set of stress bars detailing the GameCube's work load. | |
| Displays each characters' animation information. | |
| Grows the player. | |
| Sets the player back to normal size. | |
Toggles collision bubbles for all characters and stage elements (See here).
| |
Toggles various stage related visuals, such as spawn points, stage structures, and grab-able ledges (See here).
| |
Toggles collision bubbles for the player (See here).
| |
| Drops item selected on the Item Menu | |
| Display Item Menu and cycle forward through the list (See here). | |
| Display Item Menu and cycle backward through the list (See here). | |
| Display Item Menu and cycle forward through Pokémon on the list (See here). | |
| Display Item Menu and cycle backward through Pokémon on the list (See here). | |
Changes the camera view.
| |
| Used to rotate the camera (free form). | |
| Zooms in and out. | |
| Pans around the screen. |
Stage Visual Key
Camera Boxes
| Item | Description |
|---|---|
| Teal Box | Camera Limit |
| Light Yellow Box | Blast Line |
| Blue Box | Camera Focal Box |
| Small Red Box | Unknown; It's attached to each characters' left |
| Small Blue Box | Unknown; It's attached to each characters' right |
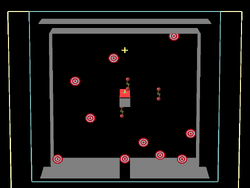
Spawn Points
| Item | Description |
|---|---|
| Blue Plus | Character Starting Point |
| Green Plus | Character Respawn Point |
| Yellow Plus | Item Spawn Point |
| Red Plus | Enemy Spawn Point |
| Magenta Plus | Trophy Spawn Point |
| White Plus | Exit Point |
Structures
| Item | Description |
|---|---|
| Gray Structure | Stage Floor |
| Red Structure | Stage Ceiling |
| Blue Structure | Stage Left Wall |
| Green Structure | Stage Right Wall |
| Gray Platform | Solid No-Grab Platform |
| Blue Platform | Drop-Through Platform |
| Red Platform | Grab Platform |
Structures that appear darker then other structures are dynamic, meaning they convert between floor, wall, and ceiling in real-time as they animate. One example is the entirety of Brinstar Depths.
Terrains
| Item | Description |
|---|---|
| Gray Platform | Basic Terrain |
| Brown Platform | Rock Terrain |
| Light Green Platform | Grass Terrain |
| Dark Red Platform | Dirt Terrain |
| Light Brown Platform | Wood Terrain |
| Blue Platform | Water Terrain |
| Light Blue Platform | Ice Terrain |
| White Platform | Snow Terrain |
| Dark Gray Platform | Light Metal Terrain |
| Dark Brown Platform | Heavy Metal Terrain |
| Yellow Platform | Alien Goop Terrain |
| Light Gray Platform | Game & Watch Terrain |
| Light Yellow Platform | Checkered Terrain |
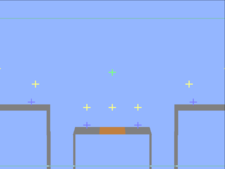
Other
| Item | Description |
|---|---|
| Orange Box | Item pickup boxes (when a character's hitbox overlaps the item box, the character can pick it up. |
Collision Bubble Key

This is a list of all hitbox colors and what they are for. For more detail, see here.
| Item | Description |
|---|---|
| Yellow | Damageable |
| Red | Attacking |
| Blue | Intangible |
| Purple | Grabbing |
| Green | Invincible |
| Aqua | Reflecting |
| Cyan | Shielding |
| Cyan-Blue | Absorbing |
| White | Special |
Stages
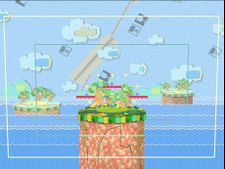
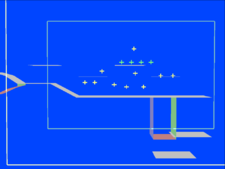
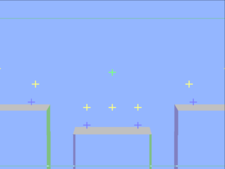
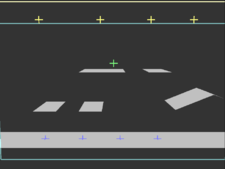
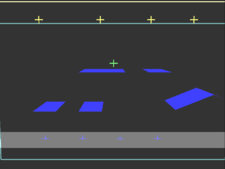
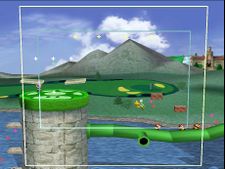
Fountain of Dreams
- Blast Zone: Fountain of Dreams has a rather large blast box.
- Spawn Points: It features 4 spawn points: 1 on each platform, but only 1 respawn point, above the top most platform.
- Item Spawn Points: The stage has 3 item spawn points all evenly spaced above the main platform, as well as 5 more evenly spaced above the camera box.
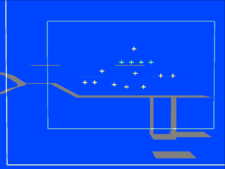
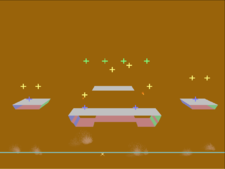
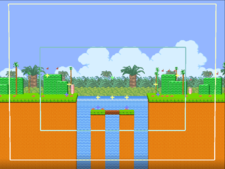
- Platforms: In addition to the main solid platform, Fountain of Dreams also features 3 drop-through platforms. The 2 lower platforms begin evenly elevated, then randomely rise and fall, while the upper-center platform remains stationary. The main platform is grab-able on both sides.
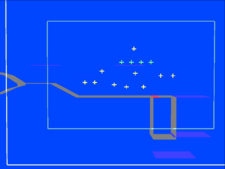
- Terrain: The 3 aerial platforms have basic terrain, while the main platform has a mostly water terrain with grass terrain on the edges.
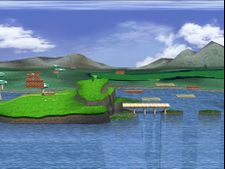
Fountain of Dreams
Fountain of Dreams showing Structure
Fountain of Dreams showing Terrain
Fountain of Dreams showing Platforms
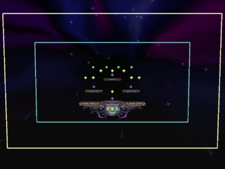
Fountain of Dreams showing the Blast Zone


Pokémon Stadium
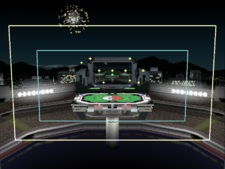
- Blast Zone: The Pokémon Stadium has a very large blast box.
- Spawn Points: Spawn points are located on either side of the lower platform, as well as above each of the 2 platforms. Although they cannot be used except for the normal form, spawn points exist in the same location in the all stage forms. The respawn point is located in the same upper-central spot in all forms as well.
- Item Spawn Points: There are a total of 10 item spawn points scattered in the air above the stage.
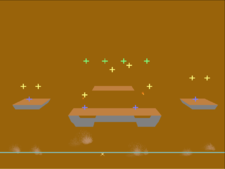
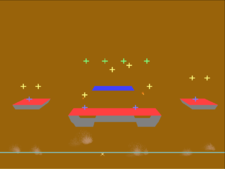
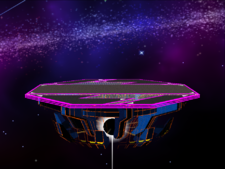
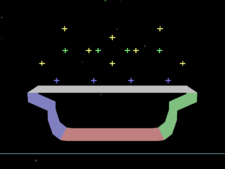
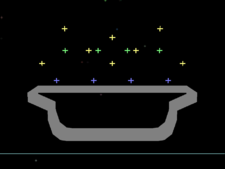
Normal Stage
- Platforms: The normal stage form features 2 evenly elevated drop-through platforms, located a short distance above the main, solid platform. The main platform is grab-able from either side.
- Terrain: This form has only basic terrain
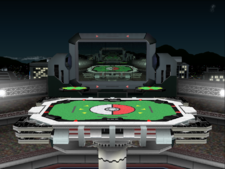
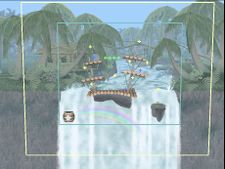
Pokémon Stadium
Pokémon Stadium showing Structure

Pokémon Stadium showing Terrain
Pokémon Stadium showing Platforms


Grass Stage
- Platforms: The grass stage form has 3 drop-through platforms, each elevated differently from the main platform. This main platform is again grab-able from both sides.
- Terrain: There are 2 central drop-through platforms that have wooden terrain, and the other right platform has grass terrain. The main platform is mostly covered with grass terrain, although there is a small strip of water terrain just left of the center.
Pokémon Stadium
Pokémon Stadium showing Structure
Pokémon Stadium showing Terrain
Pokémon Stadium showing Platforms


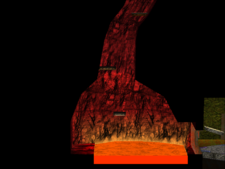
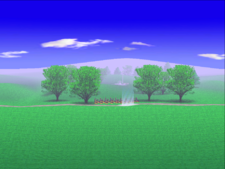
Fire Stage
- Platforms: The fire stage form has 3 drop-through platforms, although it may seem like only 2 at first. The first is the awning of the burning building on the right. The other 2 are located on the branch of the dead tree on the left. The platform technically counts as 2, as the center of it is solid. The main platform, as well as most of the dead tree (minus the aformentioned platforms on the branch) are solid, and either edge of the main platform is grab-able.
- Terrain: The edges of the main platform, as well as the awning of the burning building on the right have basic terrain. The ground under the awning and also the dead tree on the left have wooden terrain. The rest of the main platform has dirt terrain.
Pokémon Stadium
Pokémon Stadium showing Structure
Pokémon Stadium showing Terrain
Pokémon Stadium showing Platforms


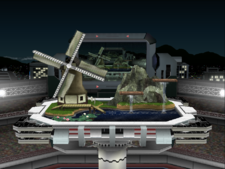
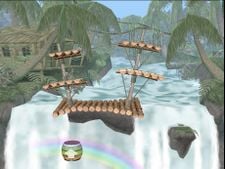
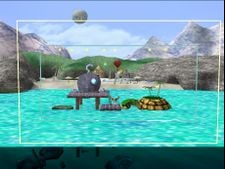
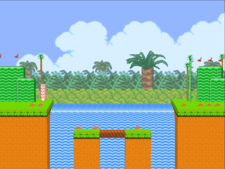
Water Stage
- Platforms: The water stage form has 3 drop-through platforms, each elevated differently. The one on the left is the windmill. The platform rotates clockwise, then disappears once it has become verticle enough. The other 2 are located towards the right and are elevated differently. The main platform is mostly flat, and again, both of its edges can be grabbed.
- Terrain: The windmill and the edges of the stage have basic terrain. The bridge on the left and the 2 aerial platforms on the right have wooden terrain and the stream has water terrain. There is also a miniscule strip of grass terrain between the left edge and the bridge.
Pokémon Stadium
Pokémon Stadium showing Structure
Pokémon Stadium showing Terrain
Pokémon Stadium showing Platforms


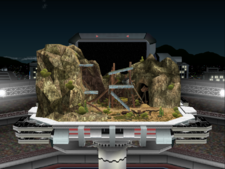
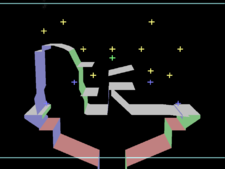
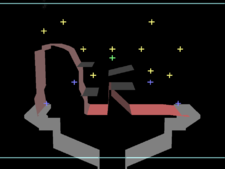
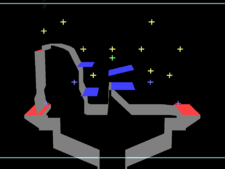
Rock Stage
- Platforms: The rock stage form features 4 drop-through platforms, all located in the center of the stage. They are arranged in 2 uneven rows of 2, and the top-right most one is slanted slightly. The main platform is flat at the right, until the center where there is a sharp slant up, then a drop down, followed by the big boulder. There is a very small wall near the right edge that can sometimes mess players up, particularly during a transformation. The main platform is grab-able on both edges, and the boulder is also grab-able from the left
- Terrain: The edges of the main platform have basic terrain. The flat areas in the left and center have dirt terrain, and the mountain has rock terrain. The aerial platforms have light-metal terrain, while the metal beam in the center has heavy-metal terrain.
Pokémon Stadium
Pokémon Stadium showing Structure
Pokémon Stadium showing Terrain
Pokémon Stadium showing Platforms
Pokémon Stadium showing the Blast Zone


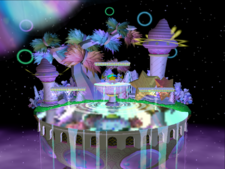
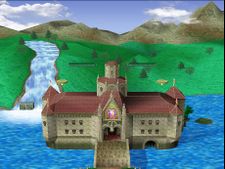
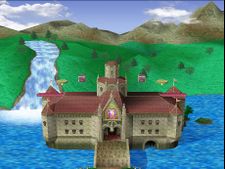
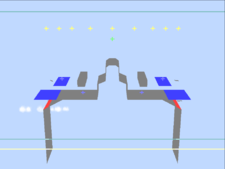
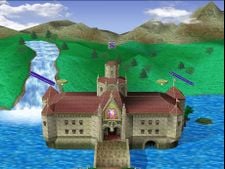
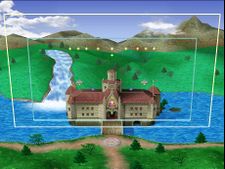
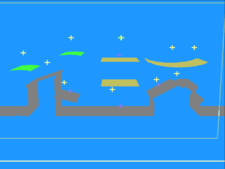
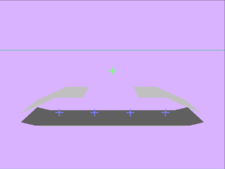
Princess Peach's Castle
- Blast Zone: Peaches Castle has a very large blast box.
- Spawn Points: Spawn points are located in the center of the flat part on either side of the central tower, as well as on both rising platforms. The respawn point is located above the tower.
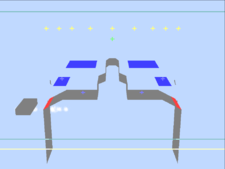
- Item Spawn Points: There are 9 item spawn points located towards the very top of the camera box. they are arranged in a straight line, 1 being directly above the tower, 4 being spaced nearly evenly above either side of the tower.
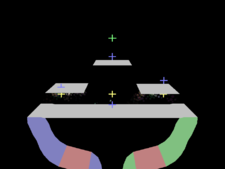
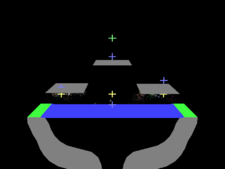
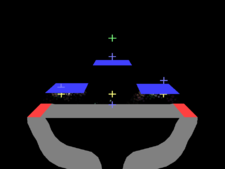
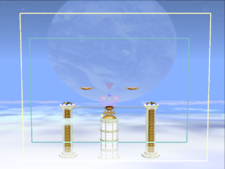
- Platforms: The entire stage is arranged symmetrically. There are 2 aerial drop-through platforms located near either edge of the stage. They will rise when a player stands on them, and will fall to their original position otherwise. The main platform is composed of a few different parts: there is a tower located in the center of the stage, with a top-most platform, as well as 2 short slanted platforms located a bit lower on either side. The stage then flattens out, then slants downward on either side. The main platform is grab-able on either edge.
- Terrain: The entire stage has basic terrain, except for the rising platforms, which have light-metal terrain.
Normal
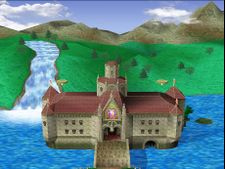
Princess Peach's Castle
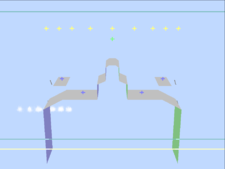
Princess Peach's Castle showing Structure
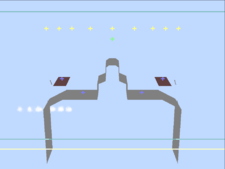
Princess Peach's Castle showing Terrain
Princess Peach's Castle showing Platforms


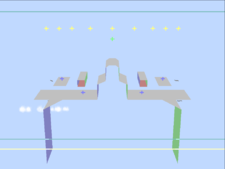
Green
- Platforms: 2 evenly elevated drop-through platforms appear on either side of the tower. A solid platform also appears off the left edge of the stage.
- Terrain: All additional platforms have basic terrain.
Princess Peach's Castle
Princess Peach's Castle showing Structure
Princess Peach's Castle showing Terrain
Princess Peach's Castle showing Platforms


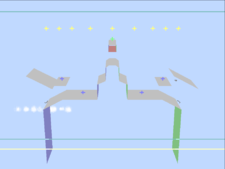
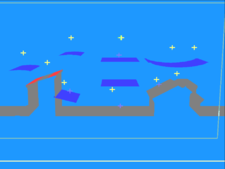
Red
- Platforms: 2 drop-through platforms appear on either side of the stage even with the lower platforms, extending them. 2 solid platforms also appear level with either side of the the lower platforms of the tower.
- Terrain: All additional platforms have basic terrain.
Princess Peach's Castle
Princess Peach's Castle showing Structure
Princess Peach's Castle showing Terrain
Princess Peach's Castle showing Platforms


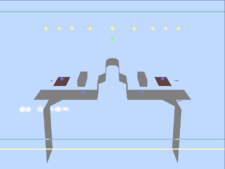
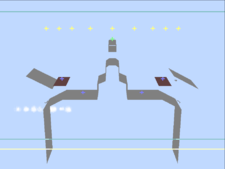
Blue
- Platforms: 2 drop-through platforms appear near either edge. They are each slanted down from the left. A solid platform also appears just above the tower.
- Terrain: All additional platforms have basic terrain.
Princess Peach's Castle
Princess Peach's Castle showing Structure
Princess Peach's Castle showing Terrain
Princess Peach's Castle showing Platforms
Princess Peach's Castle showing the Blast Zone


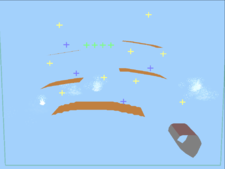
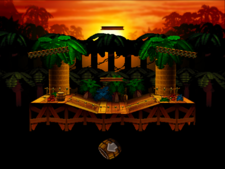
Kongo Jungle
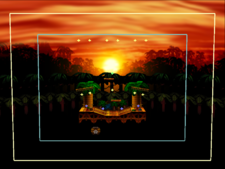
- Blast Zone: Kongo Jungle has a medium blast box.
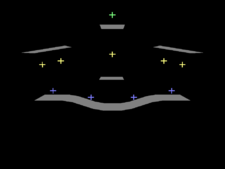
- Spawn Points: Spawn points are located on the upper-left platform, on the middle-left platform, on the middle-right platform, and towards the right of the bottom platform. There are 4 respawn points placed evenly inbetween the top-most platforms.
- Item Spawn Points: There are 9 item spawn points, scattered around the stage. 3 are located above the bottom platform, 1 above either upper platform, 1 above the middle-left platform, 2 above the middle-right platform, and 1 above the small piece of land on the right.
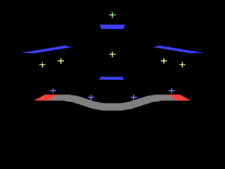
- Platforms: This stage features 4 drop-through platforms arranged in 2 uneven rows. They sway a little both randomely, and with the weight of players. The bottom platform is solid, immobile, and can be grabbed from either edge. The piece of land also solid, and can be ledge-grabbed from either side as well. In addition, a log can sometimes get caught in the side of the waterfall, and it's edges are also grab-able.
- Terrain: The bottom platform, aerial platforms, and log all have wooden terrain, while the piece of land has rock terrain.
Kongo Jungle
Kongo Jungle showing Structure
Kongo Jungle showing Terrain
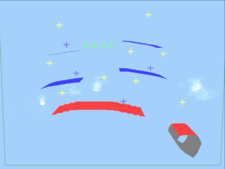
Kongo Jungle showing Platforms
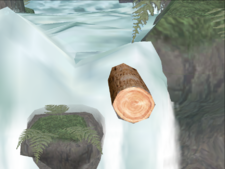
Kongo Jungle's Log
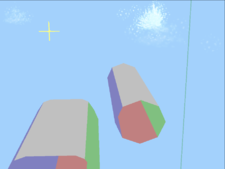
Kongo Jungle's Log showing Structure

Kongo Jungle's Log showing Terrain
Kongo Jungle's Log showing Platforms
Kongo Jungle showing the Blast Zone


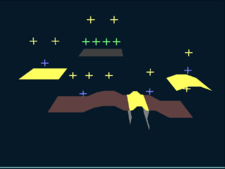
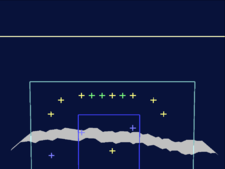
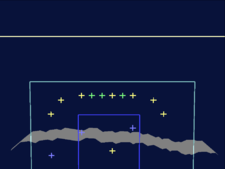
Brinstar
- Blast Zone: Brinstar has a fairly large blast box.
- Spawn Points: Spawn points are placed above the left and right aerial platforms, as well as towards the left of the main platform, and towards the right of the main platform. 4 respawn points are arranged in an even line above the upper platform.
- Item Spawn Points: There are 9 item spawn points: 2 above the left platform, 2 above the upper platform, 1 above the right platform, and 5 above the main platform.
- Platforms: The 3 aerial platforms are all drop-through. The main platform is solid, and is grab-able on either edge. Breaking the tissue connecting the left and right aerial platforms to the main platform will cause the aerial platform to slant, while breaking the fleshy goop in the center of the main platform will cause the whole thing to split.
- Terrain: The main platfom has mostly heavy metal-terrain, but the fleshy goop has alien terrain. The left and right aerial platforms also have alien terrain. The upper platform has light-metal terrain.
Brinstar
Brinstar showing Structure
Brinstar showing Terrain

Brinstar showing Platforms
Brinstar showing the Blast Zone


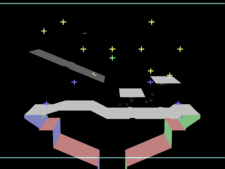
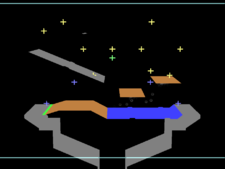
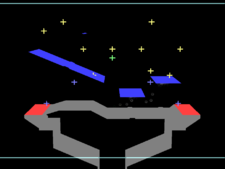
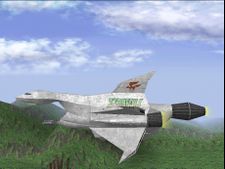
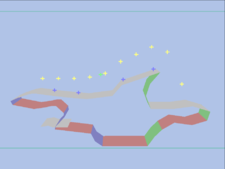
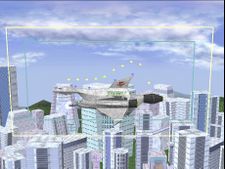
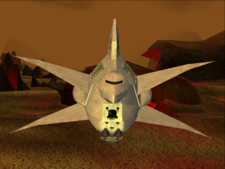
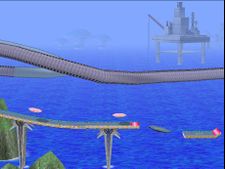
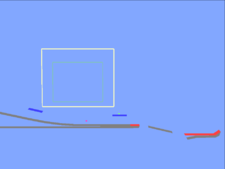
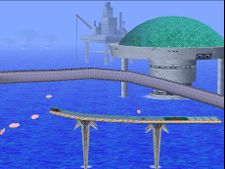
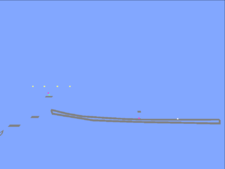
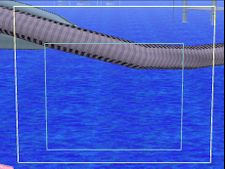
Corneria
- Blast Zone: Corneria has a medium-small blast box.
- Spawn Points: The spawn points are located on the hull and tail of the Great Fox. The respawn point is above the center of the hull.
- Item Spawn Points: There are 10 item spawn points arranged in a linear-curved fashion above the cockpit, hull, tail, and back jet of the ship.
- Platforms: The jets of the Great Fox are drop-through-able. These can be destroyed, making them intangible. The cockpit, tail, and jet have grab-able edges. Arwings and Wolfens are drop-through-able.
- Terrain: The entirety of the Great Fox has heavy-metal terrain, while the Arwings and wolfens have basic terrain.
Corneria
Corneria showing Structure
Corneria showing Terrain
Corneria showing Platforms
Corneria's Arwing

Corneria's Arwing showing Structure
Corneria's Arwing showing Terrain

Corneria's Arwing showing Platforms
Corneria showing the Blast Zone


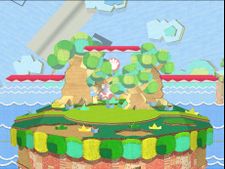
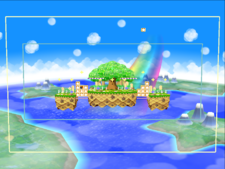
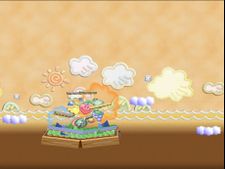
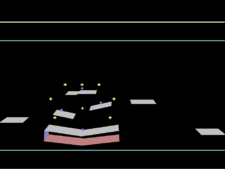
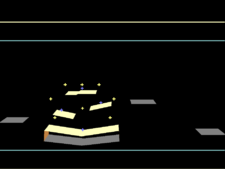
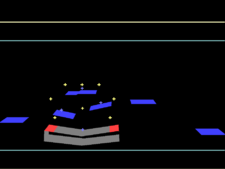
Yoshi's Story
- Blast Zone: Yoshi's Story has a medium-large blast box.
- Spawn Points: Spawn points are located 1 on each of the 3 aerial platforms and 1 in the center of the main platform. The respawn point is located above the upper platform.
- Item Spawn Points: There are 9 item spawn points: 3 above the main platform, 1 above either lower platform, 3 above the upper platform, and 1 that moves with the cloud.
- Platforms: The stage has 3 aerial drop-through platforms, and a main, solid platform with grab-able edges. There is also a cloud that travels in a set path in the lower part of the stage. The cloud is drop-through-able.
- Terrain: The entire stage has paper terrain, except for the cloud, which has basic terrain.
Yoshi's Story
Yoshi's Story showing Structure
Yoshi's Story showing Terrain

Yoshi's Story showing Platforms
Yoshi's Story showing the Blast Zone


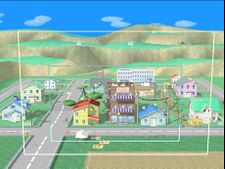
Onett
- Blast Zone: Onett has a medium-small blast box. This stage has walk-offs on both sides.
- Spawn Points: Spawn points are located on the lower roof of the left-most house, on the sidewalk near the center, on the upper drug store awning, and on the left roof of the right-most house. The respawn point is located above the upper drug store awning.
- Item Spawn Points: There are 10 item spawn points: 2 above the tree on the left (different branches), 1 above either roof of the left-most house, 1 above the upper drug store awning, 1 above the center of the sidewalk, 2 above the ribbon on the right, and 1 above either roof on the right-most house
- Platforms: The 2 tree branches, 2 drug store awnings, ribbon, and the lower roof of the left-most house all have drop-through platforms. In addition, standing on the drug store awnings for too long will cause them to fall down. The upper roof on the left-most house has 2 grab-able edges. All other platforms are solid and featureless
- Terrain: All the grounded platforms have basic terrain. The tree branches have grass terrain. The drug store awnings and the ribbon have paper terrain.
- ONETT-NRML-SSMB.jpg
Onett
- ONETT-STRUCT.png
Onett showing Structure
Onett showing Terrain
Onett showing Platforms
Onett showing the Blast Zone


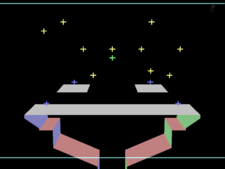
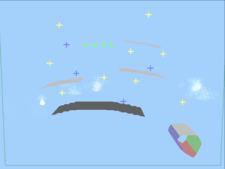
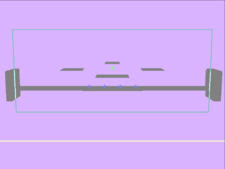
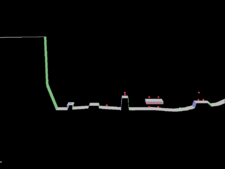
Mute City
- Blast Zone: Mute City has a very large blast box.
- Spawn Points: Spawn points are arranged evenly on the platform. They are attached to this platform. The respawn point is also attached to the platform, and it is located a bit above it.
- Item Spawn Points: Item Spawn Points are also attached to the platform, and are actually located just above the upper blast line.
Platform
- Platforms: There is a single jump-through, solid platform located just above the solid ground platform. Neither of these are drop-through-able or have grab-able edges.
- Terrain: The whole phase has basic terrain.
Mute City
Mute City showing Structure

Mute City showing Terrain
Mute City showing Platforms


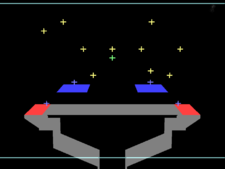
Landing 1
- Platforms: There is a single solid platform with no grab-able edges.
- Terrain: The whole phase has basic terrain.
Mute City
Mute City showing Structure
Mute City showing Terrain
Mute City showing Platforms


Landing 2
- Platforms: There are 4 drop-through platforms located above a single solid platform. This platform's edges are elevated, but are not grab-able.
- Terrain: The whole phase has basic terrain.
Mute City

Mute City showing Structure
Mute City showing Terrain
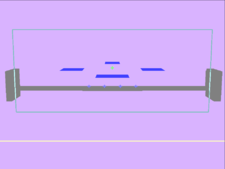
Mute City showing Platforms


Landing 3
- Platforms: There are 3 drop-through platforms on the lips of the tunnel. These again are located above a non-grab-able solid platform with elevated edges. This time, these edges come down at a slant, preventing wall jumping.
- Terrain: The whole phase has basic terrain.
Mute City
Mute City showing Structure
Mute City showing Terrain
Mute City showing Platforms


Landing 4
- Platforms: There are 2 curved drop-through platforms in the center of the stage. The main platform is solid and without grab-able edges.
- Terrain: The aerial platforms and the edges and center of the main platform have basic terrain. The healing strips on either side have ice terrain.

Mute City
Mute City showing Structure
Mute City showing Terrain
Mute City showing Platforms


Landing 5
- Platforms: There is a single drop-through platform that swivels around randomely. The main platform is solid and without grab-able edges.
- Terrain: The whole phase has basic terrain.
Mute City
Mute City showing Structure

Mute City showing Terrain
Mute City showing Platforms


Landing 6
- Platforms: There are 2 slanted drop-through platforms at either side of the stage. The main platform is again solid and without grab-able edges.
- Terrain: The whole phase has basic terrain.
Mute City
Mute City showing Structure
Mute City showing Terrain
Mute City showing Platforms
Mute City showing the Blast Zone


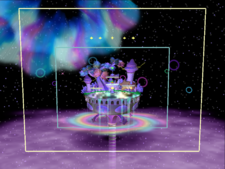
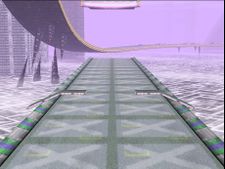
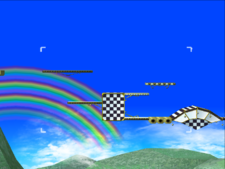
Rainbow Cruise
Opening Text
Rainbow Cruise
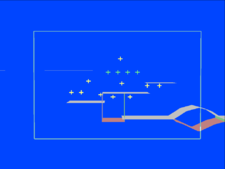
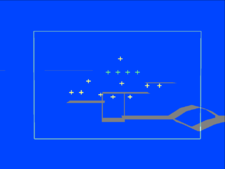
Rainbow Cruise showing Structure
Rainbow Cruise showing Terrain

Rainbow Cruise showing Platforms
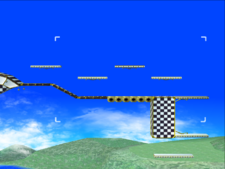
Rainbow Cruise
Rainbow Cruise showing Structure
Rainbow Cruise showing Terrain
Rainbow Cruise showing Platforms

Rainbow Cruise
Rainbow Cruise showing Structure
Rainbow Cruise showing Terrain
Rainbow Cruise showing Platforms
Rainbow Cruise
Rainbow Cruise showing Structure
Rainbow Cruise showing Terrain

Rainbow Cruise showing Platforms
Rainbow Cruise
Rainbow Cruise showing Structure
Rainbow Cruise showing Terrain

Rainbow Cruise showing Platforms
Rainbow Cruise
Rainbow Cruise showing Structure
Rainbow Cruise showing Terrain
Rainbow Cruise showing Platforms

Rainbow Cruise showing the Blast Zone


Jungle Japes
- Blast Zone: Jungle Japes has a medium-large blast box
- Spawn Points: Spawn points are located on the left platform, on either side of the center platform, and on the right platform. Respawn points are located above the upper-center platform.
- Item Spawn Points: There are 8 item spawn points: 2 above the left platform, 2 above the right platform, 2 above the upper-center platform, and 1 above either side of the center platform.
- Platforms: There is a single drop-through platform located above the solid center platform. There are then 3 solid platforms: 1 on the left, 1 in the center, and 1 on the right. All of these solid platforms are edge grab-able from either side.
- Terrain: The whole stage has wood terrain.
Jungle Japes
Jungle Japes showing Structure
Jungle Japes showing Terrain
Jungle Japes showing Platforms

Jungle Japes showing the Blast Zone


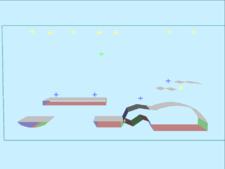
Great Bay
- Blast Zone: Great Bay has a medium blast box that extends far to the right.
- Spawn Points: Spawn points are located on either side of the main platform, on the turtle's head, and on the turtle's left tree.
- Item Spawn Points: There are 8 item spawn points: 5 arranged far over the left platform portion of the stage, 2 arranged far over the turtle, and 1 just above the turtle's back.
- Platforms: There are 3 constant solid platforms: the 3 on the left. The left-most platform shifts with players' weight. The left and right platforms have grab-able edges on either side, while the main upper platform does not. The turtle has 2 drop through platforms in its trees. After a short period of time, the turtle will sink, then after a while later reemerge, rotated clockwise. Tingle's balloon has grab-able edges. It can be destroyed.
- Terrain: The right and center platform have light-metal terrain, while the left platform has rock terrain. The turtle's head and Tingle's balloon both have basic terrain. The turtle's trees and back have grass terrain, while it's neck and behind have ice terrain.
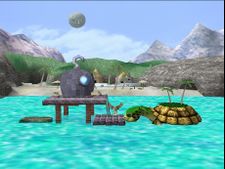
Great Bay
Great Bay showing Structure
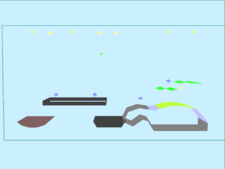
Great Bay showing Terrain
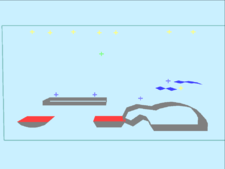
Great Bay showing Platforms
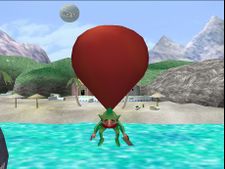
Great Bay's Tingle
Great Bay's Tingle showing Structure
Great Bay's Tingle showing Terrain

Great Bay's Tingle showing Platforms
Great Bay showing the Blast Zone


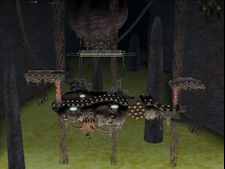
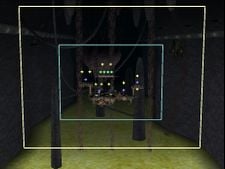
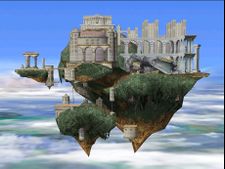
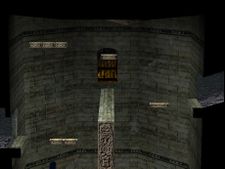
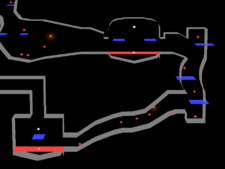
Temple
- Blast Zone: Temple has a medium-large blast box vertically, and a small blast box horizontally.
- Spawn Points: Spawn points are located on the stairs to the left of the stage, on the platform towards the top-center of the stage, in the tunnel, in the center of the stage, and on the grounded platform towards the right of the stage. The respawn point is above the tunnel entrance.
- Item Spawn Points: There are 10 item spawn points: 1 above the canopy on the left, 1 above the lower platform leading to the lower part of the stage on the left, 1 above the lower-left land mass, 1 above the lower small platform, 1 above and below the drop-through platform in the center, 1 above the small pillar, 1 above the slanted aerial platform on the right, and 1 above each of the aerial platforms on the right.
- Platforms: There are 6 drop through platforms: one above the canopy on the left, 2 leading to the lower part of the stage, 1 as the upper-center platform, 1 located on the mid-right, slanted, and 2 located above eachother on the far right. The stage also has several grab-able edges: 1 on the upper-left, one on the lower-left, one in the center above the tunnel, 1 on the right side of the lower-left land mass, 1 on either side of the small lower platform, and one on the right.
- Terrain: The right half of the lower-left land mass, the tunnel, a small portion of the ground to the right of the central pillar, and the ground to the right of the grounded platform all have dirt terrain. The rest of the stage has basic terrain.
Temple
Temple showing Structure
Temple showing Terrain
Temple showing Platforms
Temple showing the Blast Zone


Brinstar Depths
- Blast Zone: Brinstar Depths has a medium blast box.
- Spawn Points: Spawn points are located on the either side of the left portion of the main platform, the center of the upper platform, and the right portion of the main platform, after the pillar. The respawn point is located far above the middle of the stage.
- Item Spawn Points: There are 6 spawn points arranged in a line above the stage, close to the camera box.
- Platforms: There are no drop-through or grab-able edges on this stage, only 3 solid ones. Kraid rotates the whole stage at random.
- Terrain: The tops of the pillars have ice terrain. The rest of the stage is has rock terrain.
Angle 1

Brinstar Depths

Brinstar Depths showing Structure
Brinstar Depths showing Terrain
Brinstar Depths showing Platforms


Angle 2
- DEPTH-NRML2-SSBM.jpg
Brinstar Depths
- DEPTH-STRUCT2-SSBM.png
Brinstar Depths showing Structure
- DEPTH-TERRA2-SSBM.png
Brinstar Depths showing Terrain
- DEPTH-PLATF2-SSBM.png
Brinstar Depths showing Platforms
Angle 3
- DEPTH-NRML3-SSBM.jpg
Brinstar Depths
- DEPTH-STRUCT3-SSBM.png
Brinstar Depths showing Structure
- DEPTH-TERRA3-SSBM.png
Brinstar Depths showing Terrain
- DEPTH-PLATF3-SSBM.png
Brinstar Depths showing Platforms
Angle 4
- DEPTH-NRML4-SSBM.jpg
Brinstar Depths
- DEPTH-STRUCT4-SSBM.png
Brinstar Depths showing Structure
- DEPTH-TERRA4-SSBM.png
Brinstar Depths showing Terrain
- DEPTH-PLATF4-SSBM.png
Brinstar Depths showing Platforms
Angle 5
- DEPTH-NRML5-SSBM.jpg
Brinstar Depths
- DEPTH-STRUCT5-SSBM.png
Brinstar Depths showing Structure
- DEPTH-TERRA5-SSBM.png
Brinstar Depths showing Terrain
- DEPTH-PLATF5-SSBM.png
Brinstar Depths showing Platforms
Angle 6
- DEPTH-NRML6-SSBM.jpg
Brinstar Depths
- DEPTH-STRUCT6-SSBM.png
Brinstar Depths showing Structure
- DEPTH-TERRA6-SSBM.png
Brinstar Depths showing Terrain
- DEPTH-PLATF6-SSBM.png
Brinstar Depths showing Platforms
Angle 7
- DEPTH-NRML7-SSBM.jpg
Brinstar Depths
- DEPTH-STRUCT7-SSBM.png
Brinstar Depths showing Structure
- DEPTH-TERRA7-SSBM.png
Brinstar Depths showing Terrain
- DEPTH-PLATF7-SSBM.png
Brinstar Depths showing Platforms
Brinstar Depths showing the Blast Zone

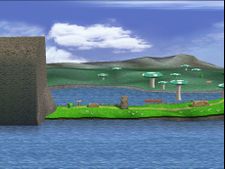
Yoshi's Island
- Blast Zone: Yoshi's Island has a medium blast box. This stage has a walk-off on the right.
- Spawn Points: Spawn points are located on the left hill, on either side of the lower flip-boxes, and on the right hill. The respawn point is located in the center of the stage, above the lower flip-boxes
- Item Spawn Points: There are 10 spawn points: 2 on the inclined hill on the left, 2 on the declined hill on the left, 2 above the lower flip-boxes, 1 above the ground to the right, and 3 on the right hill.
- Platforms: This stage has a grab-able edge on the left, and 1 more on the ground at either side of the lower flipboxes. These cannot be used unless the flip-boxes are turning. When flip-boxes turn, they become intangible.
- Terrain: The left hill has rock terrain, the flat ground has grass terrain, the right hill has dirt terrain, and the flip-boxes have basic terrain. Also, out of view, the top of the hill and land beyond that has grass terrain.
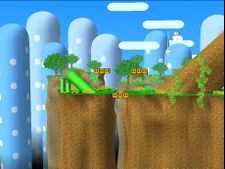
Yoshi's Island
Yoshi's Island showing Structure

Yoshi's Island showing Terrain
Yoshi's Island showing Platforms
Yoshi's Island showing the Blast Zone


Green Greens
- Blast Zone: Green Greens has a medium-large blast box.
- Spawn Points: Spawn points are located 1 on the inner side of the left and right platforms, and 1 on either side of the main platform. The respawn point is located in the center of the stage above the main platform.
- Item Spawn Points: There are 9 item spawn points: 2 above both the left and right platforms, 1 above both sets of blocks, and 3 above the main center platform.
- Platforms: The stage is split into 3 pieces by the destroyable blocks on either side of the main platform. These blocks spawn from the upper blast line and fall down to stack ontop the others. While it is difficult, it is possible to land on the blocks while they are falling. The stage has 2 drop-through platforms located above the main platform. Both sides of all 3 platforms have grab-able edges, although the edges connecting to the star block areas can only be grabbed if those blocks are destroyed.
- Terrain: The 2 aerial platforms above the main platform have paper terrain, while the rest of the stage has basic terrain.
Green Greens
Green Greens showing Structure
Green Greens showing Terrain
Green Greens showing Platforms
Green Greens showing the Blast Zone


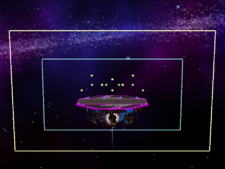
Fourside
- Blast Zone: Fourside has a medium-large blast box.
- Spawn Points: Spawn points are located on the crane platform on the left, on both the upper and lower platform of the building in the center, and on the building on the right. The spawn point is located above the upper platform of the central building.
- Item Spawn Points: There are 8 item spawn points, lined up on the camera box. They are spaced such that 3 of them are above the left building, 3 above the center building, and 2 above the right building.
- Platforms: The stage is split up into 3 parts, one for each building. The central building has 4 platforms, while the others only have one. There is also a drop-through platform connected to the crane on the left. The crane will occasionally move, raise, and lower this platform. A UFO sometimes appears in the upper left or right of the stage, creating an extra platform. It will leave after a short period of time. There are no drop-through platforms on this stage aside from the aforementioned crane platform. The stage has grab-able edges on either side of all 3 buildings.
- Terrain: The crane platform has light-metal terrain, and the UFO has ice terrain. The rest of the stage has basic terrain.
Fourside
Fourside showing Structure
Fourside showing Terrain
Fourside showing Platforms
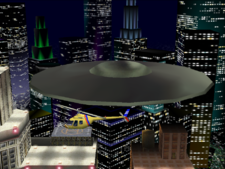
Fourside's UFO
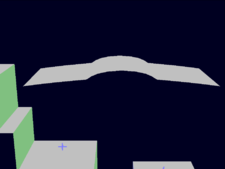
Fourside's UFO showing Structure
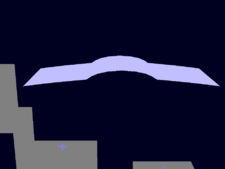
Fourside's UFO showing Terrain
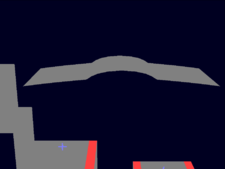
Fourside's UFO showing Platforms

Fourside showing the Blast Zone


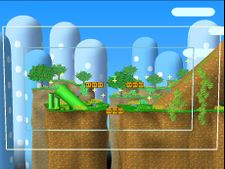
Mushroom Kingdom
- Blast Zone: Mushroom Kingdom has a very small blast box. This stage has walk-offs on either side.
- Spawn Points: Spawn points are located on the platforms on both the left and right of the stage, as well as on both upper sets of breakable blocks in the center. The respawn point is located above the lower set of breakable blocks.
- Item Spawn Points: There are 9 item spawn points: 1 far above the left platform, 1 above the sets of breakable blocks on either side of the stage, 1 above each elevator platform, 2 above the lower set of breakable blocks, 1 above the upper-left set of breakable blocks, and one right next to it, far over the lower set.
- Platforms: There are 3 solid platforms at the bottom of the stage, separated by pits. Above these pits are drop-through elevator platforms that rise and fall with players' weight. While one falls, the other will rise, and if they extend comepletely, they will both fall off into the pit, respawning a few moments later. There are also 5 sets of solid breakable blocks. These can be broken by attacks or by jumping into them. They, also will respawn. The edges on either side of both pits are grab-able.
- Terrain: The elevator platforms have light-metal terrain, while the rest of the stage has basic terrain.
Mushroom Kingdom
Mushroom Kingdom showing Structure
Mushroom Kingdom showing Terrain
Mushroom Kingdom showing Platforms
Mushroom Kingdom showing the Blast Zone


Mushroom Kingdom II
- Blast Zone: Mushroom Kingdom II has a medium-small blast box. This stage has walk-offs on either side.
- Spawn Points: Spawn points are located at the edge of the left and right platforms, as well as either side of the central platform. The respawn point is located above this central platform.
- Item Spawn Points: There are 7 item spawn points: 2 above both the left and right platforms, and 3 above the central platform.
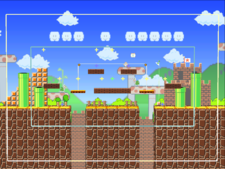
- Platforms: There are 3 solid platforms, separated by pits. Occasionally, logs that act as solid platforms will drift down the waterfall and fall down these pits. Also occasionally, Birdie will appear on his carpet, creating a moving drop-through platform. He will leave eventually. Also occasionally, Birdo may appear from either side of the stage. She can also be stood on, and she can be destroyed. The edges on either side of both pits are grab-able.
- Terrain: The logs and the wooden bridge in the center of the stage have wood terrain, Birdie's carpet has paper terrain, Birdo has ice terrain, and the rest of the stage has basic terrain.
Mushroom Kingdom II
Mushroom Kingdom II showing Structure
Mushroom Kingdom II showing Terrain
Mushroom Kingdom II showing Platforms
Mushroom Kingdom II's Log
Mushroom Kingdom II's Log showing Structure
Mushroom Kingdom II's Log showing Terrain
Mushroom Kingdom II's Log showing Platforms
Mushroom Kingdom II's Bird
Mushroom Kingdom II's Bird showing Structure
Mushroom Kingdom II's Bird showing Terrain
Mushroom Kingdom II's Bird showing Platforms
Mushroom Kingdom II's Birdo
Mushroom Kingdom II's Birdo showing Structure

Mushroom Kingdom II's Birdo showing Terrain
Mushroom Kingdom II's Birdo showing Platforms
Mushroom Kingdom II showing the Blast Zone


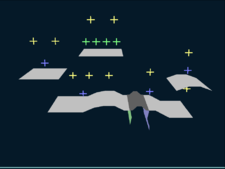
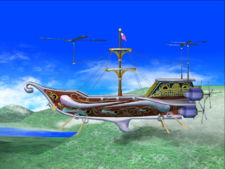
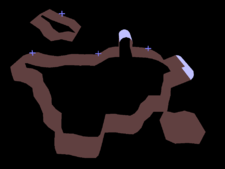
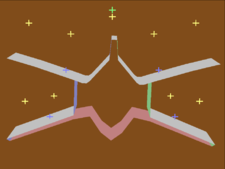
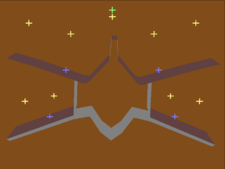
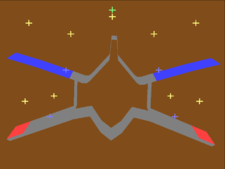
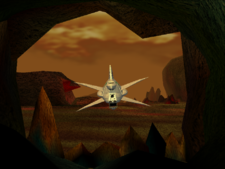
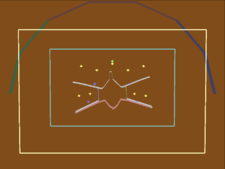
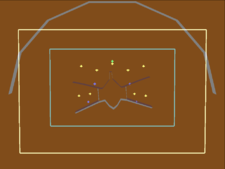
Venom
- Blast Zone: Venom has a medium-large blast box.
- Spawn Points: Spawn points are located on the inner edge of each wing. The respawn point is located above the tail.
- Item Spawn Points: There are 9 item spawn points: 2 above each wing, and one above the tail.
- Platforms: The 2 upper wings are drop-through-able, while the bottom wings are solid but have grab-able edges. Arwings and Wolfens are drop-through-able.
- Terrain: The entire stage has heavy-metal terrain
Venom
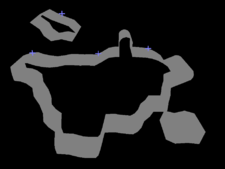
Venom showing Structure
Venom showing Terrain
Venom showing Platforms
Venom
Venom showing Structure
Venom showing Terrain
Venom showing Platforms
Venom's Arwing

Venom's Arwing showing Structure
Venom's Arwing showing Terrain
Venom's Arwing showing Platforms
Venom showing the Blast Zone


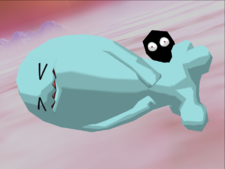
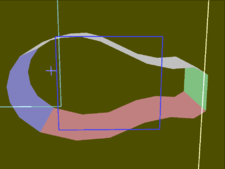
Poké Floats
- Blast Zone: Poké Floats has a medium blast box.
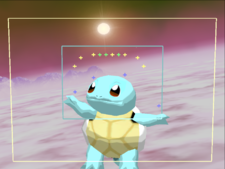
- Spawn Points: Spawn points are located on the tip edge of both Squirtle's arms, and on both edges of its head. The 4 respawn points are located in a line in the upper middle portion of the screen. Each of these points follow the screen.
- Item Spawn Points: There are 10 item spawn points, stretching across the entire top of the camera box. They are arranged in an arc. These points follow the screen
- Terrain: Every float in this stage has full basic terrain.
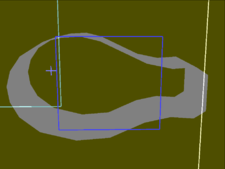
Squirtle
- Platforms: Squirtle has all solid platforms, comprised of its head and arms.

Squirtle
Squirtle showing Structure
Squirtle showing Terrain
Squirtle showing Platforms


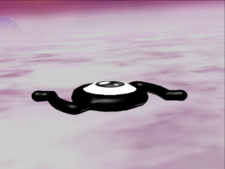
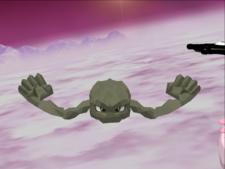
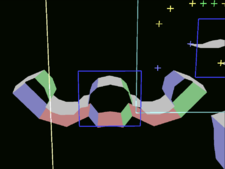
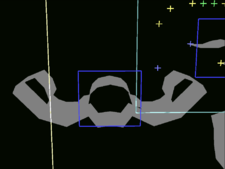
Onix
- Platforms: Onix has one big solid platform. The platform has several bumps and curves.
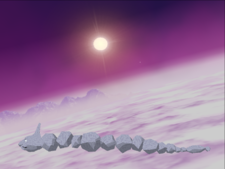
Onix
Onix showing Structure
Onix showing Terrain
Onix showing Platforms


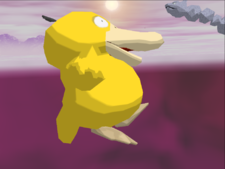
Psyduck
- Platforms: Psyduck has all solid platforms, comprised of its head and bill.
Psyduck
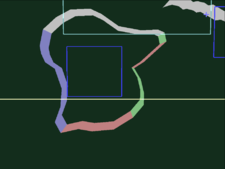
Psyduck showing Structure
Psyduck showing Terrain
Psyduck showing Platforms


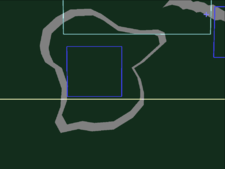
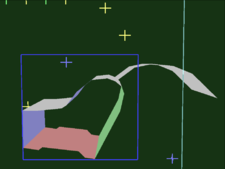
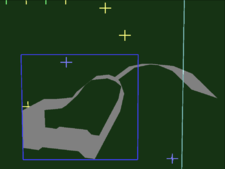
Chikorita
- Platforms: Chickorita's body is a solid platform, while its leaf is a drop-through platform.
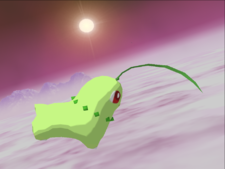
Chikorita
Chikorita showing Structure
Chikorita showing Terrain
Chikorita showing Platforms


Weezing
- Platforms: Weezing has one big solid platform. The platform is basically just the 2 curves for each head.

Weezing
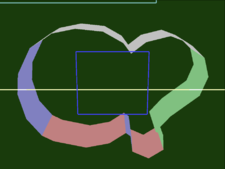
Weezing showing Structure

Weezing showing Terrain
Weezing showing Platforms


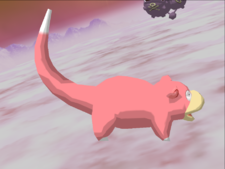
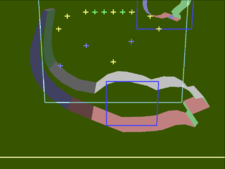
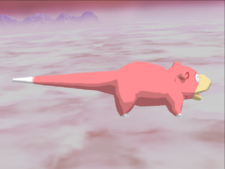
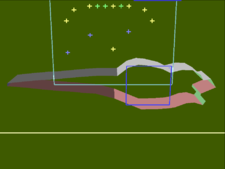
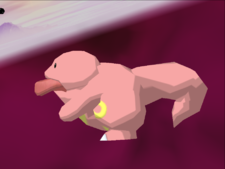
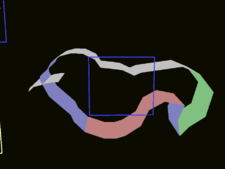
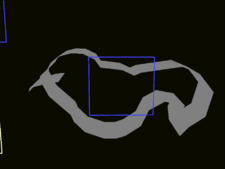
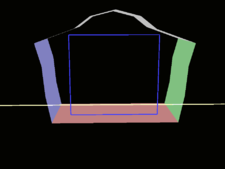
Slowpoke
- Platforms: Slowpoke's body and part of the tail is one big platform with a few bumps and curves. The tail acts as a wall and a ceiling before it lowers, where it becomes a floor.
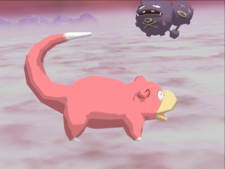
Slowpoke
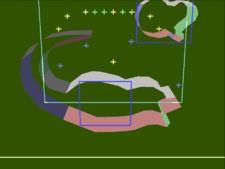
Slowpoke showing Structure

Slowpoke showing Terrain
Slowpoke showing Platforms
Slowpoke
Slowpoke showing Structure
Slowpoke
Slowpoke showing Structure


Porygon
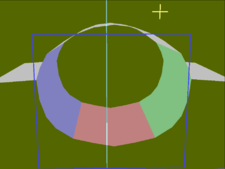
- Platforms: Porygon has all solid platforms, comprised of its head, body, and tail.
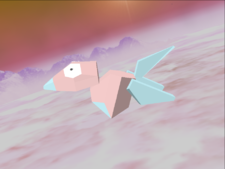
Porygon
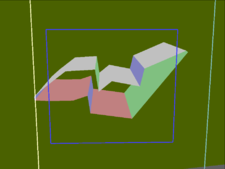
Porygon showing Structure
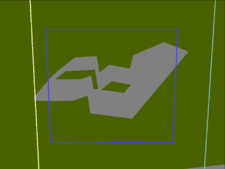
Porygon showing Terrain
Porygon showing Platforms


Wooper
- Platforms: Wooper's head is a curved solid platform, and its branches are dropthrough platforms. The body and feet never become solid.

Wooper
Wooper showing Structure
Wooper showing Terrain
Wooper showing Platforms


Sudowoodo
- Platforms: Sudowoodo's head branches, head, and right leg and foot are solid platforms, while its right arm is a drop-through platform. There is a piece of solid platform in the middle of the hand. Interestingly the left side of sudowoodo has no platforms, presumably because developers did not expect anyone to attempt to get over there.
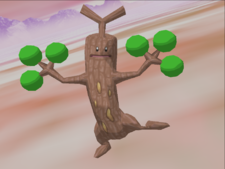
Sudowoodo
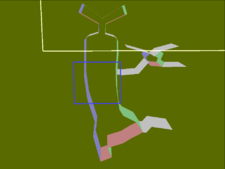
Sudowoodo showing Structure
Sudowoodo showing Terrain
Sudowoodo showing Platforms


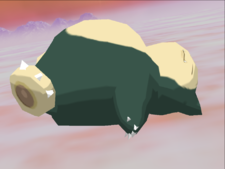
Snorlax
- Platforms: Snorlax has one big solid platform, comprised of a curve for the stomach, and one for the head.
Snorlax
Snorlax showing Structure
Snorlax showing Terrain
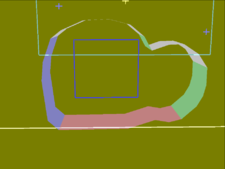
Snorlax showing Platforms


Venusaur
- Platforms: Venusaur's body and stem are solid platforms, while the flower and leaves are drop-through platforms.
Venusaur
Venusaur showing Structure
Venusaur showing Terrain
Venusaur showing Platforms


Seel
- Platforms: Seel has all solid platforms, comprised of its head, body, and tail.
Seel
Seel showing Structure
Seel showing Terrain
Seel showing Platforms


Wobbuffet
- Platforms: Wobbuffet has one big solid platform, curved around its head.
Wobbuffet
Wobbuffet showing Structure
Wobbuffet showing Terrain
Wobbuffet showing Platforms


Unown
- Platforms: Unowns have one small drop-through platform, typically with a curve in the center.
Unown

Unown showing Structure
Unown showing Terrain
Unown showing Platforms


Goldeen
- Platforms: Goldeen has all drop-through platforms, comprised of its head and tail.
Goldeen
Goldeen showing Structure

Goldeen showing Terrain
Goldeen showing Platforms


Lickitung
- Platforms: Licktung has all solid platforms, comprised of its head, tounge, body, and tail. Eventually, its tounge gets retracted.
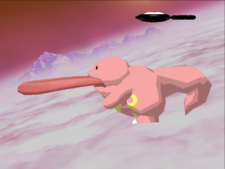
Lickitung
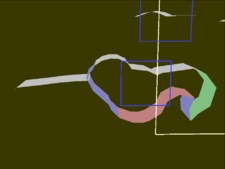
Lickitung showing Structure
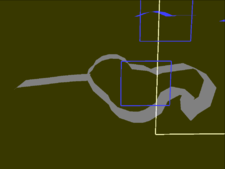
Lickitung showing Terrain
Lickitung showing Platforms
Lickitung
Lickitung showing Structure
Lickitung showing Terrain
Lickitung showing Platforms


Chansey
- Platforms: Chansey has one solid platform, comprised of its head.

Chansey
Chansey showing Structure

Chansey showing Terrain
Chansey showing Platforms


Geodude
- Platforms: Geodude has all solid platforms, comprised of its head, arms, and fists.
Geodude
Geodude showing Structure
Geodude showing Terrain
Geodude showing Platforms
Poké Floats showing the Blast Zone


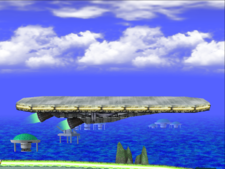
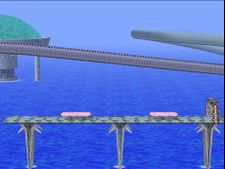
Big Blue
- Blast Zone: Big Blue has a tall, narrow blast box.
- Spawn Points: Spawn points are located on the Falcon Flyer: 1 on the tail, 2 on the body, and 1 on the nose. The respawn points are located in the center of the screen.
- Item Spawn Points: There are 7 item spawn points all located in a line at the top of the screen.
- Platforms: The flat flying platform is the only part of the stage that is drop-through-able. The Falcon Flyer and spherical platform have grab-able edges, and the entire rest of the stage is solid.
- Terrain: The Falcon Flyer, F-Zero Machines, and the edges of the spherical platform have heavy-metal terrain, while the ground, flat platform, and top of the spherical platform have basic terrain.
Big Blue
Big Blue showing Structure
Big Blue showing Terrain
Big Blue showing Platforms
Big Blue's Platform
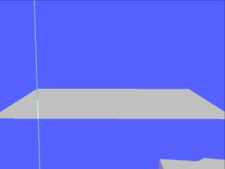
Big Blue's Platform showing Structure

Big Blue's Platform showing Terrain

Big Blue's Platform showing Platforms
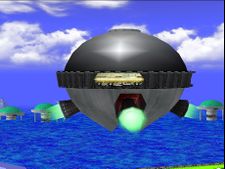
Big Blue's Second Platform
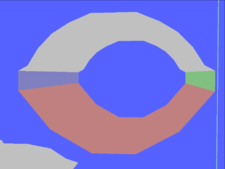
Big Blue's Second Platform showing Structure
Big Blue's Second Platform showing Terrain

Big Blue's Second Platform showing Platforms
Big Blue showing the Blast Zone


Icicle Mountain
- Blast Zone: Icicle Mountain has a large blast box, but it is easy to get to each side of it due to all the platforms. This stage has walk-offs on both sides at several different points. Oddly, it is possible to Self Distruct on the upper blast line, unlike any other stage.
- Spawn Points: Spawn points are located in the bottom portion of the stage: 1 on the upper slanted wooden platform, 2 on the lower slanted wooden platform, and 1 on the right platform inbetween the 2. Respawn points are located in a line in the center of the screen. These points follow the screen.
- Item Spawn Points: There are 8 item spawn points: 5 arranged in an arc above 3 more arranged in a triangle. These points, like the spawn and respawn points, follow the screen. These points also follow the screen.
- Trophy/Enemy Spawn Points: Oddly, this stage has unused trophy and enemy spawn points.
- Lower Half: There are 5 trophy spawn points: 1 on the right of the 3rd level platform, 1 on the left 4th level platform, 1 on the right 5th level platform, 1 on the left 6th level platform, and 1 on the breakable ice cubes on the left of the 7th level. There are 5 enemy spawn points: 1 on the right 1st level platform, 1 above the left 4th level platform, 1 on the upper wooden slant, 1 on the central 6th level platform, and 1 on the central 8th level platform.
- Upper Half: There are 5 more trophy spawn points: 1 on the left 2nd level platform, 1 on the central 3rd level platfom, 1 on the central 4th level platfom, 1 on the left 7th level platform, and 1 on the right 8th level platform. There are also 5 more enemy spawn points: 1 on the right 1st level platform, 1 on the central 3rd level platfom, 1 on the central 4th level platfom, 1 on the left 6th level platform, and 1 on the central 8th level platform.
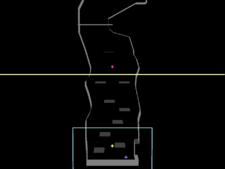
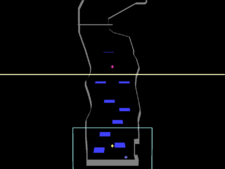
- Platforms: This stage has several drop-through platforms. There are 16 in each half. The upper half also features grab-able edges on both rocks of the 8th level. The ice cubes found throughout the stage can be destroyed.
- Terrain: This stage features multiple wood, light-metal, snow, ice, and rock terrains.
- Notes: Although this stage may seem similar to the adventure mode map, they are actually 2 entirely different stages with the same theme. This stage moves the player around by shifting the camera up and down at various speeds. In this way, the stage is completely loaded during the initial load. The camera will never exceed the upper or lower limits of the stage. The adventure mode map, however, works differently. The camera can only get shifted upwards, and the stage is not completely loaded at any time. Instead, the stage will loop, loading a new section each time the camera gets to the top edge. Because of this, the stage has many more varieties.
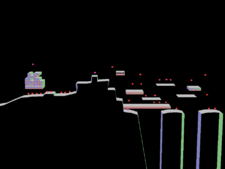
Icicle Mountain
Icicle Mountain showing Structure
Icicle Mountain showing Terrain
Icicle Mountain showing Platforms
Icicle Mountain
Icicle Mountain showing Structure
Icicle Mountain showing Terrain
Icicle Mountain showing Platforms
Icicle Mountain showing the Blast Zone


Flat Zone
- Blast Zone: Flat Zone has a very small bast box. This stage has walk-offs on either side.
- Spawn Points: Spawn points are spaced evenly in a line on the bottom platform. The respawn point is located on the upper-middle aerial platform.
- Item Spawn Points: There are only 4 item spawn points located in a line above the camera box.
- Platforms: There are 5 drop-through platforms. 4 of these, located in the center of the stage, can be extended at some points by the teleporting platform. The other drop-through platform consists of the house roof. There are no grab-able edges.
- Terrain: The whole stage has Game & Watch terrain.
Flat Zone
Flat Zone showing Structure
Flat Zone showing Terrain
Flat Zone showing Platforms
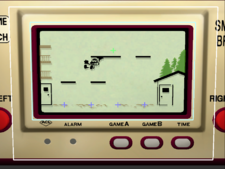
Flat Zone showing the Blast Zone


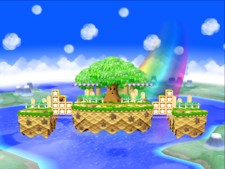
Dream Land N64
- Blast Zone: Dream Land has an enormous blast box.
- Spawn Points: Spawn points are located 1 on each of the 3 aerial platforms and 1 in the center of the main platform. The respawn point is located above the upper aerial platform.
- Item Spawn Points: There are 10 item spawn points: 1 above each edge, 2 below either of the lower aerial platforms, and 4 in a line above the main platform, center stage.
- Platforms: The stage has 3 aerial drop-through platforms, and a main, solid platform with grab-able edges.
- Terrain: The whole stage has basic terrain.
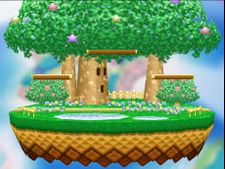
N64 Dream Land
N64 Dream Land showing Structure
N64 Dream Land showing Terrain
N64 Dream Land showing Platforms
N64 Dream Land showing the Blast Zone


Yoshi's Island N64
- Blast Zone: Dream Land has very wide blast box that stretches really far right from the main stage (for the clouds).
- Spawn Points: Spawn points are located one on each platform in the main stage. The respawn point is located above the upper aerial platform.
- Item Spawn Points: There are 8 item spawn points: 2 located above eachother above either edge of the main platform, and 3 in a line above the upper aerial platform.
- Platforms: The main stage has one solid main platform with grab-able edges. Above this platform are 3 drop-through platforms each elevated and slanted differently. The stage also has 3 clouds that act as drop-through platforms. They are located one on the left of the stage, and 2 on the right (spaced really far apart). These cloud platforms will disappear after being stood on for a while, then reappear after a short time.
- Terrain: The main and aerial platforms have paper terrain, while the clouds have basic terrain. Interestingly, the walls of the main platform have wood terrain.
N64 Yoshi's Island
N64 Yoshi's Island showing Structure
N64 Yoshi's Island showing Terrain
N64 Yoshi's Island showing Platforms

N64 Yoshi's Island showing the Blast Zone


Kongo Jungle N64
- Blast Zone: Kongo Jungle has a medium-large blast box.
- Spawn Points: Spawn points are aligned evenly along the main platform. The respawn point is located above the area containing the rotating platforms
- Item Spawn Points: There are 5 item spawn points: 2 along either edge of the main platform, and 1 in the center of the stage, around the rotating platforms.
- Platforms: The stage has 4 drop-through platforms, 1 slanted slightly above each side of the main platform, and 2 that act as elevator platforms. These platforms revolve around the centeral item spawn point. The main platform has grab-able edges.
- Terrain: The whole stage has basic terrain.
N64 Kongo Jungle

N64 Kongo Jungle showing Structure
N64 Kongo Jungle showing Terrain
N64 Kongo Jungle showing Platforms
N64 Kongo Jungle showing the Blast Zone


Battlefield
- Blast Zone: Battlefield has a moderate-to-large blast box.
- Spawn Points: Spawn points are located 1 on each of the 3 aerial platforms and 1 in the center of the main platform. There are 4 respawn points arranged evenly above the stage.
- Item Spawn Points: There are 8 item spawn points: 1 above the center of the main platform, 2 above either of the lower aerial platforms, and 3 above the upper aerial platform.
- Platforms: The stage has 3 aerial drop-through platforms, and a main, solid platform with grab-able edges.
- Terrain: The entire stage has basic terrain.
Battlefield
Battlefield showing Structure
Battlefield showing Terrain
Battlefield showing Platforms
Battlefield showing the Blast Zone


Final Destination
- Blast Zone: Final Destination has a moderate-to-large blast box.
- Spawn Points: Spawn points are spaced evenly on the main platform. There are 4 respawn points spaced evenly above the main platform.
- Item Spawn Points: There are 8 item spawn points arranged symmetrically across the stage.
- Platforms: The stage has one main platform with grab-able edges.
- Terrain: The entire stage has basic terrain.
Final Destination
Final Destination showing Structure
Final Destination showing Terrain
Final Destination showing Platforms
Final Destination showing the Blast Zone


Adventure Mode: Mushroom Kingdom
Opening Text
Mushroom Kingdom
Mushroom Kingdom showing Structure
Mushroom Kingdom showing Terrain
Mushroom Kingdom showing Platforms
Mushroom Kingdom
Mushroom Kingdom showing Structure
Mushroom Kingdom showing Terrain
Mushroom Kingdomshowing Platforms
Mushroom Kingdom
Mushroom Kingdom showing Structure
Mushroom Kingdom showing Terrain
Mushroom Kingdomshowing Platforms
Mushroom Kingdom showing the Blast Zone


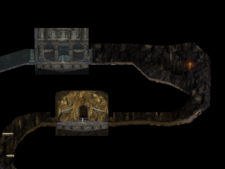
Adventure Mode: Underground Maze
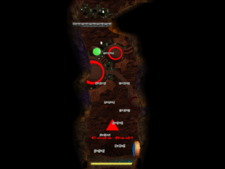
Opening Text
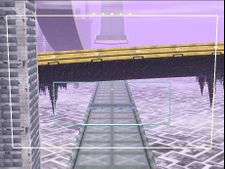
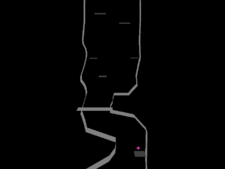
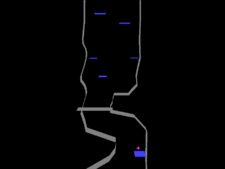
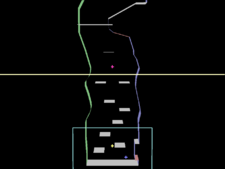
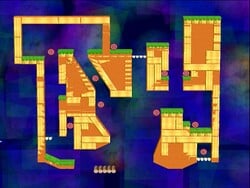
Underground Maze
Underground Maze showing Structure
Underground Maze showing Terrain
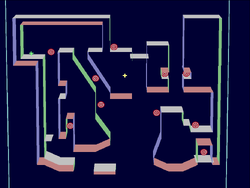
Underground Maze showing Platforms
Underground Maze
Underground Maze showing Structure
Underground Maze showing Terrain
Underground Mazeshowing Platforms
Underground Maze
Underground Maze showing Structure

Underground Maze showing Terrain
Underground Mazeshowing Platforms
Underground Maze
Underground Maze showing Structure
Underground Maze showing Terrain
Underground Mazeshowing Platforms
Underground Maze
Underground Maze showing Structure
Underground Maze showing Terrain
Underground Mazeshowing Platforms
Underground Maze
Underground Maze showing Structure
Underground Maze showing Terrain
Underground Mazeshowing Platforms
Underground Maze
Underground Maze showing Structure
Underground Maze showing Terrain
Underground Mazeshowing Platforms
Underground Maze
Underground Maze showing Structure

Underground Maze showing Terrain
Underground Mazeshowing Platforms
Underground Maze showing the Blast Zone


Adventure Mode: Brinstar Escape Shaft
Brinstar Escape Shaft is split into 6 sections by jump-through solid platforms.
- Blast Zone: The Escape Shaft has a wide and tall blast box.
- Spawn Points: The spawn point is at the bottom right in the first section, and the respawn point follows player 1. The exit point is on the platform at the very top in the sixth section.
- Item Spawn Points: Oddly, there is a single item spawn point in the center of the first section.
- Trophy/Enemy Spawn Points: There are 5 trophy spawn points: 1 towards the top of the first section, 1 on a platform in the second section, 1 on a platform towards the top of the third section, and 1 on either side of the sixth section.
- Platforms: There are several drop-through platforms throughout the stage, but no grab-able ones.
- Terrain: Almost all solid platforms have basic terrain, while the aerial platforms have light metal terrain.
Brinstar Escape Shaft
Brinstar Escape Shaft showing Structure
Brinstar Escape Shaft showing Terrain
Brinstar Escape Shaftshowing Platforms
Brinstar Escape Shaft
Brinstar Escape Shaft showing Structure
Brinstar Escape Shaft showing Terrain
Brinstar Escape Shaftshowing Platforms
Brinstar Escape Shaft
Brinstar Escape Shaft showing Structure
Brinstar Escape Shaft showing Terrain
Brinstar Escape Shaft showing Platforms
Brinstar Escape Shaft showing the Blast Zone


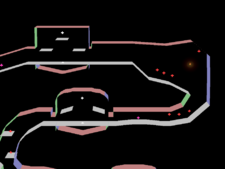
Adventure Mode: Grand Prix
Opening Text
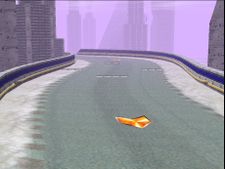
Grand Prix
Grand Prix showing Structure

Grand Prix showing Terrain

Grand Prix showing Platforms
Grand Prix
Grand Prix showing Structure
Grand Prix showing Terrain
Grand Prix showing Platforms
Grand Prix
Grand Prix showing Structure
Grand Prix showing Terrain
Grand Prix showing Platforms
Grand Prix

Grand Prix showing Structure
Grand Prix showing Terrain

Grand Prix showing Platforms
Grand Prix showing the Blast Zone


Adventure Mode: Icicle Mountain
Opening Text
Icicle Mountain
Icicle Mountain showing Structure
Icicle Mountain showing Terrain
Icicle Mountain showing Platforms
Icicle Mountain
Icicle Mountain showing Structure
Icicle Mountain showing Terrain
Icicle Mountain showing Platforms
Icicle Mountain
Icicle Mountain showing Structure
Icicle Mountain showing Terrain
Icicle Mountain showing Platforms
Icicle Mountain
Icicle Mountain showing Structure
Icicle Mountain showing Terrain
Icicle Mountain showing Platforms
Icicle Mountain showing the Blast Zone


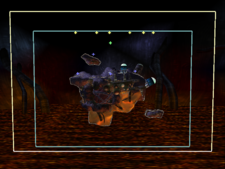
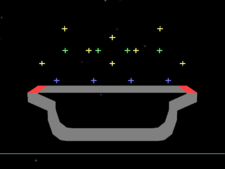
Special Stage: Race to the Finish
Opening Text
Special Stage: Trophy Collector
- Blast Zone: Trophy Collector has a medium blast box.
- Spawn Points: There is one spawn point on the trophy capture platform.
- Item Spawn Points: Interestingly, there is one located below the main platform, a little left-of-center. It's unused.
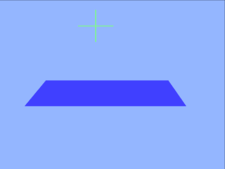
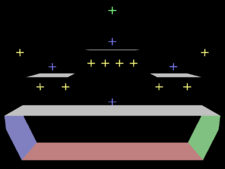
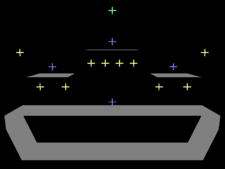
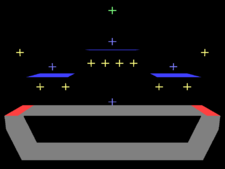
- Platforms: There are 2 drop-through aerial platforms above the main platform. In the center of the main platform is the trophy capture platform. It has the special property of being solid to characters, but non-existant to trophies. The main platform does not have grab-able edges.
- Terrain: The middle portion of the main platform has heavy-metal terrain, while the trophy capture platform, aerial platforms, and edges have basic terrain.
Trophy Collector
Trophy Collector showing Structure
Trophy Collector showing Terrain

Trophy Collector showing Platforms
Trophy Collector showing the Blast Zone


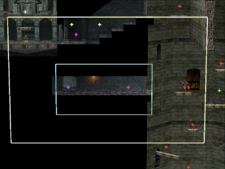
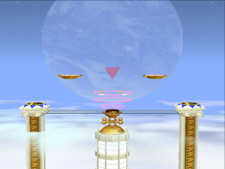
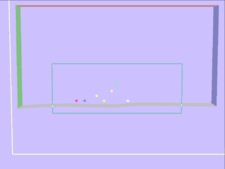
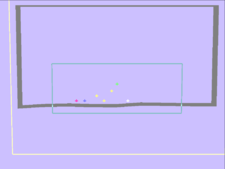
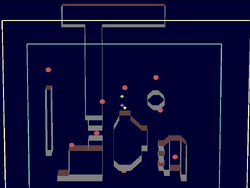
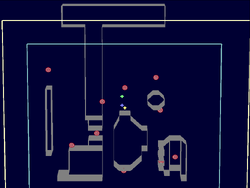
Special Stage: All-Star Rest Area
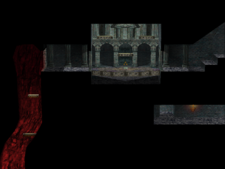
- Blast Zone: Rest area has a huge blast box. It cannot be crossed normally due to the solid walls and ceiling.
- Spawn Points: There is a single spawn point located on the left. The respawn point is located further right and above the other points. There is also an exit point located a bit right-of-center of the stage.
- Item Spawn Points: There are 3 unused item spawn points scattered on the left side of the stage.
- Trophy/Enemy Spawn Points: There is a single trophy spawn point located on the left, left of the spawn point.
- Platforms: There is a single solid platform without grab-able edges.
- Terrain: The floor has dirt terrain.
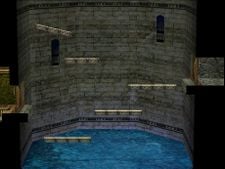
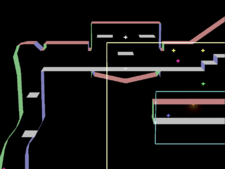
All-Star Rest Area
All-Star Rest Area showing Structure

All-Star Rest Area showing Terrain
All-Star Rest Area showing Platforms
All-Star Rest Area showing the Blast Zone


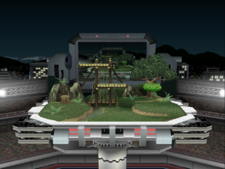
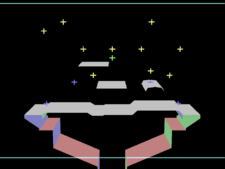
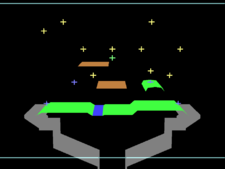
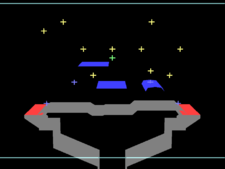
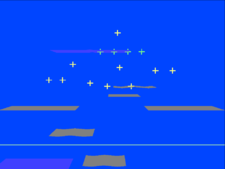
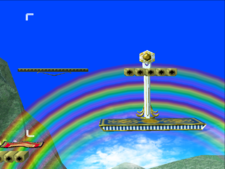
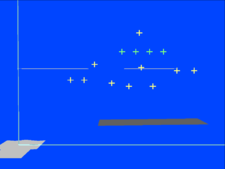
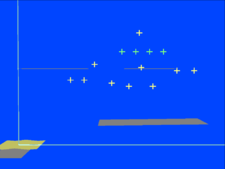
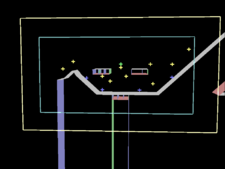
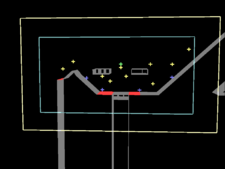
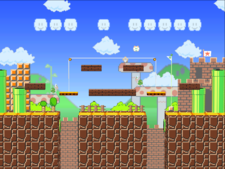
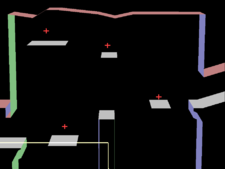
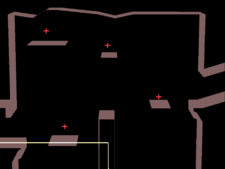
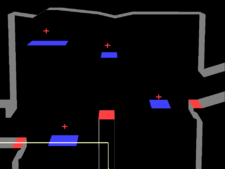
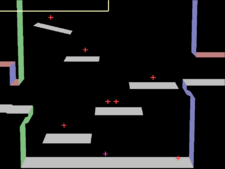
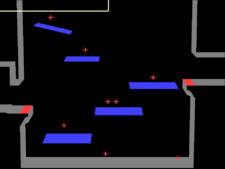
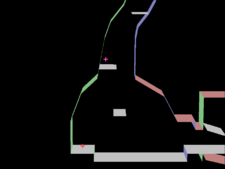
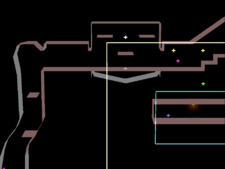
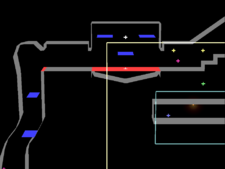
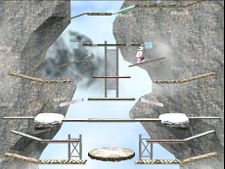
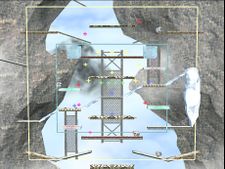
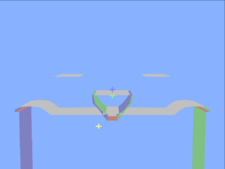
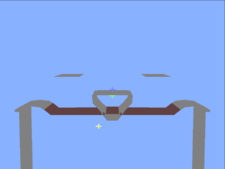
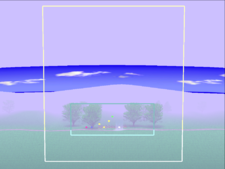
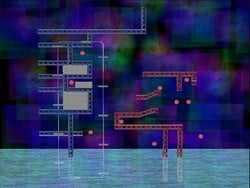
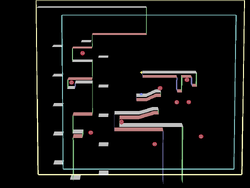
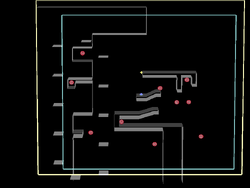
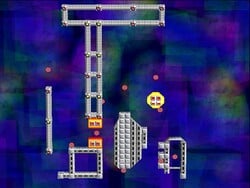
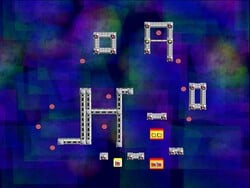
Special Stage: Target Test
Mario
Opening Text
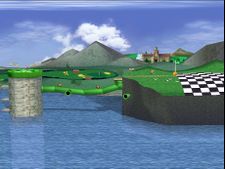
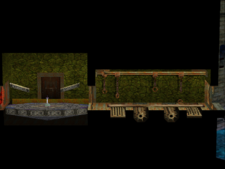
Mario's Target Test
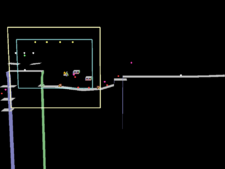
Mario's Target Test showing Structure
Mario's Target Test showing Terrain
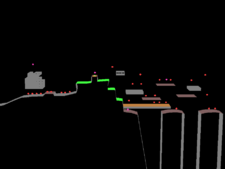
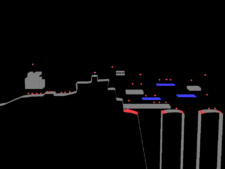
Mario's Target Test showing Platforms


Captain Falcon
Opening Text
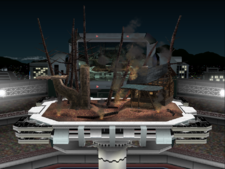
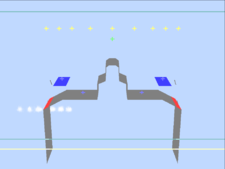
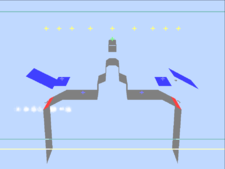
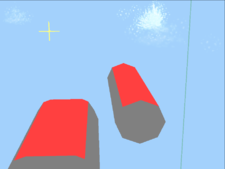
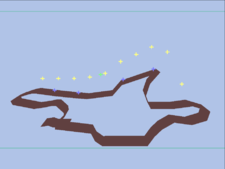
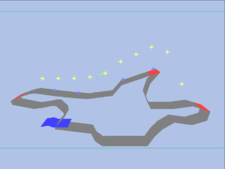
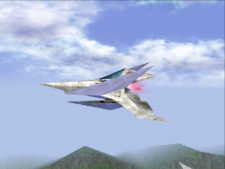
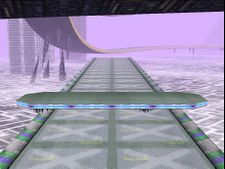
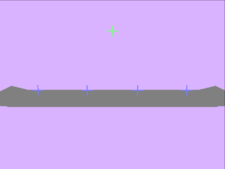
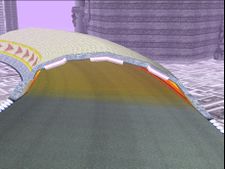
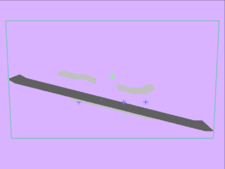
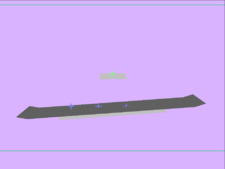
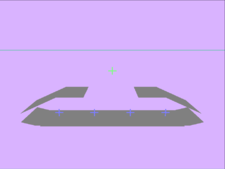
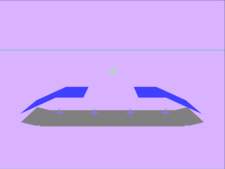
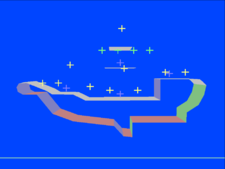
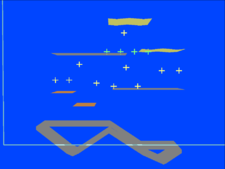
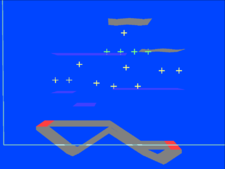
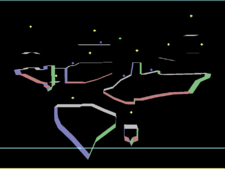
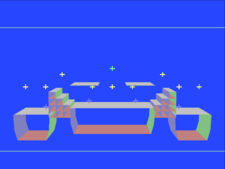
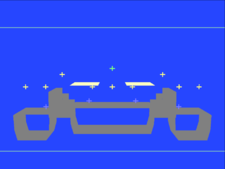
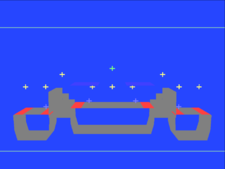
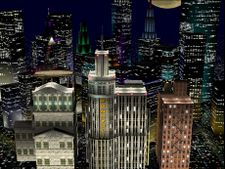
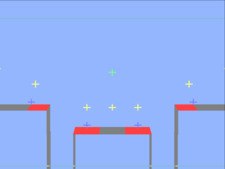
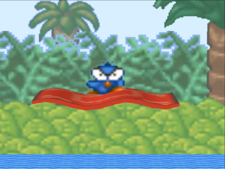
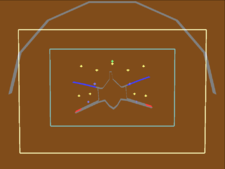
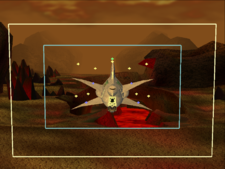
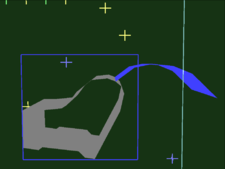
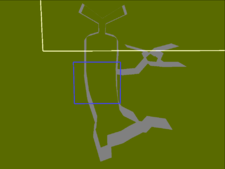
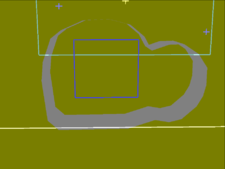
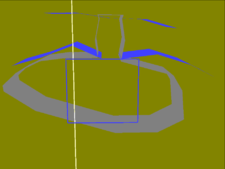
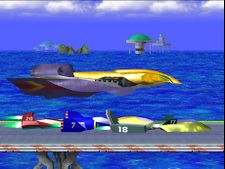
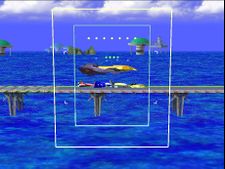
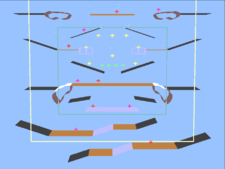
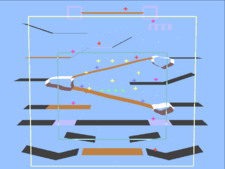
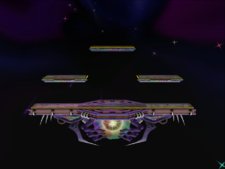
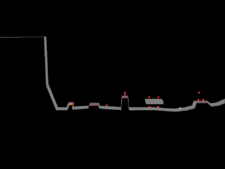
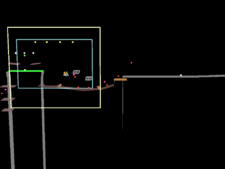
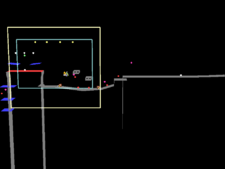
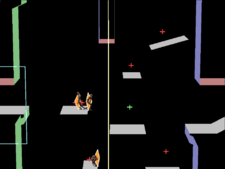
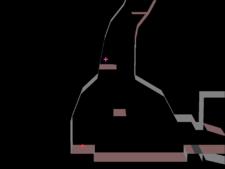
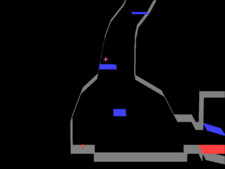
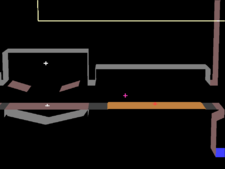
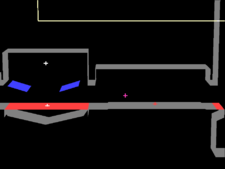
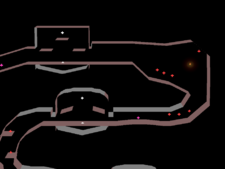
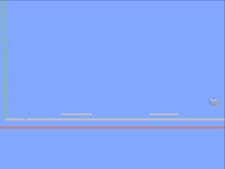
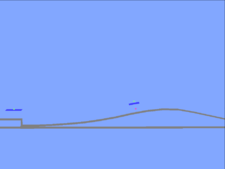
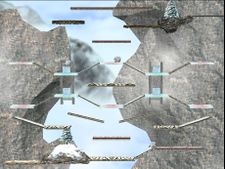
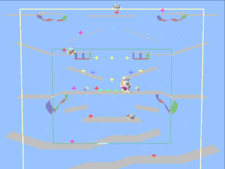
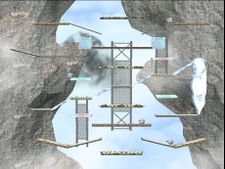
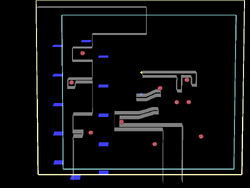
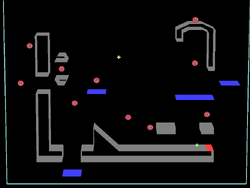
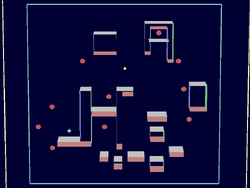
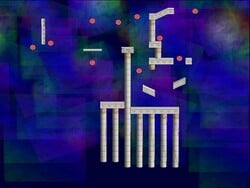
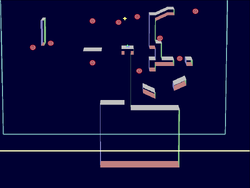
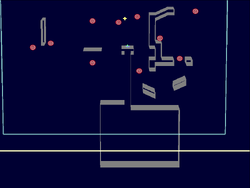
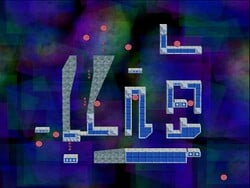
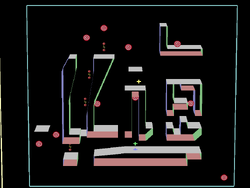
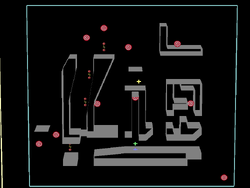
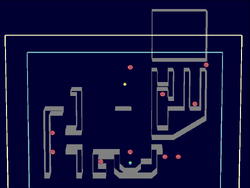
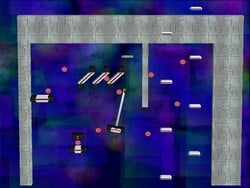
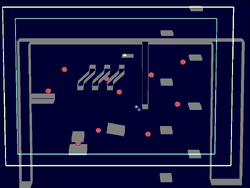
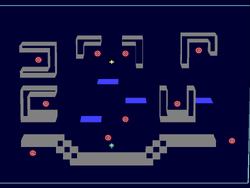
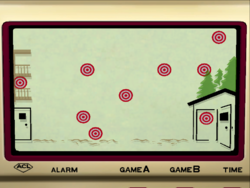
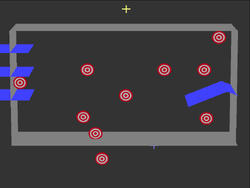
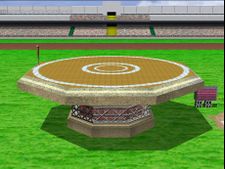
Falcon's Target Test
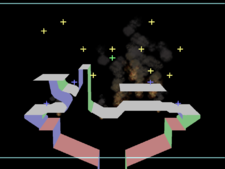
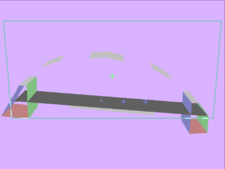
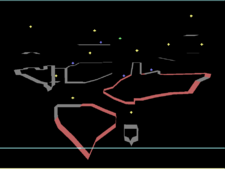
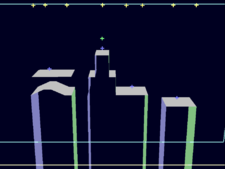
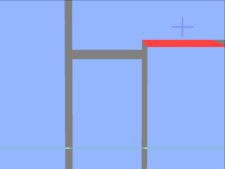
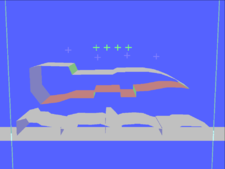
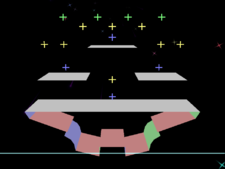
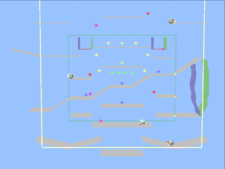
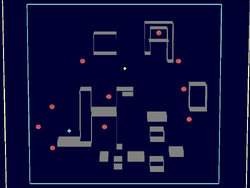
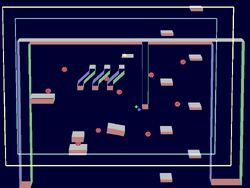
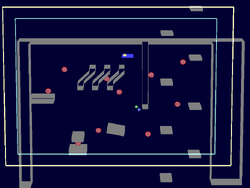
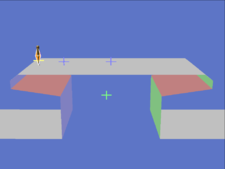
Falcon's Target Test showing Structure
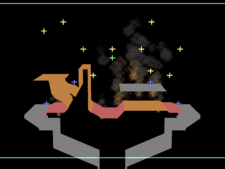
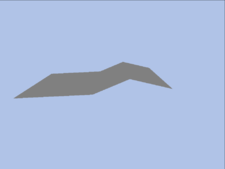
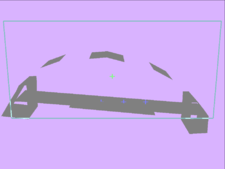
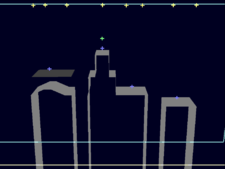
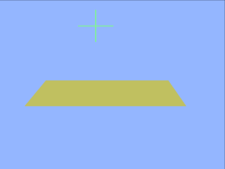
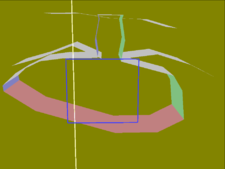
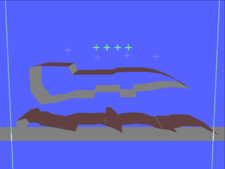
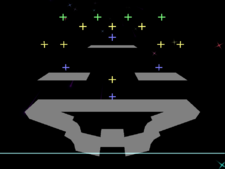
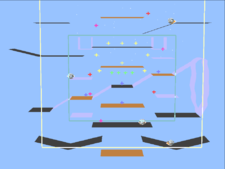
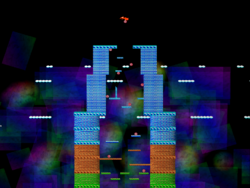
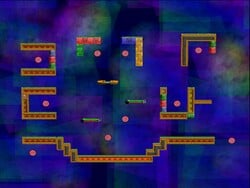
Falcon's Target Test showing Terrain
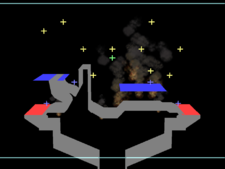
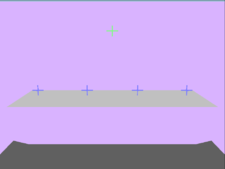
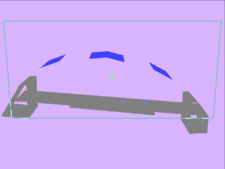
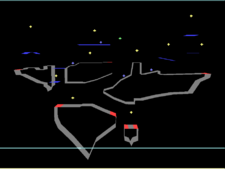
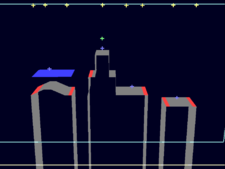
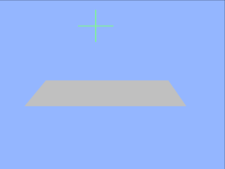
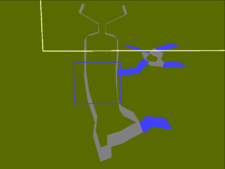
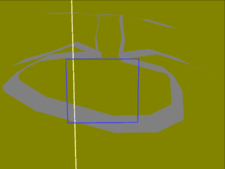
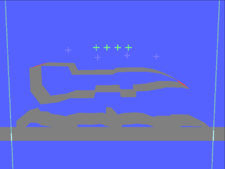
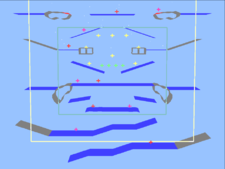
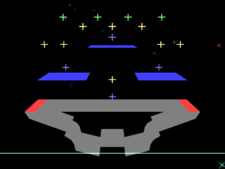
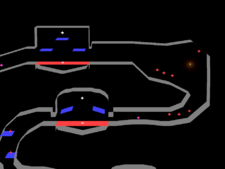
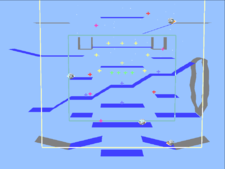
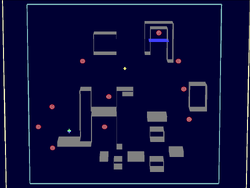
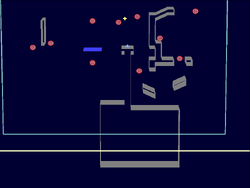
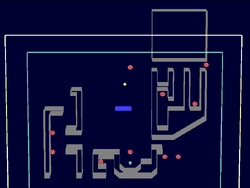
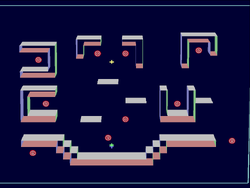
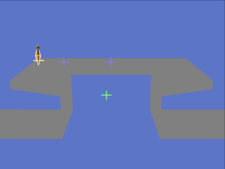
Falcon's Target Test showing Platforms


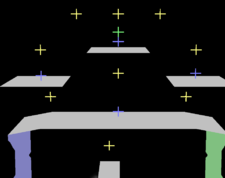
Young Link
Opening Text
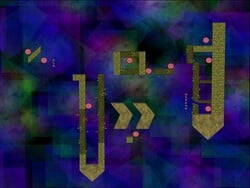
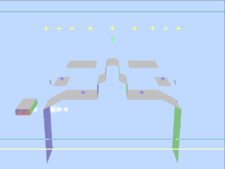
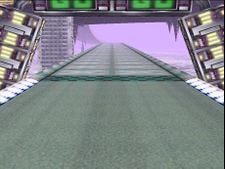
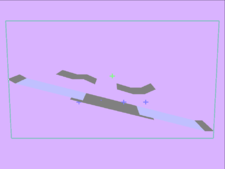
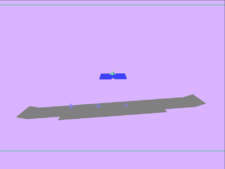
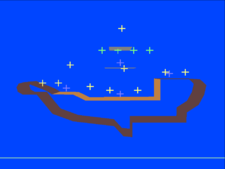
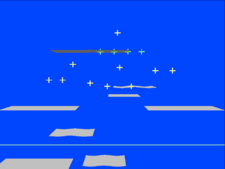
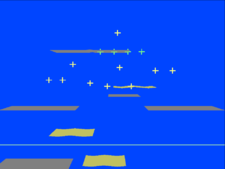
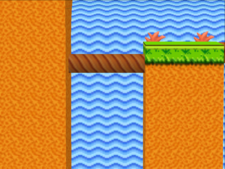
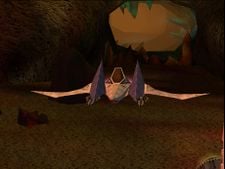
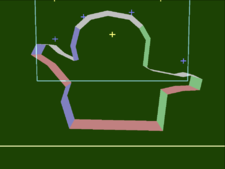
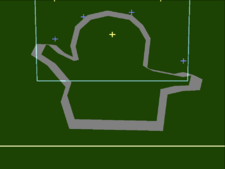
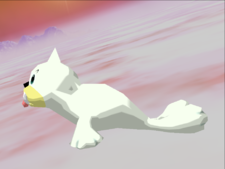
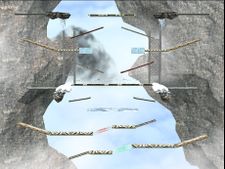
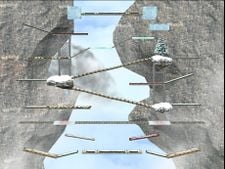
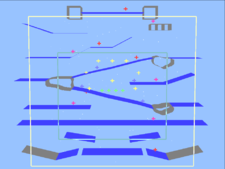
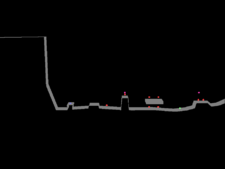
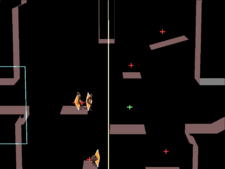
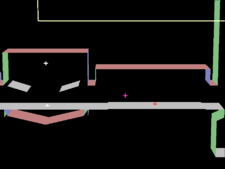
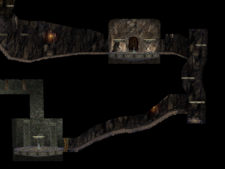
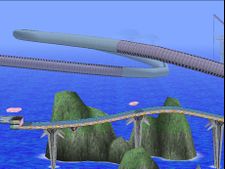
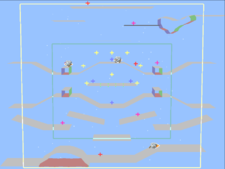
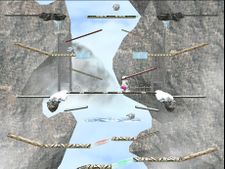
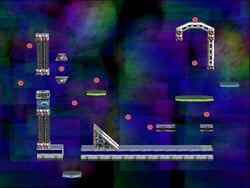
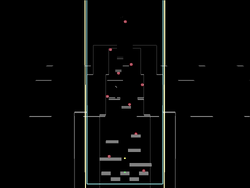
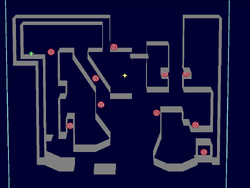
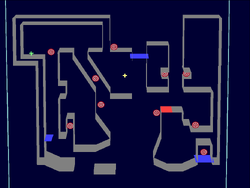
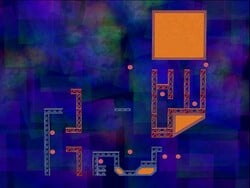
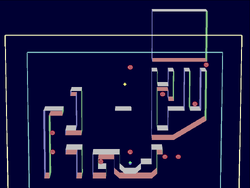
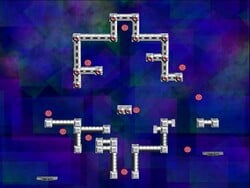
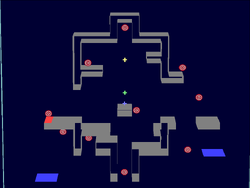
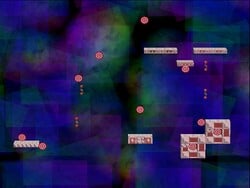
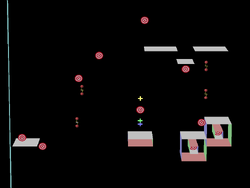
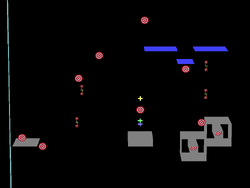
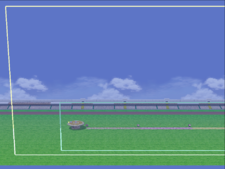
Young Link's Target Test

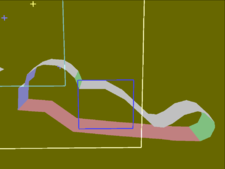
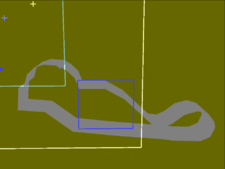
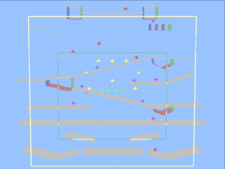
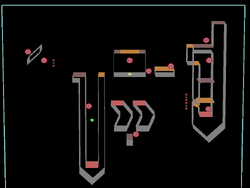
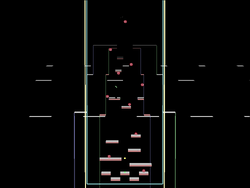
Young Link's Target Test showing Structure
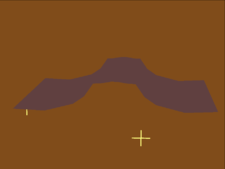
Young Link's Target Test showing Terrain
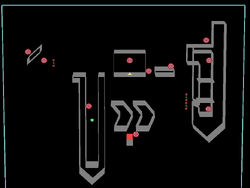
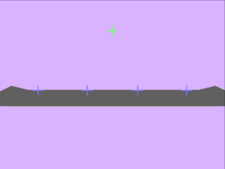
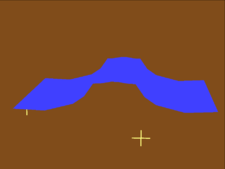
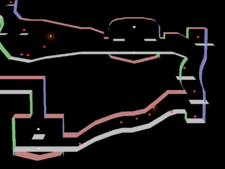
Young Link's Target Test showing Platforms


Donkey Kong
Opening Text
Dr. Mario
Opening Text
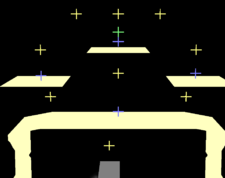
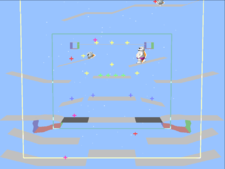
Falco
Opening Text
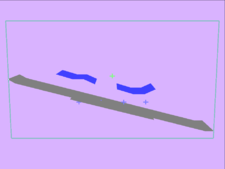
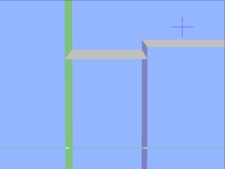
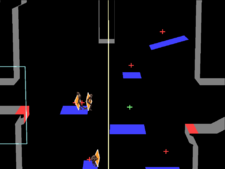
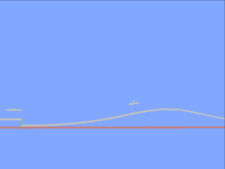
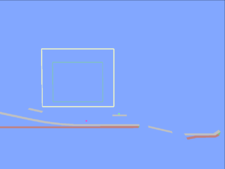
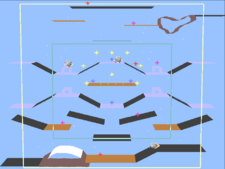
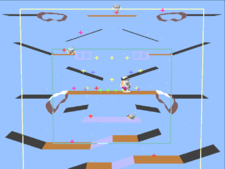
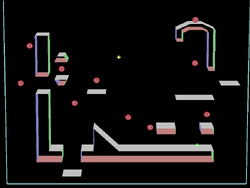
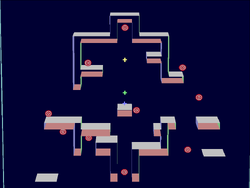
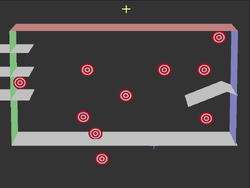
Falco's Target Test

Falco's Target Test showing Structure
Falco's Target Test showing Terrain
Falco's Target Test showing Platforms


Fox
Opening Text
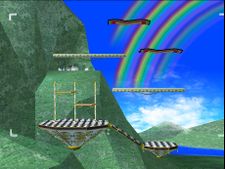
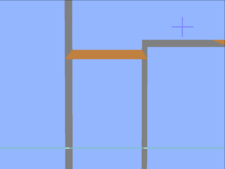
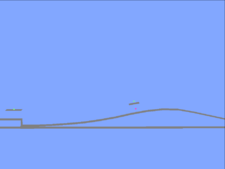
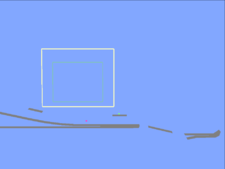
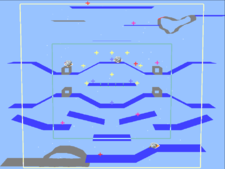
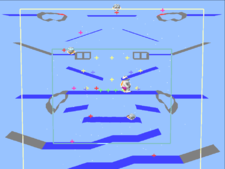
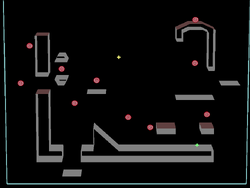
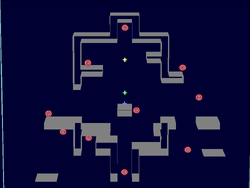
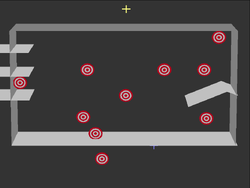
Fox's Target Test
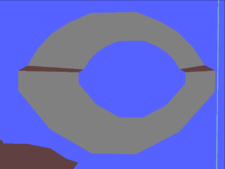
Fox's Target Test showing Structure
Fox's Target Test showing Terrain
Fox's Target Test showing Platforms


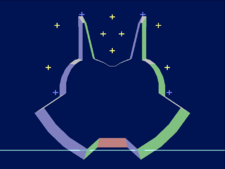
Ice Climbers
Opening Text
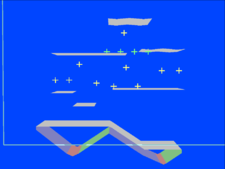
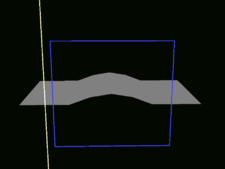
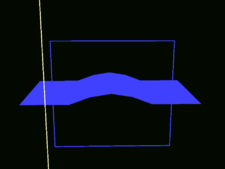
Ice Climbers' Target Test
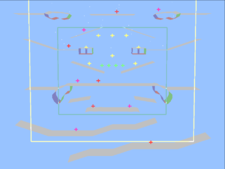
Ice Climbers' Target Test showing Structure
Ice Climbers' Target Test showing Terrain

Ice Climbers' Target Test showing Platforms


Kirby
Opening Text
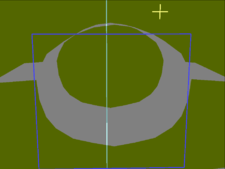
Kirby's Target Test
Kirby's Target Test showing Structure
Kirby's Target Test showing Terrain
Kirby's Target Test showing Platforms


Bowser
Opening Text
Link
Opening Text
Link's Target Test
Link's Target Test showing Structure
Link's Target Test showing Terrain
Link's Target Test showing Platforms


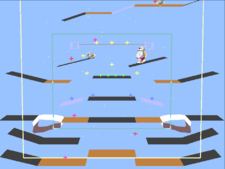
Luigi
Opening Text

Luigi's Target Test

Luigi's Target Test showing Structure

Luigi's Target Test showing Terrain
Luigi's Target Test showing Platforms


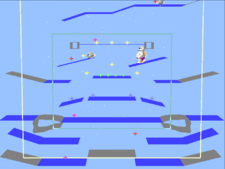
Marth
Opening Text
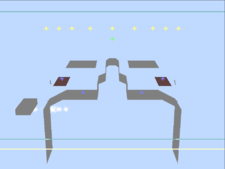
Marth's Target Test
Marth's Target Test showing Structure
Marth's Target Test showing Terrain

Marth's Target Test showing Platforms


Mewtwo
Opening Text
Ness
Opening Text
Ness's Target Test
Ness's Target Test showing Structure
Ness's Target Test showing Terrain
Ness's Target Test showing Platforms


Peach
Opening Text
Pichu
Opening Text
Pichu's Target Test
Pichu's Target Test showing Structure
Pichu's Target Test showing Terrain
Pichu's Target Test showing Platforms


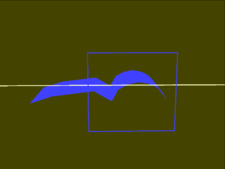
Pikachu
Opening Text
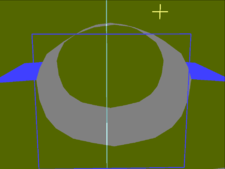
Pikachu's Target Test
Pikachu's Target Test showing Structure

Pikachu's Target Test showing Terrain
Pikachu's Target Test showing Platforms


Jigglypuff
Opening Text
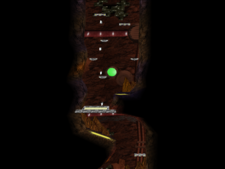
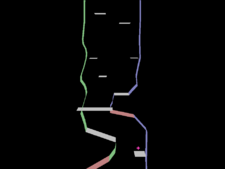
Samus
Opening Text
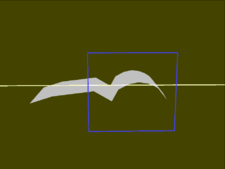
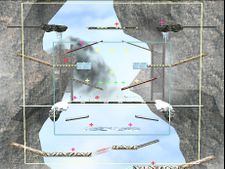
Samus's Target Test
Samus's Target Test showing Structure
Samus's Target Test showing Terrain
Samus's Target Test showing Platforms


Sheik
Opening Text
Yoshi
Opening Text
Zelda
Opening Text
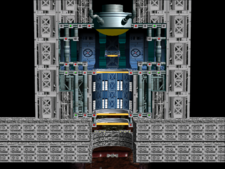
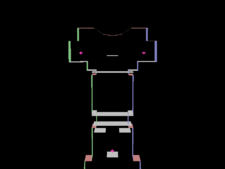
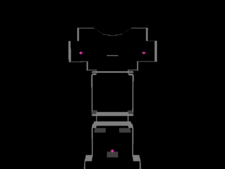
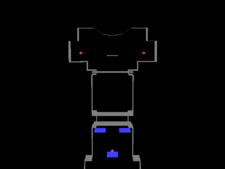
Mr. Game & Watch
Opening Text
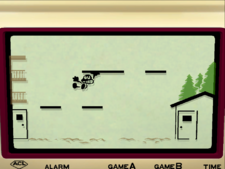
Mr. Game & Watch's Target Test
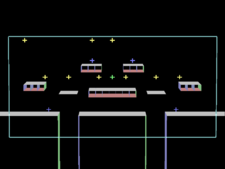
Mr. Game & Watch's Target Test showing Structure
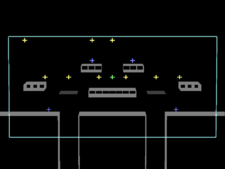
Mr. Game & Watch's Target Test showing Terrain
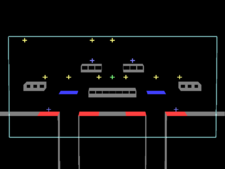
Mr. Game & Watch's Target Test showing Platforms


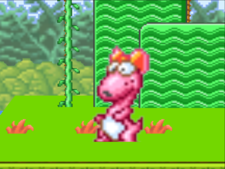
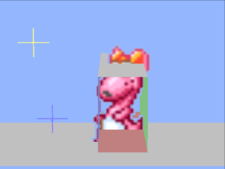
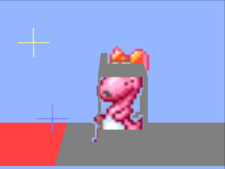
Roy
Opening Text
Roy's Target Test
Roy's Target Test showing Structure

Roy's Target Test showing Terrain
Roy's Target Test showing Platforms


Ganondorf
Opening Text
Special Stage: Home-Run Stadium
- Blast Zone: The blast zone is enormous. It is possible to KO any enemy besides Sandbag (who ignores the blast lines), but it takes a lot of work.
- Spawn Points: There are 2 spawn points: One where the player usually spawns, and one where Sandbag usually spawns. Interestingly, Sandbag's spawn point is slightly lowered into the stage. There is a respawn point that follows the camera box. It is positioned such that respawn will drop a foe on the ground (not the platform). As such, if the camera is focused on the starting platform, the respawn point will be positioned inside it. This will result in a several SDs until the camera box moves (there is no floor under the starting platform).
- Item Spawn Points: There is a single item spawn point on the left side of the starting platform, whos only purpose is to spawn the home-run bat.
- Platforms: The stage is one giant platform. it is not infinite, but it extends very, very far right, and a little left. There are no drop-through platforms or grab-able edges.
- Terrain: The whole stage has basic terrain.
Home-Run Stadium
Home-Run Stadium showing Structure
Home-Run Stadium showing Terrain
Home-Run Stadium showing Platforms
Home-Run Stadium showing the Blast Zone


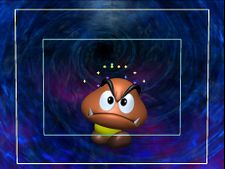
Special Stage: Goomba
- Blast Zone: Goomba has a medium blast box.
- Spawn Points: Spawn points are all located on the top of Goomba's head. The respawn point is located above this.
- Item Spawn Points: There are 8 item spawn points, all located in an arc over goomba's head.
- Platforms: Goomba has some really weird platform data. The bumps for Goomba's cheeks are grab-able, as is the left...side of goomba's right leg. There are no drop-through platforms. Also note that Goomba's left leg does not have any platforms.
- Terrain: The whole stage has basic terrain.
Goomba
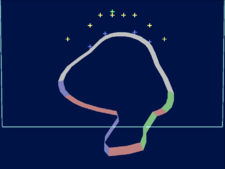
Goomba showing Structure
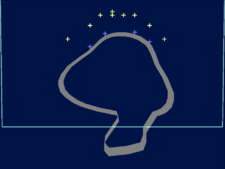
Goomba showing Terrain
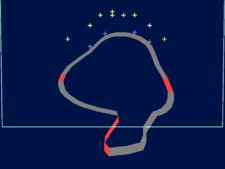
Goomba showing Platforms
Goomba showing the Blast Zone


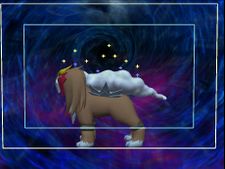
Special Stage: Entei
- Blast Zone: Entei has a medium blast box.
- Spawn Points: Spawn points are located one on Entei's head and 3 on his mane. The respawn point is located above the mane.
- Item Spawn Points: There are 8 item spawn points, 2 above the head, and 6 above the mane.
- Platforms: The tip of entei's main and its head act as grab-able edges. There are no drop-through platforms.
- Terrain: Entei's mane has ice terrain, while the rest of the stage has normal terrain.
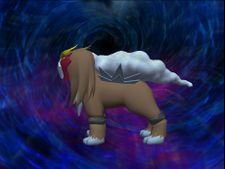
Entei
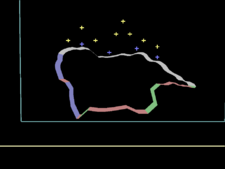
Entei showing Structure
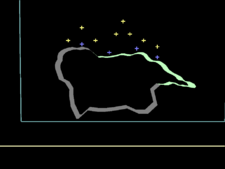
Entei showing Terrain
Entei showing Platforms
Entei showing the Blast Zone


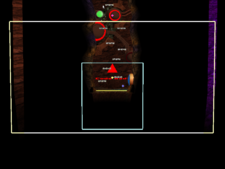
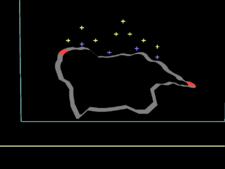
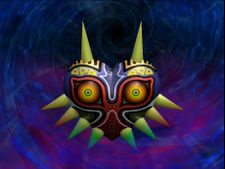
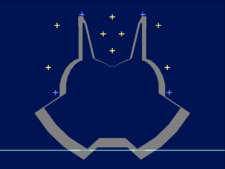
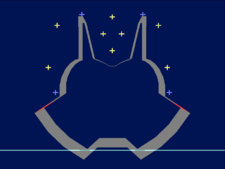
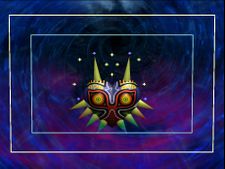
Special Stage: Majora's Mask
- Blast Zone: Majora's Mask has a medium blast box.
- Spawn Points: Spawn points are located on the upper spikes and on the inner edge of the top spike of the lower cluster. The respawn point is located in between the upper spikes, centered above the head.
- Item Spawn Points: There are 6 item spawn points: 2 above eachother on either side of the stage, and 4 arranged in a rhombus inbetween the upper spikes.
- Platforms: The edge of the Mask's upper most spikes (of the lower cluster, not the 2 on top of the head) act as grab-able edges. There are no drop-through platforms.
- Terrain: The whole stage has basic terrain.
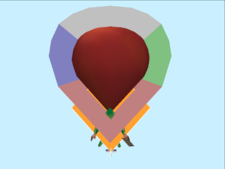
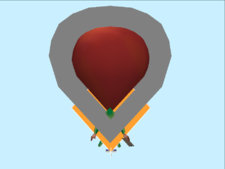
Majora's Mask
Majora's Mask showing Structure
Majora's Mask showing Terrain
Majora's Mask showing Platforms
Majora's Mask showing the Blast Zone


Debug Stage: TEST
Opening Text
TEST
TEST showing Structure
TEST showing Terrain

TEST showing Platforms
TEST showing the Blast Zone

TEST showing a close up of its Terrain


