Debug menu (SSBM)/DEVELOP mode: Difference between revisions
Serpent King (talk | contribs) |
Serpent King (talk | contribs) No edit summary |
||
| Line 214: | Line 214: | ||
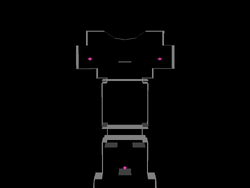
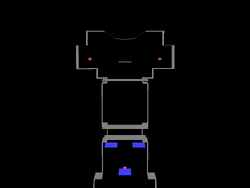
Battlefield is a mostly featureless stage. It has a moderate-to-large blast box. The spawn points placed in the center of each of the platforms, and respawn points are arranged evenly in the air above the stage. Item spawn points are scattered in the air. The whole stage has basic terrain. The stage also has 3 drop-through platforms and 2 grab-able ledges. | Battlefield is a mostly featureless stage. It has a moderate-to-large blast box. The spawn points placed in the center of each of the platforms, and respawn points are arranged evenly in the air above the stage. Item spawn points are scattered in the air. The whole stage has basic terrain. The stage also has 3 drop-through platforms and 2 grab-able ledges. | ||
<gallery> | <gallery widths=250px heights=250px perrow=4> | ||
File:BTLFD-NRML-SSBM.png|Battlefield | File:BTLFD-NRML-SSBM.png|Battlefield | ||
File:BTLFD-STRUCT-SSBM.png|Battlefield showing Structure | File:BTLFD-STRUCT-SSBM.png|Battlefield showing Structure | ||
| Line 225: | Line 225: | ||
Final Destination features very little. It has a moderate-to-large blast box. The spawn points are evenly spaced out, as are the respawn points. Item spawn points are scattered in the air over the platform. The whole stage has basic terrain. Both ledges are grab-able, and the stage does not have any drop-through platforms. | Final Destination features very little. It has a moderate-to-large blast box. The spawn points are evenly spaced out, as are the respawn points. Item spawn points are scattered in the air over the platform. The whole stage has basic terrain. Both ledges are grab-able, and the stage does not have any drop-through platforms. | ||
<gallery> | <gallery widths=250px heights=250px perrow=4> | ||
File:FDEST-NRML-SSBM.png|Final Destination | File:FDEST-NRML-SSBM.png|Final Destination | ||
File:FDEST-STRUCT-SSBM.png|Final Destination showing Structure | File:FDEST-STRUCT-SSBM.png|Final Destination showing Structure | ||
| Line 240: | Line 240: | ||
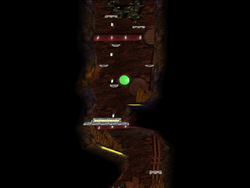
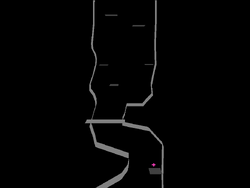
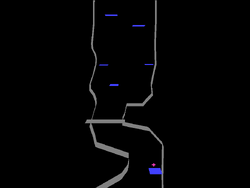
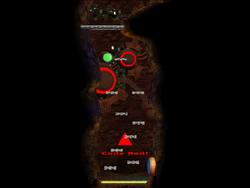
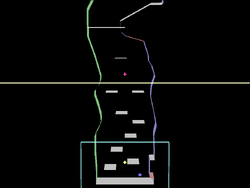
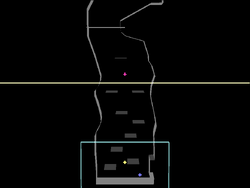
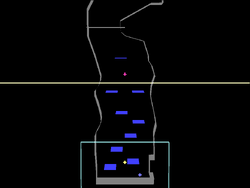
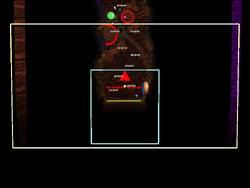
This is the Adventure Mode stage "Brinstar Escape Shaft". It features a wide and tall blast box, and a smaller and much thinner camera box. The stage itself is split into 6 sections by jump-through solid platforms. The spawn point is at the bottom right in the first section, and the respawn point follows player 1. The exit point is on the platform at the very top in the sixth section. Oddly, there is a single item spawn point in the center of the first section. There are five trophy spawn points: One towards the top of the first section, one on a platform in the second section, one on a platform towards the top of the third section, and one on either side of the sixth section. There are several drop-through platforms, but no grab-able ones. Almost all solid platforms have basic terrain, while the drop-through platforms have light metal terrain. | This is the Adventure Mode stage "Brinstar Escape Shaft". It features a wide and tall blast box, and a smaller and much thinner camera box. The stage itself is split into 6 sections by jump-through solid platforms. The spawn point is at the bottom right in the first section, and the respawn point follows player 1. The exit point is on the platform at the very top in the sixth section. Oddly, there is a single item spawn point in the center of the first section. There are five trophy spawn points: One towards the top of the first section, one on a platform in the second section, one on a platform towards the top of the third section, and one on either side of the sixth section. There are several drop-through platforms, but no grab-able ones. Almost all solid platforms have basic terrain, while the drop-through platforms have light metal terrain. | ||
<gallery widths=250px heights=250px perrow=4> | |||
<gallery> | |||
ADVES-NRML3-SSBM.png|Brinstar Escape Shaft | ADVES-NRML3-SSBM.png|Brinstar Escape Shaft | ||
ADVES-STRUCT3-SSBM.png|Brinstar Escape Shaft showing Structure | ADVES-STRUCT3-SSBM.png|Brinstar Escape Shaft showing Structure | ||
ADVES-TERRA3-SSBM.png|Brinstar Escape Shaft showing Terrain | ADVES-TERRA3-SSBM.png|Brinstar Escape Shaft showing Terrain | ||
ADVES-PLATF3-SSBM.png|Brinstar Escape Shaftshowing Platforms | ADVES-PLATF3-SSBM.png|Brinstar Escape Shaftshowing Platforms | ||
ADVES-NRML2-SSBM.png|Brinstar Escape Shaft | ADVES-NRML2-SSBM.png|Brinstar Escape Shaft | ||
ADVES-STRUCT2-SSBM.png|Brinstar Escape Shaft showing Structure | ADVES-STRUCT2-SSBM.png|Brinstar Escape Shaft showing Structure | ||
ADVES-TERRA2-SSBM.png|Brinstar Escape Shaft showing Terrain | ADVES-TERRA2-SSBM.png|Brinstar Escape Shaft showing Terrain | ||
ADVES-PLATF2-SSBM.png|Brinstar Escape Shaftshowing Platforms | ADVES-PLATF2-SSBM.png|Brinstar Escape Shaftshowing Platforms | ||
ADVES-NRML1-SSBM.png|Brinstar Escape Shaft | ADVES-NRML1-SSBM.png|Brinstar Escape Shaft | ||
ADVES-STRUCT1-SSBM.png|Brinstar Escape Shaft showing Structure | ADVES-STRUCT1-SSBM.png|Brinstar Escape Shaft showing Structure | ||
ADVES-TERRA1-SSBM.png|Brinstar Escape Shaft showing Terrain | ADVES-TERRA1-SSBM.png|Brinstar Escape Shaft showing Terrain | ||
ADVES-PLATF1-SSBM.png|Brinstar Escape | ADVES-PLATF1-SSBM.png|Brinstar Escape Shaft showing Platforms | ||
ADVES-BLAST-SSBM.png|Brinstar Escape Shaft showing the Blast Zone | ADVES-BLAST-SSBM.png|Brinstar Escape Shaft showing the Blast Zone | ||
</gallery> | </gallery> | ||
Revision as of 19:26, April 30, 2015
Below is a table detailing the controls for the DEVELOP mode extra controls. Through these controls, one can obtain free control over the camera, see character and stage hitboxes, frame advance the match, see the parts of the stage, and drop items (similar to Training Mode).
| Controls | Effect |
|---|---|
| Pauses the game, but without the usual pause interface. | |
| Hard Pause + |
Frame advances the match. |
| Speeds up gameplay. | |
| Shrinks the player. | |
Displays a list of statistics for each player:
| |
| Shows the current score and any bonuses won. | |
| Pauses the game normally. | |
Rotates through multiple visual effects.
| |
Toggles sound effects and music.
| |
| Displays a set of stress bars detailing the GameCube's work load. | |
| Displays each characters' animation information. | |
| Grows the player. | |
| Sets the player back to normal size. | |
Toggles collision bubbles for all characters and stage elements (See here).
| |
Toggles various stage related visuals, such as spawn points, stage structures, and grab-able ledges (See here).
| |
Toggles collision bubbles for the player (See here).
| |
| Drops item selected on the Item Menu | |
| Display Item Menu and cycle forward through the list (See here). | |
| Display Item Menu and cycle backward through the list (See here). | |
| Display Item Menu and cycle forward through Pokémon on the list (See here). | |
| Display Item Menu and cycle backward through Pokémon on the list (See here). | |
Changes the camera view.
| |
| Used to rotate the camera (free form). | |
| Zooms in and out. | |
| Pans around the screen. |
Stage Visual Key
Camera Boxes
| Item | Description |
|---|---|
| Teal Box | Camera Limit |
| Light Yellow Box | Blast Line |
| Blue Box | Camera Focal Box |
| Small Red Box | Unknown; It's attached to each characters' left |
| Small Blue Box | Unknown; It's attached to each characters' right |
Spawn Points
| Item | Description |
|---|---|
| Blue Plus | Character Starting Point |
| Green Plus | Character Respawn Point |
| Yellow Plus | Item Spawn Point |
| Red Plus | Enemy Spawn Point |
| Magenta Plus | Trophy Spawn Point |
| White Plus | Exit Point |
Structures
| Item | Description |
|---|---|
| Gray Structure | Stage Floor |
| Red Structure | Stage Ceiling |
| Blue Structure | Stage Left Wall |
| Green Structure | Stage Right Wall |
| Gray Platform | Solid No-Grab Platform |
| Blue Platform | Drop-Through Platform |
| Red Platform | Grab Platform |
Terrains
| Item | Description |
|---|---|
| Gray Platform | Basic Terrain |
| Brown Platform | Rock Terrain |
| Light Green Platform | Grass Terrain |
| Dark Red Platform | Dirt Terrain |
| Light Brown Platform | Wood Terrain |
| Blue Platform | Water Terrain |
| Light Blue Platform | Ice Terrain |
| White Platform | Snow Terrain |
| Dark Gray Platform | Light Metal Terrain |
| Dark Brown Platform | Heavy Metal Terrain |
| Yellow Platform | Alien Goop Terrain |
| Light Gray Platform | Game & Watch Terrain |
| Light Yellow Platform | Checkered Terrain |
Other
| Item | Description |
|---|---|
| Orange Box | Item pickup boxes (when a character's hitbox overlaps the item box, the character can pick it up. |
Collision Bubble Key
This is a list of all hitbox colors and what they are for. For more detail, see here.
| Item | Description |
|---|---|
| Yellow | Damageable |
| Red | Attacking |
| Blue | Intangible |
| Purple | Grabbing |
| Green | Invincible |
| Cyan | Shielding |
| Cyan-Blue | Absorbing |
| White | Special |
Battlefield
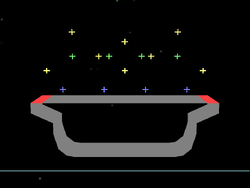
Battlefield is a mostly featureless stage. It has a moderate-to-large blast box. The spawn points placed in the center of each of the platforms, and respawn points are arranged evenly in the air above the stage. Item spawn points are scattered in the air. The whole stage has basic terrain. The stage also has 3 drop-through platforms and 2 grab-able ledges.
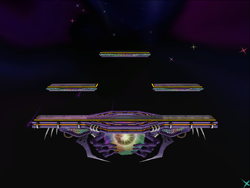
Battlefield
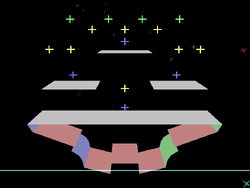
Battlefield showing Structure
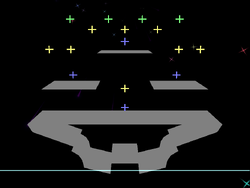
Battlefield showing Terrain
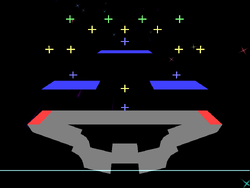
Battlefield showing Platforms
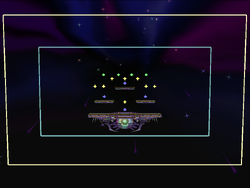
Battlefield showing the Blast Zone


Final Destination
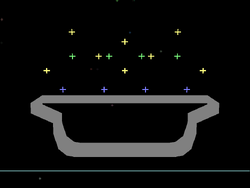
Final Destination features very little. It has a moderate-to-large blast box. The spawn points are evenly spaced out, as are the respawn points. Item spawn points are scattered in the air over the platform. The whole stage has basic terrain. Both ledges are grab-able, and the stage does not have any drop-through platforms.
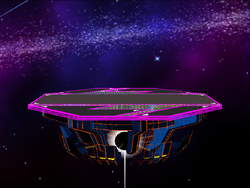
Final Destination
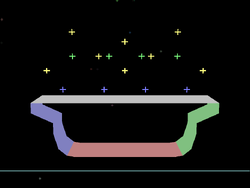
Final Destination showing Structure
Final Destination showing Terrain
Final Destination showing Platforms
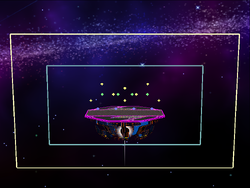
Final Destination showing the Blast Zone


Adventure Mode: Mushroom Kingdom
Adventure Mode: Underground Maze
Adventure Mode: Brinstar Escape Shaft
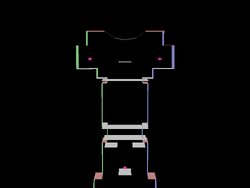
This is the Adventure Mode stage "Brinstar Escape Shaft". It features a wide and tall blast box, and a smaller and much thinner camera box. The stage itself is split into 6 sections by jump-through solid platforms. The spawn point is at the bottom right in the first section, and the respawn point follows player 1. The exit point is on the platform at the very top in the sixth section. Oddly, there is a single item spawn point in the center of the first section. There are five trophy spawn points: One towards the top of the first section, one on a platform in the second section, one on a platform towards the top of the third section, and one on either side of the sixth section. There are several drop-through platforms, but no grab-able ones. Almost all solid platforms have basic terrain, while the drop-through platforms have light metal terrain.
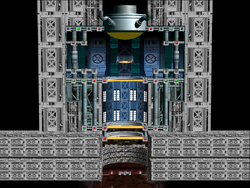
Brinstar Escape Shaft
Brinstar Escape Shaft showing Structure
Brinstar Escape Shaft showing Terrain
Brinstar Escape Shaftshowing Platforms
Brinstar Escape Shaft

Brinstar Escape Shaft showing Structure
Brinstar Escape Shaft showing Terrain
Brinstar Escape Shaftshowing Platforms
Brinstar Escape Shaft
Brinstar Escape Shaft showing Structure
Brinstar Escape Shaft showing Terrain
Brinstar Escape Shaft showing Platforms
Brinstar Escape Shaft showing the Blast Zone


