Lucario (SSB4)/Forward smash: Difference between revisions
From SmashWiki, the Super Smash Bros. wiki
Jump to navigationJump to search
No edit summary |
m (Text replacement - "== ([^=])" to "== $1") |
||
| (2 intermediate revisions by 2 users not shown) | |||
| Line 4: | Line 4: | ||
==Overview== | ==Overview== | ||
{{competitive expertise}} | {{competitive expertise}} | ||
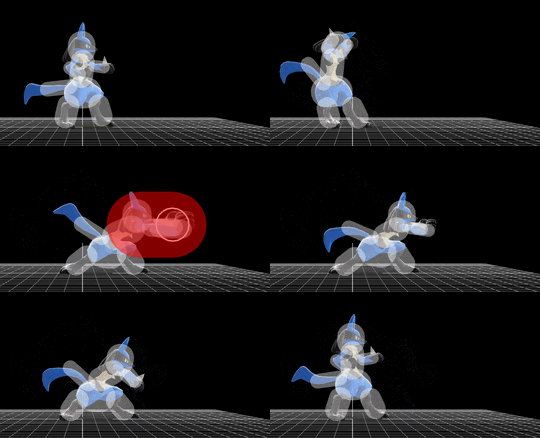
Lucario performs a double palm thrust, which releases a small burst of [[Aura]]. If Lucario is at max aura, this is the strongest smash attack in the game, reliably KOing anyone at 25% from the center of {{SSB4|Final Destination}} when fully charged. | Lucario performs a double palm thrust, which releases a small burst of [[Aura]]. If Lucario is at max aura, this is the strongest smash attack in the game, reliably KOing anyone at 25% from the center of {{SSB4|Final Destination}}, or at 0% near the ledge when fully charged. | ||
==Hitboxes== | ==Hitboxes== | ||
| Line 53: | Line 53: | ||
==Timing== | ==Timing== | ||
{|class="wikitable" | {|class="wikitable" | ||
!Charges between | |||
|1-2 | |||
|- | |||
!Clean hit | !Clean hit | ||
|22-23 | |22-23 | ||
| Line 60: | Line 62: | ||
!Late hit | !Late hit | ||
|24-25 | |24-25 | ||
|- | |- | ||
!Animation length | !Animation length | ||
| | |54 | ||
|} | |} | ||
{{FrameStripStart}} | {{FrameStripStart}} | ||
{{FrameStrip|t=Lag|c=1|e=LagChargeS}}{{FrameStrip|t=Lag|c=20|s=LagChargeE}}{{FrameStrip|t=Hitbox|c=2|e=HitboxChangeS}}{{FrameStrip|t=Hitbox|c=2|s=HitboxChangeE}}{{FrameStrip|t=Lag|c=29 | {{FrameStrip|t=Lag|c=1|e=LagChargeS}}{{FrameStrip|t=Lag|c=20|s=LagChargeE}}{{FrameStrip|t=Hitbox|c=2|e=HitboxChangeS}}{{FrameStrip|t=Hitbox|c=2|s=HitboxChangeE}}{{FrameStrip|t=Lag|c=29}} | ||
{{FrameStripEnd}} | {{FrameStripEnd}} | ||
{{FrameIconLegend|lag | {{FrameIconLegend|lag=y|hitbox=y|hitboxchange=y|charge=y}} | ||
{{MvSubNavLucario|g=SSB4}} | {{MvSubNavLucario|g=SSB4}} | ||
[[Category:Lucario (SSB4)]] | [[Category:Lucario (SSB4)]] | ||
[[Category:Forward smashes (SSB4)]] | [[Category:Forward smashes (SSB4)]] | ||
Latest revision as of 23:04, April 12, 2022
Overview[edit]
Lucario performs a double palm thrust, which releases a small burst of Aura. If Lucario is at max aura, this is the strongest smash attack in the game, reliably KOing anyone at 25% from the center of Final Destination, or at 0% near the ledge when fully charged.
Hitboxes[edit]
Timing[edit]
| Charges between | 1-2 |
|---|---|
| Clean hit | 22-23 |
| Late hit | 24-25 |
| Animation length | 54 |
Lag time |
Charge interval |
Hitbox |
Hitbox change |
|

