SSBM Icon.png

Mewtwo (SSBM)/Down tilt

From SmashWiki, the Super Smash Bros. wiki
Jump to navigationJump to search
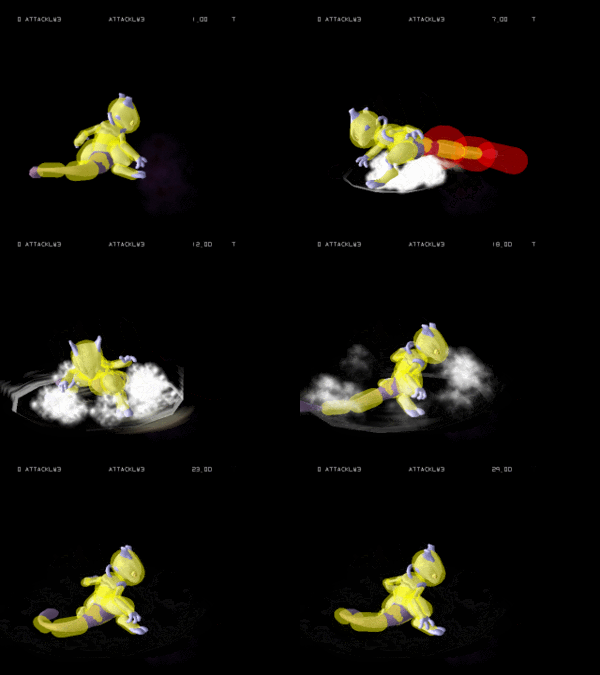
Hitbox visualization showing Mewtwo's down tilt.
Competitive.png This article or section may require competitive expertise.
You can discuss this issue on the talk page or edit this page to improve it.

Overview

Mewtwo does a spin with his tail sticking out. This is generally believed to be one of Mewtwo's best moves as well as one of the best down tilts in the entire game.

One of this move's greatest advantages is its speed, being Mewtwo's fastest move on the ground. It's one of the down tilts with the least startup, while also having a very short end lag due to its high interruptibility window. This makes it a very low risk move that can be used in the neutral for being difficult to punish if it misses, as well as Mewtwo's go-to close quarters tool.

Another good thing about it is its range, being just enough to avoid every single shield grab in the game if spaced properly.

But the number one aspect that makes this move good is that it's a combo starter, and Mewtwo's best one by far. Typical follow-ups for down tilt include itself at lower percents, his forward aerial to set up a juggling situation, and his grab, to then use up throw to combo fast fallers at low percents, down throw to set up a tech chase situation, or KO his opponent with up or back throw.

Hitboxes

ID Part Damage SD Angle BK KS FKV Radius Bone Offset Clang Rebound Effect G A Sound
0 0 9% 0 AngleIcon80.png 40 80 0 4.2966 21 0.0 0.0 0.0 HitboxTableIcon(Clang).png HitboxTableIcon(Rebound).png EffectIcon(Normal).png HitboxTableIcon(GroundedTrue).png HitboxTableIcon(AerialTrue).png S Kick
1 0 8% 0 AngleIcon80.png 40 80 0 3.5154 23 0.0 0.0 0.0 HitboxTableIcon(Clang).png HitboxTableIcon(Rebound).png EffectIcon(Normal).png HitboxTableIcon(GroundedTrue).png HitboxTableIcon(AerialTrue).png S Kick
2 0 5% 0 AngleIcon80.png 40 80 0 2.7342 25 0.0 0.0 0.0 HitboxTableIcon(Clang).png HitboxTableIcon(Rebound).png EffectIcon(Normal).png HitboxTableIcon(GroundedTrue).png HitboxTableIcon(AerialTrue).png S Kick

Timing

Hitboxes 5-7
Interruptible 20
Animation length 29
FrameIcon(Lag).png FrameIcon(Lag).png FrameIcon(Lag).png FrameIcon(Lag).png FrameIcon(Hitbox).png FrameIcon(Hitbox).png FrameIcon(Hitbox).png FrameIcon(Lag).png FrameIcon(Lag).png FrameIcon(Lag).png FrameIcon(Lag).png FrameIcon(Lag).png FrameIcon(Lag).png FrameIcon(Lag).png FrameIcon(Lag).png FrameIcon(Lag).png FrameIcon(Lag).png FrameIcon(Lag).png FrameIcon(Lag).png FrameIcon(Interruptible).png FrameIcon(Interruptible).png FrameIcon(Interruptible).png FrameIcon(Interruptible).png FrameIcon(Interruptible).png FrameIcon(Interruptible).png FrameIcon(Interruptible).png FrameIcon(Interruptible).png FrameIcon(Interruptible).png FrameIcon(Interruptible).png
Legend (1 square = 1 frame)
FrameIcon(Lag).png
Lag time
FrameIcon(Hitbox).png
Hitbox
FrameIcon(Interruptible).png
Interruptible