SSBB Icon.png

Mario (SSBB)/Neutral attack/Hit 2: Difference between revisions

From SmashWiki, the Super Smash Bros. wiki
Jump to navigationJump to search
m (see my edit summary on Mario (SSBB)/Neutral attack 1)
Line 1: Line 1:
{{ArticleIcons|ssbb=y}}
{{merge|Mario (SSBB)/Neutral attack 1|See description on target page}}
==Overview==
==Overview==
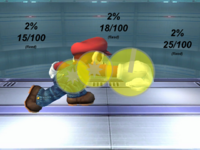
[[File:MarioSSBBNeutral(hit2).png|thumb|Hitbox of the move.]]
[[File:MarioSSBBNeutral(hit2).png|thumb|Hitbox of the move.]]

Revision as of 16:07, September 27, 2013

Overview

Hitbox of the move.

The second jab deals 1% less damage than the first jab, with negligibly more fixed knockback. It follows into the third hit of Mario's jab seamlessly, and can jab cancel into a tilt or down smash moderately well. It cannot jab lock however like the first jab can, and thus one jab locking with the first jab will have to be careful to not use the second jab.

Post hit data

Hitbox Base knockback Knockback scaling KO percent with poor DI KO percent with no DI KO percent with good DI
Fist 1035 0 NA NA NA
Arm 967 0 NA NA NA
Body 1194 0 NA NA NA

Hitboxes

ID Part Damage SD Angle BK KS FKV Radius Bone Offset SDIx T% Clang Rebound Type Effect G A Sound Direct
0 0 2% 0 Sakurai angle 0 100 18 5.0E-5 46 -2.3333333333333E-5 0.0 0.0 1.0x 1.0x 0% no flag data specified
1 0 2% 0 Sakurai angle 0 100 15 4.6666666666667E-5 22 0.0 0.0 0.0 1.0x 1.0x 0% no flag data specified
2 0 2% 0 AngleIcon80.png 0 100 25 6.6666666666667E-5 47 -7.0E-5 0.0 0.0 1.0x 1.0x 0% no flag data specified

Timing

Hitbox 2-3
Continuation window 6-24
Auto-jab 10
Animation length 17
Interruptible 19
FrameIcon(Lag).png FrameIcon(Hitbox).png FrameIcon(Hitbox).png FrameIcon(Lag).png FrameIcon(Lag).png FrameIcon(Lag).png FrameIcon(Lag).png FrameIcon(Lag).png FrameIcon(Lag).png FrameIcon(Lag).png FrameIcon(Lag).png FrameIcon(Lag).png FrameIcon(Lag).png FrameIcon(Lag).png FrameIcon(Lag).png FrameIcon(Lag).png FrameIcon(Lag).png FrameIcon(Interruptible).png FrameIcon(Blank).png FrameIcon(Blank).png FrameIcon(Blank).png FrameIcon(Blank).png FrameIcon(Blank).png FrameIcon(Blank).png
FrameIcon(Blank).png FrameIcon(Blank).png FrameIcon(Blank).png FrameIcon(Blank).png FrameIcon(Blank).png FrameIcon(Continuable).png FrameIcon(Continuable).png FrameIcon(Continuable).png FrameIcon(Continuable).png FrameIcon(Continuable).png FrameIcon(Continuable).png FrameIcon(Continuable).png FrameIcon(Continuable).png FrameIcon(Continuable).png FrameIcon(Continuable).png FrameIcon(Continuable).png FrameIcon(Continuable).png FrameIcon(Continuable).png FrameIcon(Continuable).png FrameIcon(Continuable).png FrameIcon(Continuable).png FrameIcon(Continuable).png FrameIcon(Continuable).png FrameIcon(Continuable).png
Legend (1 square = 1 frame)
FrameIcon(Lag).png
Lag time
FrameIcon(Hitbox).png
Hitbox
FrameIcon(Continuable).png
Continuable
FrameIcon(Interruptible).png
Interruptible