Serpent King (talk | contribs) No edit summary |
SuperSqank (talk | contribs) No edit summary |
||
| (One intermediate revision by one other user not shown) | |||
| Line 1: | Line 1: | ||
{{ArticleIcons|ssb4=y}} | {{ArticleIcons|ssb4=y}} | ||
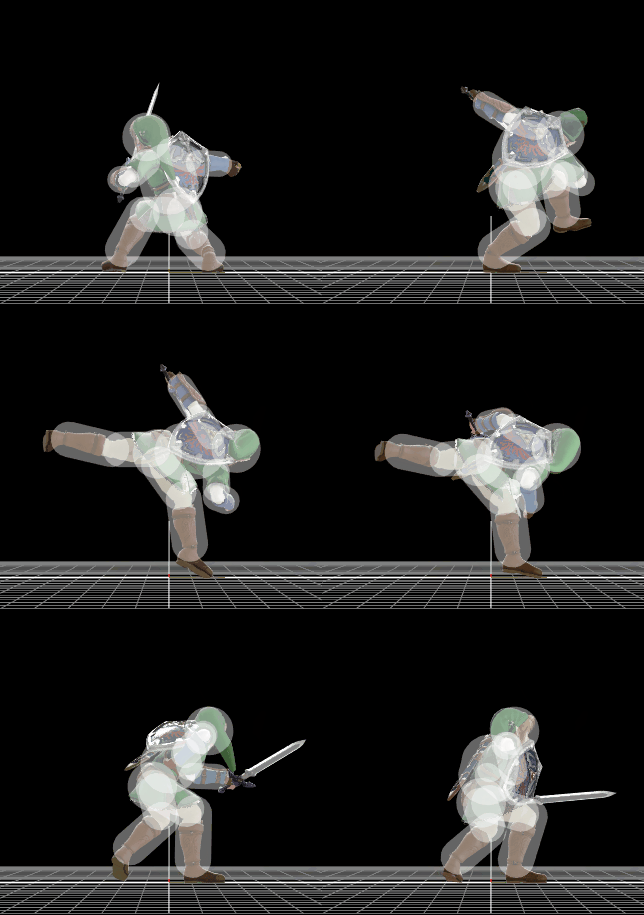
[[File:LinkThrowBack.gif|thumb|270px|Hitbox visualization showing Link's back throw.]] | [[File:LinkThrowBack.gif|thumb|270px|Hitbox visualization showing Link's back throw.]] | ||
==Overview== | |||
{{competitive expertise}} | {{competitive expertise}} | ||
== | ==Throw and Hitbox Data== | ||
{{SSB4HitboxTableHeader}} | ===Hitboxes=== | ||
{{ | {{SSB4HitboxTableHeader|special=y}} | ||
{{SSB4SpecialHitboxTableRow | |||
|id=0 | |id=0 | ||
|part=0 | |part=0 | ||
| Line 23: | Line 15: | ||
|sd=1 | |sd=1 | ||
|angle=361 | |angle=361 | ||
|af=3 | |||
|bk=0 | |bk=0 | ||
|ks=0 | |ks=0 | ||
| Line 39: | Line 32: | ||
|slvl=M | |slvl=M | ||
}} | }} | ||
{{ | {{SSB4SpecialHitboxTableRow | ||
|id=1 | |id=1 | ||
|part=0 | |part=0 | ||
| Line 45: | Line 38: | ||
|sd=1 | |sd=1 | ||
|angle=361 | |angle=361 | ||
|af=3 | |||
|bk=0 | |bk=0 | ||
|ks=0 | |ks=0 | ||
| Line 63: | Line 57: | ||
|} | |} | ||
===Throw=== | |||
{{SSB4ThrowTableHeader}} | |||
{{SSB4ThrowTableRow | |||
|id=0 | |||
|damage=4% | |||
|af=3 | |||
|angle=130 | |||
|bk=50 | |||
|ks=110 | |||
|fkv=0 | |||
|bn=0 | |||
|trip=0 | |||
|type=Throwing | |||
|effect=Normal | |||
|slvl=S | |||
|sfx=None | |||
}} | |||
{{SSB4ThrowTableRow | |||
|id=1 | |||
|damage=3% | |||
|af=3 | |||
|angle=361 | |||
|bk=40 | |||
|ks=100 | |||
|fkv=0 | |||
|bn=0 | |||
|trip=0 | |||
|type=Throwing | |||
|effect=Normal | |||
|slvl=S | |||
|sfx=None | |||
}} | |||
|} | |||
==Timing== | |||
{|class="wikitable" | |||
!Invincibility | |||
|1-18 | |||
|- | |||
!Hitbox | |||
|12-13 | |||
|- | |||
!Throw Release | |||
|14 | |||
|- | |||
!Interruptible | |||
|39 | |||
|- | |||
!Animation length | |||
|44 | |||
|} | |||
{{FrameStripStart}} | |||
{{FrameStrip|t=Lag|c=11}}{{FrameStrip|t=Hitbox|c=2|e=HitboxThrowS}}{{FrameStrip|t=Lag|c=25|s=LagThrowE}}{{FrameStrip|t=Interruptible|c=6}} | |||
|- | |||
{{FrameStrip|t=Invincible|c=18}}{{FrameStrip|t=Vulnerable|c=26}} | |||
{{FrameStripEnd}} | |||
{{FrameIconLegend|lag=y|hitbox=y|throw=y|vulnerable=y|invincible=y|interruptible=y}} | |||
{{MvSubNavLink|g=SSB4}} | {{MvSubNavLink|g=SSB4}} | ||
[[Category:Link (SSB4)]] | [[Category:Link (SSB4)]] | ||
[[Category:Back throws (SSB4)]] | [[Category:Back throws (SSB4)]] | ||
Latest revision as of 17:35, January 12, 2021
OverviewEdit
Throw and Hitbox DataEdit
HitboxesEdit
ThrowEdit
| ID | Damage | Angle | BK | KS | FKV | Bone | FFx | Type | Effect | Sound | |
|---|---|---|---|---|---|---|---|---|---|---|---|
| 0 | 4% | Forwards | 50 | 110 | 0 | 0 | None | None | |||
| 1 | 3% | Forwards | 40 | 100 | 0 | 0 | None | None | |||
TimingEdit
| Invincibility | 1-18 |
|---|---|
| Hitbox | 12-13 |
| Throw Release | 14 |
| Interruptible | 39 |
| Animation length | 44 |
| Lag time |
Hitbox |
Vulnerable |
Invincible |
Throw point |
Interruptible |
|
