SSBU Icon.png

Ice Climbers (SSBU)/Back aerial

From SmashWiki, the Super Smash Bros. wiki
Jump to navigationJump to search
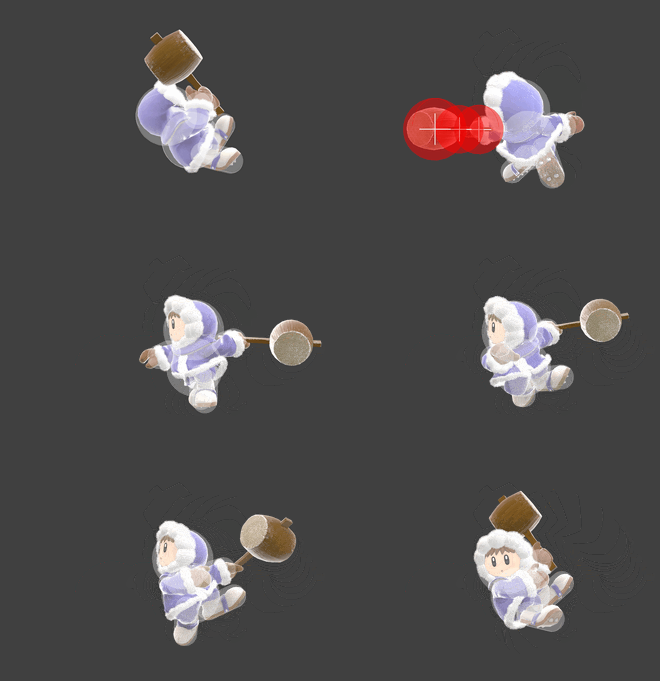
Hitbox visualization showing Popo's back aerial.
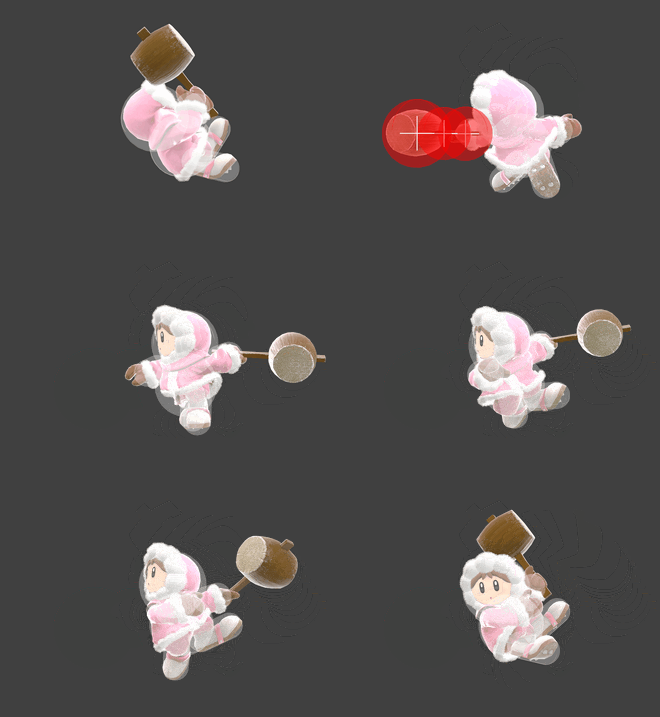
Hitbox visualization showing Nana's back aerial.

Overview[edit]

Each of the duo whips around, flicking their mallet outward. The attack boasts high speed and minimal landing lag, almost as low as an autocancel, with decent range, activity, and ending lag to boot. Due to the lack of landing delay and its above-average shieldstun, it's insanely safe, leaving absolutely no opening after being blocked. On top of being so safe, it's remarkably strong, dealing a boatload of damage and taking stocks at around 110%.

The aforementioned frame data allows back air to start combos in spite of its great power. A landing back aerial can lead to a simple tilt to great effect, a smash attack to send opponents offstage, or a dash attack, stacking on half a stock's worth of damage with the combos that follow. It can additionally be used as a powerful finisher after landing an up tilt or down throw at a variety of percentages, even those high enough to kill. It hasn't got much use in desync combos, however.

While edgeguarding is usually left to neutral or down aerial, back aerial is a great ledge trump punish, and still is useful to KO opponents who are forced to recover predictably. Despite the Climbers' above-average jump height and very poor air speed, back airs can also be chained together thanks to the extra frame advantage from the 2nd Climber's attack. This can cause a lot of damage and even lead to gimps at early percents, and can occasionally be chained further along when desynced. Desyncing can also let the duo swing to a rhythm, erecting a wall of pain with the near-constant swinging.

On top of being a reliable move to punish and KO with, back aerial can pull a lot of weight in corner and ledgetrapping scenarios. The partner's additional swing effectively gives the move much more range and activity with how their aerial is slightly delayed and positioned differently, covering more of the target's options than usual. What's more, a slight desync can have the duo hopping up and down one after the other, constantly posing the threat of a sudden attack while one's down time between jumps is covered by the other. On top of that, the move's risk-free nature means it can easily bait an out of shield option or let the duo continue exerting pressure even if they guess incorrectly.

Upon isolation, the lead climber's back aerial retains most of the excellent traits of its dual form, just less so than before. As such, it's able to serve a solo climber quite well, only now it's less damaging and punishable by a handful of out of shield options.


Overall, the Ice Climbers' back aerial is at worst, a premium kill move with a combination of speed, range, and safety that many fighters can't replicate; and is head and shoulders above the rest in its prime.

Hitboxes[edit]

ID Part Rehit rate Damage SD Angle Angle type BK KS FKV Set weight Radius Bone Offset SDI× T% Clang Rebound Effect Type G A Sound Direct Hit bits Hit part Blockable Reflectable Absorbable Flinchless No GFX Heedless
Leader
0 0 0 10.0% 0 Sakurai angle Backward 25 115 0 HitboxTableIcon(False).png 3.0 havel 0.0 0.0 0.0 1.0× 1.0× 0% HitboxTableIcon(Clang).png HitboxTableIcon(Rebound).png EffectIcon(Normal).png TypeIcon(Hammer).png HitboxTableIcon(GroundedTrue).png HitboxTableIcon(AerialTrue).png M Punch SpecialsDirect.png All All HitboxTableIcon(Blockable).png HitboxTableIcon(Unreflectable).png HitboxTableIcon(Unabsorbable).png HitboxTableIcon(False).png HitboxTableIcon(False).png HitboxTableIcon(False).png
1 0 0 10.0% 0 Sakurai angle Backward 25 115 0 HitboxTableIcon(False).png 3.0 havel 0.0 3.0 0.0 1.0× 1.0× 0% HitboxTableIcon(Clang).png HitboxTableIcon(Rebound).png EffectIcon(Normal).png TypeIcon(Hammer).png HitboxTableIcon(GroundedTrue).png HitboxTableIcon(AerialTrue).png M Punch SpecialsDirect.png All All HitboxTableIcon(Blockable).png HitboxTableIcon(Unreflectable).png HitboxTableIcon(Unabsorbable).png HitboxTableIcon(False).png HitboxTableIcon(False).png HitboxTableIcon(False).png
2 0 0 10.0% 0 Sakurai angle Backward 25 115 0 HitboxTableIcon(False).png 4.0 havel 0.0 7.0 0.0 1.0× 1.0× 0% HitboxTableIcon(Clang).png HitboxTableIcon(Rebound).png EffectIcon(Normal).png TypeIcon(Hammer).png HitboxTableIcon(GroundedTrue).png HitboxTableIcon(AerialTrue).png M Punch SpecialsDirect.png All All HitboxTableIcon(Blockable).png HitboxTableIcon(Unreflectable).png HitboxTableIcon(Unabsorbable).png HitboxTableIcon(False).png HitboxTableIcon(False).png HitboxTableIcon(False).png
Partner
0 0 0 7.5% 0 Sakurai angle Backward 25 138 0 HitboxTableIcon(False).png 3.0 havel 0.0 0.0 0.0 1.0× 1.0× 0% HitboxTableIcon(Clang).png HitboxTableIcon(Rebound).png EffectIcon(Normal).png TypeIcon(Hammer).png HitboxTableIcon(GroundedTrue).png HitboxTableIcon(AerialTrue).png M Punch SpecialsDirect.png All All HitboxTableIcon(Blockable).png HitboxTableIcon(Unreflectable).png HitboxTableIcon(Unabsorbable).png HitboxTableIcon(False).png HitboxTableIcon(False).png HitboxTableIcon(False).png
1 0 0 7.5% 0 Sakurai angle Backward 25 138 0 HitboxTableIcon(False).png 3.0 havel 0.0 3.0 0.0 1.0× 1.0× 0% HitboxTableIcon(Clang).png HitboxTableIcon(Rebound).png EffectIcon(Normal).png TypeIcon(Hammer).png HitboxTableIcon(GroundedTrue).png HitboxTableIcon(AerialTrue).png M Punch SpecialsDirect.png All All HitboxTableIcon(Blockable).png HitboxTableIcon(Unreflectable).png HitboxTableIcon(Unabsorbable).png HitboxTableIcon(False).png HitboxTableIcon(False).png HitboxTableIcon(False).png
2 0 0 7.5% 0 Sakurai angle Backward 25 138 0 HitboxTableIcon(False).png 4.0 havel 0.0 7.0 0.0 1.0× 1.0× 0% HitboxTableIcon(Clang).png HitboxTableIcon(Rebound).png EffectIcon(Normal).png TypeIcon(Hammer).png HitboxTableIcon(GroundedTrue).png HitboxTableIcon(AerialTrue).png M Punch SpecialsDirect.png All All HitboxTableIcon(Blockable).png HitboxTableIcon(Unreflectable).png HitboxTableIcon(Unabsorbable).png HitboxTableIcon(False).png HitboxTableIcon(False).png HitboxTableIcon(False).png

Timing[edit]

Attack[edit]

Initial autocancel 1-7
Hitboxes 8-11
Ending autocancel 19-
Interruptible 36
Animation length 45
FrameIcon(Lag).png FrameIcon(Lag).png FrameIcon(Lag).png FrameIcon(Lag).png FrameIcon(Lag).png FrameIcon(Lag).png FrameIcon(Lag).png FrameIcon(Hitbox).png FrameIcon(Hitbox).png FrameIcon(Hitbox).png FrameIcon(Hitbox).png FrameIcon(Lag).png FrameIcon(Lag).png FrameIcon(Lag).png FrameIcon(Lag).png FrameIcon(Lag).png FrameIcon(Lag).png FrameIcon(Lag).png FrameIcon(Lag).png FrameIcon(Lag).png FrameIcon(Lag).png FrameIcon(Lag).png FrameIcon(Lag).png FrameIcon(Lag).png FrameIcon(Lag).png FrameIcon(Lag).png FrameIcon(Lag).png FrameIcon(Lag).png FrameIcon(Lag).png FrameIcon(Lag).png FrameIcon(Lag).png FrameIcon(Lag).png FrameIcon(Lag).png FrameIcon(Lag).png FrameIcon(Lag).png FrameIcon(Interruptible).png FrameIcon(Interruptible).png FrameIcon(Interruptible).png FrameIcon(Interruptible).png FrameIcon(Interruptible).png FrameIcon(Interruptible).png FrameIcon(Interruptible).png FrameIcon(Interruptible).png FrameIcon(Interruptible).png FrameIcon(Interruptible).png
FrameIcon(Autocancel).png FrameIcon(Autocancel).png FrameIcon(Autocancel).png FrameIcon(Autocancel).png FrameIcon(Autocancel).png FrameIcon(Autocancel).png FrameIcon(Autocancel).png FrameIcon(Blank).png FrameIcon(Blank).png FrameIcon(Blank).png FrameIcon(Blank).png FrameIcon(Blank).png FrameIcon(Blank).png FrameIcon(Blank).png FrameIcon(Blank).png FrameIcon(Blank).png FrameIcon(Blank).png FrameIcon(Blank).png FrameIcon(Autocancel).png FrameIcon(Autocancel).png FrameIcon(Autocancel).png FrameIcon(Autocancel).png FrameIcon(Autocancel).png FrameIcon(Autocancel).png FrameIcon(Autocancel).png FrameIcon(Autocancel).png FrameIcon(Autocancel).png FrameIcon(Autocancel).png FrameIcon(Autocancel).png FrameIcon(Autocancel).png FrameIcon(Autocancel).png FrameIcon(Autocancel).png FrameIcon(Autocancel).png FrameIcon(Autocancel).png FrameIcon(Autocancel).png FrameIcon(Autocancel).png FrameIcon(Autocancel).png FrameIcon(Autocancel).png FrameIcon(Autocancel).png FrameIcon(Autocancel).png FrameIcon(Autocancel).png FrameIcon(Autocancel).png FrameIcon(Autocancel).png FrameIcon(Autocancel).png FrameIcon(Autocancel).png

Landing lag[edit]

Interruptible 8
Animation length 11
FrameIcon(Lag).png FrameIcon(Lag).png FrameIcon(Lag).png FrameIcon(Lag).png FrameIcon(Lag).png FrameIcon(Lag).png FrameIcon(Lag).png FrameIcon(Interruptible).png FrameIcon(Interruptible).png FrameIcon(Interruptible).png FrameIcon(Interruptible).png
Legend (1 square = 1 frame)
FrameIcon(Lag).png
Lag time
FrameIcon(Hitbox).png
Hitbox
FrameIcon(Autocancel).png
Autocancel
FrameIcon(Interruptible).png
Interruptible