Yo-yo glitch: Difference between revisions
Serpent King (talk | contribs) mNo edit summary |
(Cleaned up) |
||
| Line 1: | Line 1: | ||
{{ArticleIcons|ssbm=y}} | {{ArticleIcons|ssbm=y}} | ||
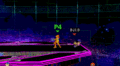
[[Image:Yoyo glich hitbox.png|thumb|Ness taunting alongside the disconnected yo-yo hitbox, seen in red.]] | [[Image:Yoyo glich hitbox.png|thumb|Ness taunting alongside the disconnected yo-yo hitbox, seen in red.]] | ||
The '''yo-yo glitch''' refers to a glitch in ''[[Super Smash Bros. Melee]]'' done using {{SSBM|Ness}}'s [http://i.imgur.com/HAWif.gif yo-yo]. It can be used to attack or grab with near limitless range or attach certain single-[[hitbox]] attacks to Ness's body. The discovery of the glitch was a collaborative effort between {{Sm|VilNess}}, {{Sm|LonelyNess}}, and {{Sm|Dan Smith}}, and was spurred on by an innocuous video of an unknown Japanese player accidentally dropping a yo-yo hitbox. | The '''yo-yo glitch''' refers to a glitch in ''[[Super Smash Bros. Melee]]'' done using {{SSBM|Ness}}'s [http://i.imgur.com/HAWif.gif yo-yo]. It can be used to attack or grab with near limitless range or attach certain single-[[hitbox]] attacks to Ness's body. The discovery of the glitch was a collaborative effort between {{Sm|VilNess}}, {{Sm|LonelyNess}}, and {{Sm|Dan Smith}}, and was spurred on by an innocuous video of an unknown Japanese player accidentally dropping a yo-yo hitbox. | ||
| Line 7: | Line 6: | ||
==Mechanics== | ==Mechanics== | ||
Ness's [[up smash]] consists of 3 | Ness's [[up smash]] consists of 3 states each with its own hitbox: outreaching, spinning, and swinging. The yo-yo glitch drops the last [[hitbox]] of the up smash onto the ground and leaves it there until Ness gets [[KO]]'d or uses a non-[[projectile]] attack. | ||
==How | ==How To Perform== | ||
Ness's up smash must first be used and charged up slightly, then hit any opponent or damageable object while in its spinning state before being released. The yo-yo can't hit anything after it is released into its swinging state, although the outcome of the glitch is not affected if it does so while in its outreaching state. | |||
===Followups=== | |||
*'''Deadline''': If Ness uses any non-projectile attack (including a [[grab]]) after performing the yo-yo glitch, any characters or damageable stage elements between Ness and the location where the glitch was performed will be hit by said attack. If a grab is used, then only the target closest to Ness will be affected. This followup technique to the yo-yo glitch was discovered by {{Sm|LonelyNess}}. | |||
*'''Thunder Jacket''': After performing the yo-yo glitch, if the player blasts with [[PK Thunder 2]] against a floor or a grabbable ledge, the hitbox of the move will be attached to Ness' body. Besides hitting opponents and destructible stage elements, it can also [[Priority|clash]] with opposing attacks. This followup technique to the yo-yo glitch was discovered by {{Sm|Simna ibn Sind}}. | |||
*'''Spike Jacket''': If the player uses Ness' [[down aerial]] and lands immediately after its hitbox comes out (which can be done by [[SHFFL]]ing), it will be attached to his lower body, [[meteor smash]]ing opponents on contact. This followup technique to the yo-yo glitch was discovered by {{Sm|MasterofFlames}}. | |||
*'''Star Jacket''': Similar to the Spike Jacket, the hitbox of Ness' [[up aerial]] will be stuck to his upper body if he uses the move and lands after the hitbox comes out. It was as well discovered by MasterofFlames. | |||
*'''Toy Jacket''': After performing the glitch, if Ness uses an up smash or [[down smash]] on a disappearing platform (such as the awnings in [[Onett]]) and times it so that the platform disappears right as the yo-yo comes out, the hitbox of either move will be attached to his feet, causing either weak or strong yo-yo knockback based on the timing of the setup. This followup technique was discovered by {{Sm|Earthbound360}}. | |||
*'''{{SSBM|Kirby}} Jacket''': If Ness is {{b|Inhale|Kirby}}d and spat out by Kirby after performing the glitch, the hitbox of Kirby's star launch will be attached to Ness' lower body. This followup was discovered by Fisac. | |||
*'''Throw Jacket''': If any other character [[throw]]s Ness into a wall or ceiling after he performs the glitch, the hitbox of said throw will be attached to Ness body, damaging opponents on contact. Interestingly, KOing them in this way yields the [[List of Bonuses#Dead-Weight KO|Dead-Weight KO]] bonus. This followup was discovered by {{Sm|Kahnu}}. | |||
== | ===Jackets=== | ||
After using the yoyo glitch, certain other attacks can be used to replace the yo-yo hitbox with the hitbox of the attack used. The rules of the regular yo-yo glitch still apply when using a jacket. | |||
After using the yoyo glitch, certain other attacks can be used to replace the | |||
*[[PK Thunder]] - must either be used to hit Ness into the ground or at a ledge to grab it. | *[[PK Thunder]] - must either be used to hit Ness into the ground or at a ledge to grab it. | ||
| Line 108: | Line 35: | ||
==Super Yo-yo Glitch== | ==Super Yo-yo Glitch== | ||
{{cleanup|Sounds speculative}} | |||
It is a very rare occurrence, so very little about it is known. Its effects (including but not limited to infinite Jackets and instant KO throws) are similar to those of the | It is a very rare occurrence, so very little about it is known. Its effects (including but not limited to infinite Jackets and instant KO throws) are similar to those of the yo-yo glitch, but are more lethal and have longer lasting effects. Most Ness mains don't believe in its existence due to little evidence. This technique holds much value to Ness players and is said to be the secret to beating the [[Bowser Challenge]]. | ||
Most Ness mains don't believe in | |||
This technique holds much value to Ness players and is said to be the secret to beating the [[Bowser Challenge]]. | |||
==Gallery== | ==Gallery== | ||
Revision as of 18:09, December 28, 2015

The yo-yo glitch refers to a glitch in Super Smash Bros. Melee done using Ness's yo-yo. It can be used to attack or grab with near limitless range or attach certain single-hitbox attacks to Ness's body. The discovery of the glitch was a collaborative effort between VilNess, LonelyNess, and Dan Smith, and was spurred on by an innocuous video of an unknown Japanese player accidentally dropping a yo-yo hitbox.
The glitch can be performed in all versions of Melee.
Mechanics
Ness's up smash consists of 3 states each with its own hitbox: outreaching, spinning, and swinging. The yo-yo glitch drops the last hitbox of the up smash onto the ground and leaves it there until Ness gets KO'd or uses a non-projectile attack.
How To Perform
Ness's up smash must first be used and charged up slightly, then hit any opponent or damageable object while in its spinning state before being released. The yo-yo can't hit anything after it is released into its swinging state, although the outcome of the glitch is not affected if it does so while in its outreaching state.
Followups
- Deadline: If Ness uses any non-projectile attack (including a grab) after performing the yo-yo glitch, any characters or damageable stage elements between Ness and the location where the glitch was performed will be hit by said attack. If a grab is used, then only the target closest to Ness will be affected. This followup technique to the yo-yo glitch was discovered by LonelyNess.
- Thunder Jacket: After performing the yo-yo glitch, if the player blasts with PK Thunder 2 against a floor or a grabbable ledge, the hitbox of the move will be attached to Ness' body. Besides hitting opponents and destructible stage elements, it can also clash with opposing attacks. This followup technique to the yo-yo glitch was discovered by Simna ibn Sind.
- Spike Jacket: If the player uses Ness' down aerial and lands immediately after its hitbox comes out (which can be done by SHFFLing), it will be attached to his lower body, meteor smashing opponents on contact. This followup technique to the yo-yo glitch was discovered by MasterofFlames.
- Star Jacket: Similar to the Spike Jacket, the hitbox of Ness' up aerial will be stuck to his upper body if he uses the move and lands after the hitbox comes out. It was as well discovered by MasterofFlames.
- Toy Jacket: After performing the glitch, if Ness uses an up smash or down smash on a disappearing platform (such as the awnings in Onett) and times it so that the platform disappears right as the yo-yo comes out, the hitbox of either move will be attached to his feet, causing either weak or strong yo-yo knockback based on the timing of the setup. This followup technique was discovered by Earthbound360.
- Kirby Jacket: If Ness is Inhaled and spat out by Kirby after performing the glitch, the hitbox of Kirby's star launch will be attached to Ness' lower body. This followup was discovered by Fisac.
- Throw Jacket: If any other character throws Ness into a wall or ceiling after he performs the glitch, the hitbox of said throw will be attached to Ness body, damaging opponents on contact. Interestingly, KOing them in this way yields the Dead-Weight KO bonus. This followup was discovered by Kahnu.
Jackets
After using the yoyo glitch, certain other attacks can be used to replace the yo-yo hitbox with the hitbox of the attack used. The rules of the regular yo-yo glitch still apply when using a jacket.
- PK Thunder - must either be used to hit Ness into the ground or at a ledge to grab it.
- Down aerial
- Up aerial
- Down smash
- Inhale
- Throw - must be thrown at wall or ceiling
- Parasol
- Barrel Cannon
If any non-projectile attack other than the ones listed is used to hit all targets between Ness and the location this glitch was performed, the jacket will be transferred to the opponent, allowing for near-limitless range.
Super Yo-yo Glitch

It is a very rare occurrence, so very little about it is known. Its effects (including but not limited to infinite Jackets and instant KO throws) are similar to those of the yo-yo glitch, but are more lethal and have longer lasting effects. Most Ness mains don't believe in its existence due to little evidence. This technique holds much value to Ness players and is said to be the secret to beating the Bowser Challenge.
Gallery
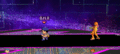
Ness performs the first step, creating a trap with a dropped hitbox.
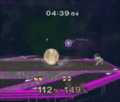
If the enemy is in between Ness and the dropped hitbox, all of his standard attacks, smash attacks, grabs, and PK Thunder 2 will hit the opponent.
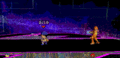
Not only can one grab the enemy, but smash attacks work too.
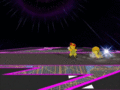
Using the deadline to smash from long range, with hitboxes visible.
Deadline even works with PK Thunder 2, the attack that occurs when Ness hits himself with PK Thunder.

Ness runs into Samus while wearing a Thunder Jacket
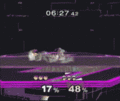
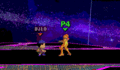
The glitch is viable for tournament use: here, Mofo performs the glitch and grabs Hax (Captain Falcon) from long range.
In the same match, Mofo installs a Thunder Jacket. He is hit by Hax, who is KO'd by the jacket. Mofo is hit by the tail of his PK Thunder and survives.


Demonstration videos
- A video that showcases the yo-yo glitch.
- Another video showing the glitch
- 2015 guide