SSBU Icon.png

Jigglypuff (SSBU)/Side special

From SmashWiki, the Super Smash Bros. wiki
Jump to navigationJump to search
This article is about the hitbox visualization in Super Smash Bros. Ultimate. For the move itself, see Pound.
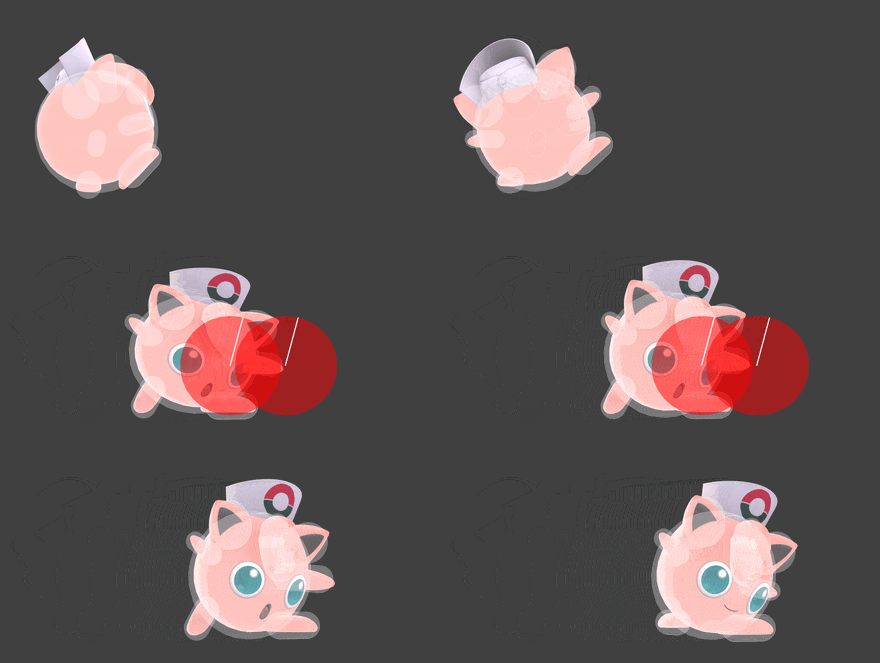
Hitbox visualization showing Jigglypuff's side special, Pound.
Competitive.png This article or section may require competitive expertise.
You can discuss this issue on the talk page or edit this page to improve it.

Overview[edit]

Rears back, before throwing a punch in front of it whilst travelling a short distance forwards. This move deals moderate knockback to opponents, also sporting a fairly large and long-lasting hitbox which doesn't deteriorate in power, although it lacks reasonable kill power. In the air, Pound briefly pauses Jigglypuff's descent, assisting in recoveries back to the stage and even gaining additional height when used in tandem with its multiple double jumps. Additionally, it can be angled either up or down in the air, slightly effecting its direction of travel in the air.

Pound is an important move in Jigglypuff's aerial-focused neutral, in large part due to the moves frame data. The move's short duration and lack of end lag in the air allows it to be used frequently in the air, assisting in approaching opponents especially if they have been conditioned to shield. Compounding this is Pound's ability to pressure shields - in addition to being relatively safe on shield especially if hit late into the hitbox's duration, Pound deals high damage to shields, punishing unaware opponents for carelessly shielding. Finally, hitting the move on opponents deals high hitstun, giving the move combo potential at lower percents.

Update History[edit]

Super Smash Bros. Ultimate 6.0.0

  • Buff Pound inflicts 2 additional frames of hitstun, and has gained a shieldstun multiplier of 1.5×, improving its combo potential and shield pressuring ability.

Hitboxes[edit]

ID Part Rehit rate Damage SD Angle Angle type BK KS FKV Set weight Radius Bone Offset SDI× T% Clang Rebound Effect Type G A Sound Direct Hit bits Hit part Blockable Reflectable Absorbable Flinchless No GFX Heedless Hitstun Shieldstun
0 0 0 11.0% 20.0 AngleIcon75.png Forward 52 75 0 HitboxTableIcon(False).png 4.5 top 0.0 4.0 10.0 1.0× 1.0× 40% HitboxTableIcon(Clang).png HitboxTableIcon(Rebound).png EffectIcon(Normal).png TypeIcon(Hand).png HitboxTableIcon(GroundedTrue).png HitboxTableIcon(AerialTrue).png L Paper SpecialsDirect.png All All HitboxTableIcon(Blockable).png HitboxTableIcon(Unreflectable).png HitboxTableIcon(Unabsorbable).png HitboxTableIcon(False).png HitboxTableIcon(False).png HitboxTableIcon(False).png +2 frames 1.5×
1 0 0 11.0% 20.0 AngleIcon75.png Forward 52 75 0 HitboxTableIcon(False).png 4.5 top 0.0 4.0 5.0 1.0× 1.0× 40% HitboxTableIcon(Clang).png HitboxTableIcon(Rebound).png EffectIcon(Normal).png TypeIcon(Hand).png HitboxTableIcon(GroundedTrue).png HitboxTableIcon(AerialTrue).png L Paper SpecialsDirect.png All All HitboxTableIcon(Blockable).png HitboxTableIcon(Unreflectable).png HitboxTableIcon(Unabsorbable).png HitboxTableIcon(False).png HitboxTableIcon(False).png HitboxTableIcon(False).png +2 frames 1.5×

Timing[edit]

For the aerial version, the control stick is checked on frame 13 to apply vertical momentum in the chosen direction. Ledge grabs are enabled from the front starting on frame 30, and from behind starting on frame 42.

Hitboxes 13-28
Interruptible 40
Animation length 49
FrameIcon(Lag).png FrameIcon(Lag).png FrameIcon(Lag).png FrameIcon(Lag).png FrameIcon(Lag).png FrameIcon(Lag).png FrameIcon(Lag).png FrameIcon(Lag).png FrameIcon(Lag).png FrameIcon(Lag).png FrameIcon(Lag).png FrameIcon(Lag).png FrameIcon(Hitbox).png FrameIcon(Hitbox).png FrameIcon(Hitbox).png FrameIcon(Hitbox).png FrameIcon(Hitbox).png FrameIcon(Hitbox).png FrameIcon(Hitbox).png FrameIcon(Hitbox).png FrameIcon(Hitbox).png FrameIcon(Hitbox).png FrameIcon(Hitbox).png FrameIcon(Hitbox).png FrameIcon(Hitbox).png FrameIcon(Hitbox).png FrameIcon(Hitbox).png FrameIcon(Hitbox).png FrameIcon(Lag).png FrameIcon(Lag).png FrameIcon(Lag).png FrameIcon(Lag).png FrameIcon(Lag).png FrameIcon(Lag).png FrameIcon(Lag).png FrameIcon(Lag).png FrameIcon(Lag).png FrameIcon(Lag).png FrameIcon(Lag).png FrameIcon(Interruptible).png FrameIcon(Interruptible).png FrameIcon(Interruptible).png FrameIcon(Interruptible).png FrameIcon(Interruptible).png FrameIcon(Interruptible).png FrameIcon(Interruptible).png FrameIcon(Interruptible).png FrameIcon(Interruptible).png FrameIcon(Interruptible).png
Legend (1 square = 1 frame)
FrameIcon(Lag).png
Lag time
FrameIcon(Hitbox).png
Hitbox
FrameIcon(Interruptible).png
Interruptible

Parameters[edit]

Momentum forward 3
Stick sensitivity for angle modification in midair 0.25 to 0.5
Maximum angle modification 20°
Friction (speed multiplier per frame) 0.85

Trivia[edit]

  • The move has a 40% trip chance that can never actually happen, due to its largely vertical launch angle.