SSBU Icon.png

Snake (SSBU)/Neutral attack/Hit 1

From SmashWiki, the Super Smash Bros. wiki
< Snake (SSBU)‎ | Neutral attack
Revision as of 13:53, July 23, 2022 by SacredFire37 (talk | contribs) (→‎Overview)
(diff) ← Older revision | Latest revision (diff) | Newer revision → (diff)
Jump to navigationJump to search
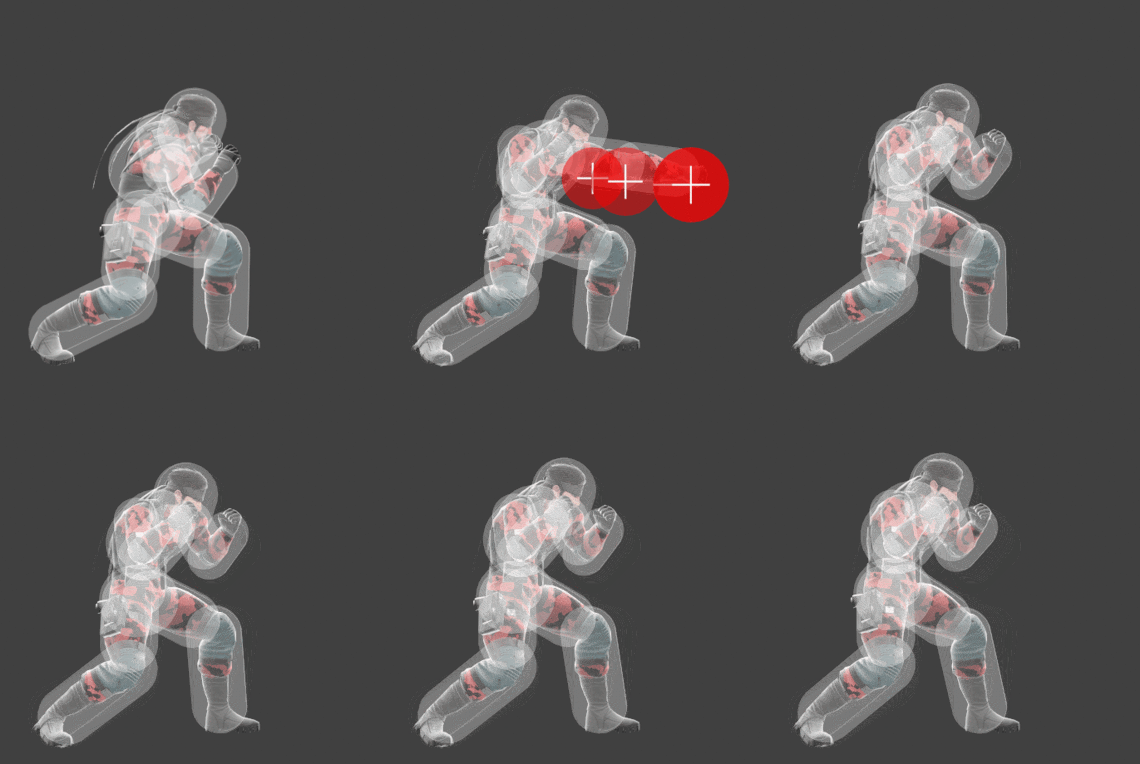
Hitbox visualization for Snake's jab 1
Hitbox visualization showing Snake's first jab.

Overview[edit]

Snake throws a quick punch. It has fast startup, coming out on frame 3, making it Snake's fastest ground attack. It is also quite safe on shield for a jab at -8, and is a reliable move for warding off pressure as Snake can easily use his jab combo to keep his opponent off of him due to its quick speed. Additionally, it can be held consecutively, allowing it to counter spot dodges.

It is also a useful move for mixups and conditioning. Due to jab 1's low ending lag and safety on shield, Snake can quickly use jab 1, then retreat if the opponent attempts to retaliate, leaving them open for a punish opportunity. A unique trait of the move is that the hitbox with ID #2 (the hitbox located on Snake's fist) has slightly more knockback and sends at an angle that moves them towards Snake. When combined with the hitstun modifier of 2 on the move applying to all hitboxes, this gives it a jab cancel setup into forward tilt at high percentages.

Lastly, it can jab lock opponents who miss their tech, making them susceptible to much more damaging attacks. Examples of these include: down aerial as a way to quickly rack up damage, forward tilt, and even up tilt, the latter of which can KO at high percentages.

A drawback of jab 1 is its short range. Unlike many of Snake's other moves, his jab lacks a sizeable disjoint, making it difficult to connect against opponents as long as they are not sufficiently close to Snake. Another downside of jab 1 is its high hitbox placement. Due to the hits being placed relatively high above the ground, this hinders its jab locking potential, as characters with small or slim hurtboxes can usually avoid being hit by jab 1 and any follow ups.

Comprehensively, Snake's jab 1 is a useful move with a good amount of versatility and few weaknesses.

Update History[edit]

Super Smash Bros. Ultimate 3.1.0

  • Buff Neutral attack 1 connects into neutral attack 2 more reliably. (BKB 20 → 26).

Hitboxes[edit]

Only the ID 1 hitbox has a hitstun modifier specified in the scripts, but it applies to all hitboxes due to a glitch.

ID Part Rehit rate Damage SD Angle Angle type BK KS FKV Set weight Radius Bone Offset SDI× T% Clang Rebound Effect Type G A Sound Direct Hit bits Hit part Blockable Reflectable Absorbable Flinchless No GFX Heedless Hitstun
0 0 0 2.5% 0 Sakurai angle Forward 25 25 0 HitboxTableIcon(False).png 1.9 top 0.0 10.8 5.5 1.6× 1.0× 0% HitboxTableIcon(Clang).png HitboxTableIcon(Rebound).png EffectIcon(Normal).png TypeIcon(Hand).png HitboxTableIcon(GroundedTrue).png HitboxTableIcon(AerialTrue).png S Punch SpecialsDirect.png All All HitboxTableIcon(Blockable).png HitboxTableIcon(Unreflectable).png HitboxTableIcon(Unabsorbable).png HitboxTableIcon(False).png HitboxTableIcon(False).png HitboxTableIcon(False).png
1 0 0 2.5% 0 Sakurai angle Forward 20 25 0 HitboxTableIcon(False).png 2.1 top 0.0 10.6 7.5 1.6× 1.0× 0% HitboxTableIcon(Clang).png HitboxTableIcon(Rebound).png EffectIcon(Normal).png TypeIcon(Hand).png HitboxTableIcon(GroundedTrue).png HitboxTableIcon(AerialTrue).png S Punch SpecialsDirect.png All All HitboxTableIcon(Blockable).png HitboxTableIcon(Unreflectable).png HitboxTableIcon(Unabsorbable).png HitboxTableIcon(False).png HitboxTableIcon(False).png HitboxTableIcon(False).png +2 frames
2 0 0 2.5% 0 AngleIcon180.png Forward 26 20 0 HitboxTableIcon(False).png 2.3 top 0.0 10.4 11.5 1.6× 1.0× 0% HitboxTableIcon(Clang).png HitboxTableIcon(Rebound).png EffectIcon(Normal).png TypeIcon(Hand).png HitboxTableIcon(GroundedTrue).png HitboxTableIcon(AerialTrue).png S Punch SpecialsDirect.png Fighter only All HitboxTableIcon(Blockable).png HitboxTableIcon(Unreflectable).png HitboxTableIcon(Unabsorbable).png HitboxTableIcon(False).png HitboxTableIcon(False).png HitboxTableIcon(False).png
3 0 0 2.5% 0 Sakurai angle Forward 20 20 0 HitboxTableIcon(False).png 2.3 top 0.0 10.4 11.5 1.6× 1.0× 0% HitboxTableIcon(Clang).png HitboxTableIcon(Rebound).png EffectIcon(Normal).png TypeIcon(Hand).png HitboxTableIcon(GroundedTrue).png HitboxTableIcon(AerialTrue).png S Punch SpecialsDirect.png All All HitboxTableIcon(Blockable).png HitboxTableIcon(Unreflectable).png HitboxTableIcon(Unabsorbable).png HitboxTableIcon(False).png HitboxTableIcon(False).png HitboxTableIcon(False).png

Timing[edit]

Hitboxes 3-4
Continuability window 6-30
Consecutive jab frame 7
Interruptible 16
Animation length 31
FrameIcon(Lag).png FrameIcon(Lag).png FrameIcon(Hitbox).png FrameIcon(Hitbox).png FrameIcon(LagContinuableS).png FrameIcon(LagContinuableELoopS).png FrameIcon(LagLoopE).png FrameIcon(Lag).png FrameIcon(Lag).png FrameIcon(Lag).png FrameIcon(Lag).png FrameIcon(Lag).png FrameIcon(Lag).png FrameIcon(Lag).png FrameIcon(Lag).png FrameIcon(Interruptible).png FrameIcon(Interruptible).png FrameIcon(Interruptible).png FrameIcon(Interruptible).png FrameIcon(Interruptible).png FrameIcon(Interruptible).png FrameIcon(Interruptible).png FrameIcon(Interruptible).png FrameIcon(Interruptible).png FrameIcon(Interruptible).png FrameIcon(Interruptible).png FrameIcon(Interruptible).png FrameIcon(Interruptible).png FrameIcon(Interruptible).png FrameIcon(Interruptible).png FrameIcon(Interruptible).png
FrameIcon(Blank).png FrameIcon(Blank).png FrameIcon(Blank).png FrameIcon(Blank).png FrameIcon(Blank).png FrameIcon(Continuable).png FrameIcon(Continuable).png FrameIcon(Continuable).png FrameIcon(Continuable).png FrameIcon(Continuable).png FrameIcon(Continuable).png FrameIcon(Continuable).png FrameIcon(Continuable).png FrameIcon(Continuable).png FrameIcon(Continuable).png FrameIcon(Continuable).png FrameIcon(Continuable).png FrameIcon(Continuable).png FrameIcon(Continuable).png FrameIcon(Continuable).png FrameIcon(Continuable).png FrameIcon(Continuable).png FrameIcon(Continuable).png FrameIcon(Continuable).png FrameIcon(Continuable).png FrameIcon(Continuable).png FrameIcon(Continuable).png FrameIcon(Continuable).png FrameIcon(Continuable).png FrameIcon(Continuable).png FrameIcon(Blank).png
Legend (1 square = 1 frame)
FrameIcon(Lag).png
Lag time
FrameIcon(Hitbox).png
Hitbox
FrameIcon(BlankLoopS).pngFrameIcon(BlankLoopE).png
Loop point
FrameIcon(Continuable).png
Continuable
FrameIcon(BlankContinuableS).pngFrameIcon(BlankContinuableE).png
Earliest continuable point
FrameIcon(Interruptible).png
Interruptible