SSBM Icon.png

Pichu (SSBM)/Forward smash

From SmashWiki, the Super Smash Bros. wiki
< Pichu (SSBM)
Revision as of 19:23, April 26, 2021 by Zeckemyro (talk | contribs) (→‎Timing: Also if charging is on frame 14, that means it charges between 13 and 14, not between 14 and 15.)
Jump to navigationJump to search
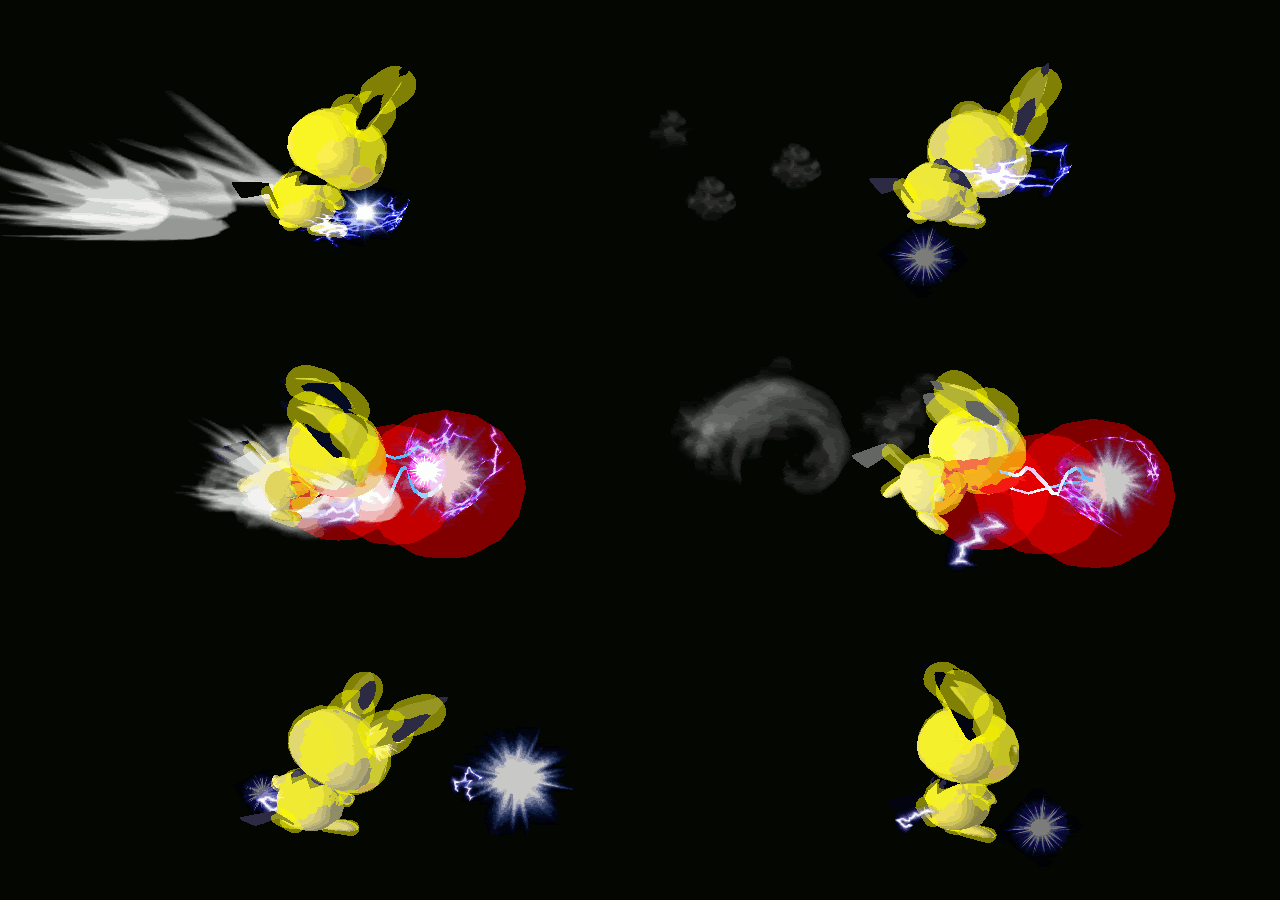
Hitbox visualization showing Pichu's forward smash.
Competitive.png This article or section may require competitive expertise.
You can discuss this issue on the talk page or edit this page to improve it.

Overview

Pichu charges electricity from its cheek pouches before leaning forward and aggressively releasing it. This move, coming out on frame 16 and ending on frame 49, is one of its most useful versatile tools. Pichu's forward smash is difficult to tech thanks to its long duration, low hitboxes, and great knockback potential.

Application

Forward smash excels at edgeguarding fast-fallers such as Fox, Captain Falcon, and Falco, where Pichu can use its low hitboxes to make recovering an arduous task. This is especially prominent if characters like Falco are unable to sweetspot the ledge, making it far easier for Pichu to edgehog. The move's sourspots can be used to surprise the aforementioned fast-fallers near the ledge, which can cause them to flub their recovery and subsequently self-destruct. The move can also be used after a jab reset, where Pichu can capitalize off their tech animations. Pichu is able to more effectively pressure opponents near the ledge, since their options are more limited there. Lastly, Pichu can use it as a situational neutral tool, allowing it to circumvent its difficulty in landing the move otherwise. Pichu's forward smash, while potent as an edgeguarding tool, is rarely seen elsewhere, as it fails to protect Pichu from hits above or behind it, which can allow the opponent a free punish. Using it to call out ledge invincibility positions is risky, since this can lead to prediction battles for Pichu.

Overall, Pichu’s forward smash excels at its niche in advantage, while the move’s applications elsewhere requires players to carefully practice in order to fully synergise it with its other moves, like its neutral aerial or Thunder Jolts.

Hitboxes

ID Part Damage SD Angle BK KS FKV Radius Bone Offset Clang Rebound Effect G A Sound
Hits 1-5
0 0 2% 0 AngleIcon0.png 10 50 0 3.991932 0 0.0 4.6872 8.9838 HitboxTableIcon(NoClang).png HitboxTableIcon(Rebound).png EffectIcon(Electric).png HitboxTableIcon(GroundedTrue).png HitboxTableIcon(AerialTrue).png M Shock
1 0 2% 0 AngleIcon20.png 10 50 0 4.323942 0 0.0 4.6872 16.0146 HitboxTableIcon(NoClang).png HitboxTableIcon(Rebound).png EffectIcon(Electric).png HitboxTableIcon(GroundedTrue).png HitboxTableIcon(AerialTrue).png M Shock
2 0 2% 0 AngleIcon180.png 10 50 0 5.323878 0 0.0 4.6872 22.6548 HitboxTableIcon(NoClang).png HitboxTableIcon(Rebound).png EffectIcon(Electric).png HitboxTableIcon(GroundedTrue).png HitboxTableIcon(AerialTrue).png M Shock
Hit 6
0 0 6% 0 Sakurai angle 90 140 0 3.991932 0 0.0 4.6872 8.9838 HitboxTableIcon(NoClang).png HitboxTableIcon(Rebound).png EffectIcon(Electric).png HitboxTableIcon(GroundedTrue).png HitboxTableIcon(AerialTrue).png L Shock
1 0 6% 0 Sakurai angle 90 140 0 4.323942 0 0.0 4.6872 16.0146 HitboxTableIcon(NoClang).png HitboxTableIcon(Rebound).png EffectIcon(Electric).png HitboxTableIcon(GroundedTrue).png HitboxTableIcon(AerialTrue).png L Shock
2 0 6% 0 Sakurai angle 90 140 0 5.323878 0 0.0 4.6872 22.6548 HitboxTableIcon(NoClang).png HitboxTableIcon(Rebound).png EffectIcon(Electric).png HitboxTableIcon(GroundedTrue).png HitboxTableIcon(AerialTrue).png L Shock

Timing

Charges between 13-14
Hits 1-5 16-18, 19-21, 22-24, 25-27, 28-30
Hit 6 31-33
Animation length 49
FrameIcon(Lag).png FrameIcon(Lag).png FrameIcon(Lag).png FrameIcon(Lag).png FrameIcon(Lag).png FrameIcon(Lag).png FrameIcon(Lag).png FrameIcon(Lag).png FrameIcon(Lag).png FrameIcon(Lag).png FrameIcon(Lag).png FrameIcon(Lag).png FrameIcon(LagChargeS).png FrameIcon(LagChargeE).png FrameIcon(Lag).png FrameIcon(Hitbox).png FrameIcon(Hitbox).png FrameIcon(HitboxChangeS).png FrameIcon(HitboxChangeE).png FrameIcon(Hitbox).png FrameIcon(HitboxChangeS).png FrameIcon(HitboxChangeE).png FrameIcon(Hitbox).png FrameIcon(HitboxChangeS).png FrameIcon(HitboxChangeE).png FrameIcon(Hitbox).png FrameIcon(HitboxChangeS).png FrameIcon(HitboxChangeE).png FrameIcon(Hitbox).png FrameIcon(HitboxChangeS).png FrameIcon(HitboxChangeE).png FrameIcon(Hitbox).png FrameIcon(Hitbox).png FrameIcon(Lag).png FrameIcon(Lag).png FrameIcon(Lag).png FrameIcon(Lag).png FrameIcon(Lag).png FrameIcon(Lag).png FrameIcon(Lag).png FrameIcon(Lag).png FrameIcon(Lag).png FrameIcon(Lag).png FrameIcon(Lag).png FrameIcon(Lag).png FrameIcon(Lag).png FrameIcon(Lag).png FrameIcon(Lag).png FrameIcon(Lag).png
Legend (1 square = 1 frame)
FrameIcon(Lag).png
Lag time
FrameIcon(LagChargeS).pngFrameIcon(LagChargeE).png
Charge interval
FrameIcon(Hitbox).png
Hitbox
FrameIcon(HitboxChangeS).pngFrameIcon(HitboxChangeE).png
Hitbox change

External links