SSBU Icon.png

Mewtwo (SSBU)/Neutral aerial

From SmashWiki, the Super Smash Bros. wiki
Jump to navigationJump to search
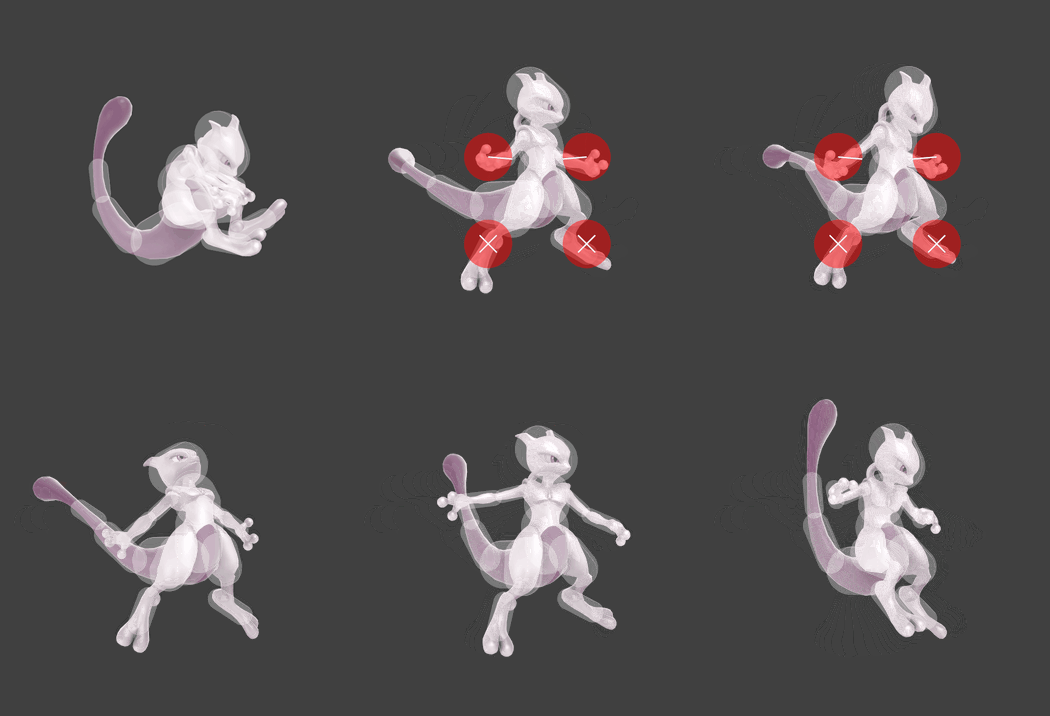
Hitbox visualization showing Mewtwo's neutral aerial.
Competitive.png This article or section may require competitive expertise.
You can discuss this issue on the talk page or edit this page to improve it.

Overview[edit]

Mewtwo discharges electricity around its body, hitting opponents multiple times before launching them away with a burst of energy. At 7 frames of start-up when used in the air, it is tied with forward aerial as Mewtwo's fastest aerial and also as its second fastest option out of shield, beaten only by up smash (frame 9).

While not as versatile of a move as forward aerial, neutral aerial plays a few important roles, most notably in Mewtwo's punish game. Its aforementioned speed combined with its long duration makes it an excellent move for catching jumping opponents, and great for gimping recoveries offstage. Its low knockback additionally allows for follow ups onstage, notably forward aerial, dash grab or dash attack at low - mid percentages, however its combo ability really shines when the Mewtwo player is able to consistently drag opponents down with it. Due to the multi-hit nature of the move, drag down combos are possible if the Mewtwo fast falls during the first stage of the move. It can be comboed into via down tilt, up aerial or a charged Shadow Ball, the former being integral to performing "Nair loops" where the Mewtwo drags down an opponent and hits them with sweetspot down tilt, setting them up for another neutral aerial, allowing the combo to be repeated until the opponent's damage becomes too high.

Mewtwo's neutral aerial is also unique from other multi-hitting neutral aerials in a couple of ways - it is able to send opponents behind Mewtwo as well as in front of it, opening up different combo routes if the Mewtwo player is able to drift correctly while using the move. Additionally, with the way the multihit hitboxes are designed to keep the opponent trapped in the move (feet hitboxes send up, hand hitboxes send down and inward toward Mewtwo), the feet hitboxes can be used to "pop" opponents up into the air - a very precise manoeuvre that can be used to set up into up smash for a kill.

However despite its strengths, the move does have some glaring issues, which make it an unruly move to use. Firstly, while neutral aerial does allow Mewtwo to tap into its ability to deal heavy damage, even with proper set ups the move can be inconsistent with the direction it sends opponents, which can be problematic for combos and especially edgeguards as you may accidentally send the opponent toward the stage. Opponents may fall out of the move prematurely as well, making Mewtwo lose out on the potential for huge damage. Finally, the move's hitboxes during the multihit stage are very small, making it unwise to attempt landings with and usually resulting in unfavourable trades if used against an attack, especially disjointed moves.

Overall, neutral aerial is an important move on Mewtwo's moveset, being the centrepiece to Mewtwo's advantage state as it can be comboed into by other moves and allows Mewtwo to deal heavy damage via "Nair loops", confirm into kill moves and prevent recoveries back to the stage. Additionally its speed and coverage on both sides of Mewtwo allow it to be used out of shield, however the move has issues with its consistency and tends to trade unfavourably with other moves due to the small hitboxes present in the early stages of the move.

Hitboxes[edit]

ID Part Rehit rate Damage SD Angle Angle type BK KS FKV Set weight Radius Bone Offset SDI× T% Clang Rebound Effect Type G A Sound Direct Hit bits Hit part Blockable Reflectable Absorbable Flinchless No GFX Heedless
Hits 1-5
0 0 0 1.6% 0 AngleIcon185.png Standard 20 100 30 HitboxTableIcon(False).png 2.5 top 0.0 11.0 4.1 0.6× 1.0× 0% HitboxTableIcon(Clang).png HitboxTableIcon(Rebound).png EffectIcon(Electric).png TypeIcon(Body).png HitboxTableIcon(GroundedTrue).png HitboxTableIcon(AerialTrue).png M Electric SpecialsDirect.png All All HitboxTableIcon(Blockable).png HitboxTableIcon(Unreflectable).png HitboxTableIcon(Unabsorbable).png HitboxTableIcon(False).png HitboxTableIcon(False).png HitboxTableIcon(False).png
1 0 0 1.6% 0 AngleIcon185.png Standard 20 100 30 HitboxTableIcon(False).png 2.5 top 0.0 11.0 -6.1 0.6× 1.0× 0% HitboxTableIcon(Clang).png HitboxTableIcon(Rebound).png EffectIcon(Electric).png TypeIcon(Body).png HitboxTableIcon(GroundedTrue).png HitboxTableIcon(AerialTrue).png M Electric SpecialsDirect.png All All HitboxTableIcon(Blockable).png HitboxTableIcon(Unreflectable).png HitboxTableIcon(Unabsorbable).png HitboxTableIcon(False).png HitboxTableIcon(False).png HitboxTableIcon(False).png
2 0 0 1.6% 0 Autolink angle (367) Standard 20 100 60 HitboxTableIcon(False).png 2.5 top 0.0 2.0 4.1 0.6× 1.0× 0% HitboxTableIcon(Clang).png HitboxTableIcon(Rebound).png EffectIcon(Electric).png TypeIcon(Body).png HitboxTableIcon(GroundedTrue).png HitboxTableIcon(AerialTrue).png M Electric SpecialsDirect.png All All HitboxTableIcon(Blockable).png HitboxTableIcon(Unreflectable).png HitboxTableIcon(Unabsorbable).png HitboxTableIcon(False).png HitboxTableIcon(False).png HitboxTableIcon(False).png
3 0 0 1.6% 0 Autolink angle (367) Standard 20 100 60 HitboxTableIcon(False).png 2.5 top 0.0 2.0 -6.1 0.6× 1.0× 0% HitboxTableIcon(Clang).png HitboxTableIcon(Rebound).png EffectIcon(Electric).png TypeIcon(Body).png HitboxTableIcon(GroundedTrue).png HitboxTableIcon(AerialTrue).png M Electric SpecialsDirect.png All All HitboxTableIcon(Blockable).png HitboxTableIcon(Unreflectable).png HitboxTableIcon(Unabsorbable).png HitboxTableIcon(False).png HitboxTableIcon(False).png HitboxTableIcon(False).png
Hit 6
0 0 0 4.0% 0 Sakurai angle Standard 40 110 0 HitboxTableIcon(False).png 13.5 top 0.0 7.0 -2.0 1.2× 1.0× 0% HitboxTableIcon(Clang).png HitboxTableIcon(Rebound).png EffectIcon(Electric).png TypeIcon(Body).png HitboxTableIcon(GroundedTrue).png HitboxTableIcon(AerialTrue).png L Electric SpecialsDirect.png All All HitboxTableIcon(Blockable).png HitboxTableIcon(Unreflectable).png HitboxTableIcon(Unabsorbable).png HitboxTableIcon(False).png HitboxTableIcon(False).png HitboxTableIcon(False).png

Timing[edit]

Attack[edit]

Hits 1-5 7-8, 11-12, 15-16, 19-20, 23-24
Hit 6 27-28
Ending autocancel 46-
Interruptible 50
Animation length 58
FrameIcon(Lag).png FrameIcon(Lag).png FrameIcon(Lag).png FrameIcon(Lag).png FrameIcon(Lag).png FrameIcon(Lag).png FrameIcon(Hitbox).png FrameIcon(Hitbox).png FrameIcon(Lag).png FrameIcon(Lag).png FrameIcon(Hitbox).png FrameIcon(Hitbox).png FrameIcon(Lag).png FrameIcon(Lag).png FrameIcon(Hitbox).png FrameIcon(Hitbox).png FrameIcon(Lag).png FrameIcon(Lag).png FrameIcon(Hitbox).png FrameIcon(Hitbox).png FrameIcon(Lag).png FrameIcon(Lag).png FrameIcon(Hitbox).png FrameIcon(Hitbox).png FrameIcon(Lag).png FrameIcon(Lag).png FrameIcon(Hitbox).png FrameIcon(Hitbox).png FrameIcon(Lag).png FrameIcon(Lag).png FrameIcon(Lag).png FrameIcon(Lag).png FrameIcon(Lag).png FrameIcon(Lag).png FrameIcon(Lag).png FrameIcon(Lag).png FrameIcon(Lag).png FrameIcon(Lag).png FrameIcon(Lag).png FrameIcon(Lag).png FrameIcon(Lag).png FrameIcon(Lag).png FrameIcon(Lag).png FrameIcon(Lag).png FrameIcon(Lag).png FrameIcon(Lag).png FrameIcon(Lag).png FrameIcon(Lag).png FrameIcon(Lag).png FrameIcon(Interruptible).png FrameIcon(Interruptible).png FrameIcon(Interruptible).png FrameIcon(Interruptible).png FrameIcon(Interruptible).png FrameIcon(Interruptible).png FrameIcon(Interruptible).png FrameIcon(Interruptible).png FrameIcon(Interruptible).png
FrameIcon(Blank).png FrameIcon(Blank).png FrameIcon(Blank).png FrameIcon(Blank).png FrameIcon(Blank).png FrameIcon(Blank).png FrameIcon(Blank).png FrameIcon(Blank).png FrameIcon(Blank).png FrameIcon(Blank).png FrameIcon(Blank).png FrameIcon(Blank).png FrameIcon(Blank).png FrameIcon(Blank).png FrameIcon(Blank).png FrameIcon(Blank).png FrameIcon(Blank).png FrameIcon(Blank).png FrameIcon(Blank).png FrameIcon(Blank).png FrameIcon(Blank).png FrameIcon(Blank).png FrameIcon(Blank).png FrameIcon(Blank).png FrameIcon(Blank).png FrameIcon(Blank).png FrameIcon(Blank).png FrameIcon(Blank).png FrameIcon(Blank).png FrameIcon(Blank).png FrameIcon(Blank).png FrameIcon(Blank).png FrameIcon(Blank).png FrameIcon(Blank).png FrameIcon(Blank).png FrameIcon(Blank).png FrameIcon(Blank).png FrameIcon(Blank).png FrameIcon(Blank).png FrameIcon(Blank).png FrameIcon(Blank).png FrameIcon(Blank).png FrameIcon(Blank).png FrameIcon(Blank).png FrameIcon(Blank).png FrameIcon(Autocancel).png FrameIcon(Autocancel).png FrameIcon(Autocancel).png FrameIcon(Autocancel).png FrameIcon(Autocancel).png FrameIcon(Autocancel).png FrameIcon(Autocancel).png FrameIcon(Autocancel).png FrameIcon(Autocancel).png FrameIcon(Autocancel).png FrameIcon(Autocancel).png FrameIcon(Autocancel).png FrameIcon(Autocancel).png

Landing lag[edit]

Interruptible 11
Animation length 16
FrameIcon(Lag).png FrameIcon(Lag).png FrameIcon(Lag).png FrameIcon(Lag).png FrameIcon(Lag).png FrameIcon(Lag).png FrameIcon(Lag).png FrameIcon(Lag).png FrameIcon(Lag).png FrameIcon(Lag).png FrameIcon(Interruptible).png FrameIcon(Interruptible).png FrameIcon(Interruptible).png FrameIcon(Interruptible).png FrameIcon(Interruptible).png FrameIcon(Interruptible).png
Legend (1 square = 1 frame)
FrameIcon(Lag).png
Lag time
FrameIcon(Hitbox).png
Hitbox
FrameIcon(Autocancel).png
Autocancel
FrameIcon(Interruptible).png
Interruptible