SSBU Icon.png

Marth (SSBU)/Neutral aerial

From SmashWiki, the Super Smash Bros. wiki
< Marth (SSBU)
Revision as of 12:56, June 20, 2022 by DrakRoar (talk | contribs)
(diff) ← Older revision | Latest revision (diff) | Newer revision → (diff)
Jump to navigationJump to search
Competitive.png This article or section may require competitive expertise.
You can discuss this issue on the talk page or edit this page to improve it.
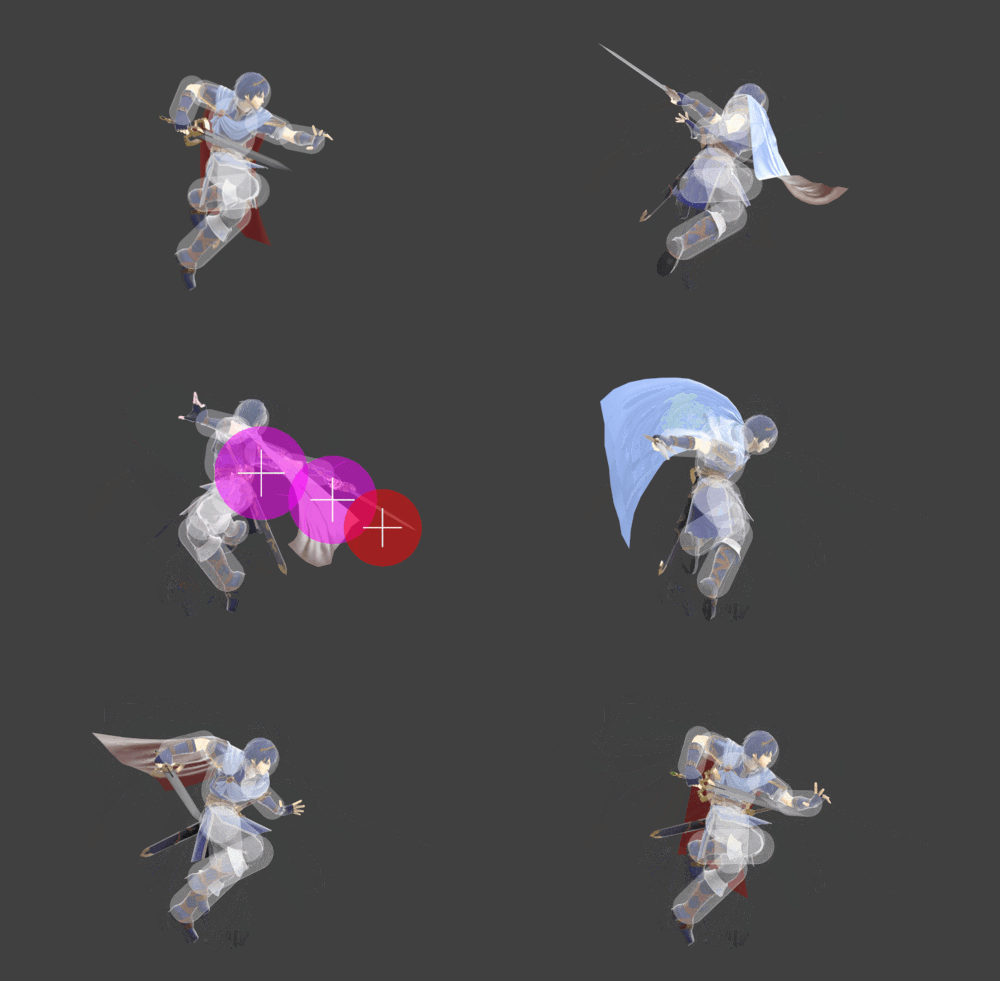
Hitbox visualization showing Marth's neutral aerial.

Overview[edit]

Marth's neutral aerial can essentially be used anytime and lead to results. In the neutral game, Marth can short hop and fast fall during neutral air to safely cover space while slowly advancing. When approaching, neutral aerial is also Marth's safest move in that it has the lowest ending lag. When the latest active frame of the fast falled second hit strikes an opponent's shield at maximum range, it is essentially impossible to shield grab Marth, especially if Marth buffers a defensive roll away. Better players, however, avoid using shield grab, and know their best out of shield option(s). Even in these scenarios, Marth's neutral aerial is so safe that if spaced and timed perfectly, very few characters can hope to even tie Marth's fastest follow-ups if they attempt to attack after defending against Marth's neutral air, either because they lack the speed or because these moves lack the range. On the other hand, it is precisely for this reason opponents will often continuously shield. In these scenarios, do not lose patience and continue to look for safe ways to poke at their shield such as down tilt or additional neutral aerials before committing to a grab or resorting to shield breaker. The safest shield pressure after falling neutral air is another (instant, rising, retreating) neutral air.

As a grounded combo starter, fast falling before the second hit comes out (such that only a single hit of neutral air is used) produces one of Marth's few ways of comboing into forward smash. Otherwise, dancing blade is still a fine followup. Alternatively, drifting out with Marth's neutral aerial so the first (non-tipper) hit of neutral air combos into the second (tipper) hit of neutral air provides a more reliable setup than simply fishing for stray tippers.

As an edgeguarding tool, Marth's neutral aerial can be used to catch opponents who are trying to return to laterally to the ledge at ground elevation. This type of recovery does not appear naturally, but should be forced by threatening a forward air earlier in the game. Neutral air can also be used to catch opponents who are attempting to land on middle height platforms as a low risk, medium reward option. Characters with teleport recoveries such as Mewtwo and Palutena are common examples here. Neutral aerial is also one of Marth's best ledgetrapping tools, as it has sufficient range to avoid being hit by many ledge getup attacks, while possessing enough active frames to potentially punish neutral getup.

Hitboxes[edit]

ID Part Rehit rate Damage SD Angle Angle type BK KS FKV Set weight Radius Bone Offset SDI× T% Clang Rebound Effect Type G A Sound Direct Hit bits Hit part Blockable Reflectable Absorbable Flinchless No GFX Heedless
Hit 1
0 0 0 3.5% 0 AngleIcon75.png Standard 45 50 0 HitboxTableIcon(True).png 3.8 sword1 1.0 -1.3 1.6 0.7× 1.0× 0% HitboxTableIcon(Clang).png HitboxTableIcon(Rebound).png EffectIcon(Slash).png TypeIcon(Sword).png HitboxTableIcon(GroundedTrue).png HitboxTableIcon(AerialTrue).png S Slash SpecialsDirect.png All All HitboxTableIcon(Blockable).png HitboxTableIcon(Unreflectable).png HitboxTableIcon(Unabsorbable).png HitboxTableIcon(False).png HitboxTableIcon(False).png HitboxTableIcon(False).png
1 0 0 3.5% 0 AngleIcon80.png Standard 45 50 0 HitboxTableIcon(True).png 4.0 armr -1.5 1.0 -1.5 0.7× 1.0× 0% HitboxTableIcon(Clang).png HitboxTableIcon(Rebound).png EffectIcon(Slash).png TypeIcon(Sword).png HitboxTableIcon(GroundedTrue).png HitboxTableIcon(AerialTrue).png S Slash SpecialsDirect.png All All HitboxTableIcon(Blockable).png HitboxTableIcon(Unreflectable).png HitboxTableIcon(Unabsorbable).png HitboxTableIcon(False).png HitboxTableIcon(False).png HitboxTableIcon(False).png
2 0 0 5.0% 0 AngleIcon90.png Standard 35 50 0 HitboxTableIcon(True).png 3.3 sword1 1.0 -1.3 7.2 1.25× 1.0× 0% HitboxTableIcon(Clang).png HitboxTableIcon(Rebound).png EffectIcon(Slash).png TypeIcon(Sword).png HitboxTableIcon(GroundedTrue).png HitboxTableIcon(AerialTrue).png M Marth Sword SpecialsDirect.png All All HitboxTableIcon(Blockable).png HitboxTableIcon(Unreflectable).png HitboxTableIcon(Unabsorbable).png HitboxTableIcon(False).png HitboxTableIcon(False).png HitboxTableIcon(False).png
Hit 2
0 0 0 7.0% 0 Sakurai angle Standard 50 90 0 HitboxTableIcon(False).png 3.8 sword1 1.2 -1.1 1.5 0.7× 1.0× 0% HitboxTableIcon(Clang).png HitboxTableIcon(Rebound).png EffectIcon(Slash).png TypeIcon(Sword).png HitboxTableIcon(GroundedTrue).png HitboxTableIcon(AerialTrue).png M Slash SpecialsDirect.png All All HitboxTableIcon(Blockable).png HitboxTableIcon(Unreflectable).png HitboxTableIcon(Unabsorbable).png HitboxTableIcon(False).png HitboxTableIcon(False).png HitboxTableIcon(False).png
1 0 0 7.0% 0 Sakurai angle Standard 50 90 0 HitboxTableIcon(False).png 4.0 armr -2.0 1.0 -1.6 0.7× 1.0× 0% HitboxTableIcon(Clang).png HitboxTableIcon(Rebound).png EffectIcon(Slash).png TypeIcon(Sword).png HitboxTableIcon(GroundedTrue).png HitboxTableIcon(AerialTrue).png M Slash SpecialsDirect.png All All HitboxTableIcon(Blockable).png HitboxTableIcon(Unreflectable).png HitboxTableIcon(Unabsorbable).png HitboxTableIcon(False).png HitboxTableIcon(False).png HitboxTableIcon(False).png
2 0 0 9.5% 0 Sakurai angle Standard 60 100 0 HitboxTableIcon(False).png 3.4 sword1 0.8 -1.1 7.0 1.25× 1.0× 0% HitboxTableIcon(Clang).png HitboxTableIcon(Rebound).png EffectIcon(Slash).png TypeIcon(Sword).png HitboxTableIcon(GroundedTrue).png HitboxTableIcon(AerialTrue).png L Marth Sword SpecialsDirect.png All All HitboxTableIcon(Blockable).png HitboxTableIcon(Unreflectable).png HitboxTableIcon(Unabsorbable).png HitboxTableIcon(False).png HitboxTableIcon(False).png HitboxTableIcon(False).png

Timing[edit]

Attack[edit]

Initial autocancel 1
Hit 1 6-7
Hit 2 15-21
Ending autocancel 47-
Interruptible 50
Animation length 49
FrameIcon(Lag).png FrameIcon(Lag).png FrameIcon(Lag).png FrameIcon(Lag).png FrameIcon(Lag).png FrameIcon(Hitbox).png FrameIcon(Hitbox).png FrameIcon(Lag).png FrameIcon(Lag).png FrameIcon(Lag).png FrameIcon(Lag).png FrameIcon(Lag).png FrameIcon(Lag).png FrameIcon(Lag).png FrameIcon(Hitbox).png FrameIcon(Hitbox).png FrameIcon(Hitbox).png FrameIcon(Hitbox).png FrameIcon(Hitbox).png FrameIcon(Hitbox).png FrameIcon(Hitbox).png FrameIcon(Lag).png FrameIcon(Lag).png FrameIcon(Lag).png FrameIcon(Lag).png FrameIcon(Lag).png FrameIcon(Lag).png FrameIcon(Lag).png FrameIcon(Lag).png FrameIcon(Lag).png FrameIcon(Lag).png FrameIcon(Lag).png FrameIcon(Lag).png FrameIcon(Lag).png FrameIcon(Lag).png FrameIcon(Lag).png FrameIcon(Lag).png FrameIcon(Lag).png FrameIcon(Lag).png FrameIcon(Lag).png FrameIcon(Lag).png FrameIcon(Lag).png FrameIcon(Lag).png FrameIcon(Lag).png FrameIcon(Lag).png FrameIcon(Lag).png FrameIcon(Lag).png FrameIcon(Lag).png FrameIcon(Lag).png
FrameIcon(Autocancel).png FrameIcon(Blank).png FrameIcon(Blank).png FrameIcon(Blank).png FrameIcon(Blank).png FrameIcon(Blank).png FrameIcon(Blank).png FrameIcon(Blank).png FrameIcon(Blank).png FrameIcon(Blank).png FrameIcon(Blank).png FrameIcon(Blank).png FrameIcon(Blank).png FrameIcon(Blank).png FrameIcon(Blank).png FrameIcon(Blank).png FrameIcon(Blank).png FrameIcon(Blank).png FrameIcon(Blank).png FrameIcon(Blank).png FrameIcon(Blank).png FrameIcon(Blank).png FrameIcon(Blank).png FrameIcon(Blank).png FrameIcon(Blank).png FrameIcon(Blank).png FrameIcon(Blank).png FrameIcon(Blank).png FrameIcon(Blank).png FrameIcon(Blank).png FrameIcon(Blank).png FrameIcon(Blank).png FrameIcon(Blank).png FrameIcon(Blank).png FrameIcon(Blank).png FrameIcon(Blank).png FrameIcon(Blank).png FrameIcon(Blank).png FrameIcon(Blank).png FrameIcon(Blank).png FrameIcon(Blank).png FrameIcon(Blank).png FrameIcon(Blank).png FrameIcon(Blank).png FrameIcon(Blank).png FrameIcon(Blank).png FrameIcon(Autocancel).png FrameIcon(Autocancel).png FrameIcon(Autocancel).png

Landing lag[edit]

Interruptible 8
Animation length 27
FrameIcon(Lag).png FrameIcon(Lag).png FrameIcon(Lag).png FrameIcon(Lag).png FrameIcon(Lag).png FrameIcon(Lag).png FrameIcon(Lag).png FrameIcon(Interruptible).png FrameIcon(Interruptible).png FrameIcon(Interruptible).png FrameIcon(Interruptible).png FrameIcon(Interruptible).png FrameIcon(Interruptible).png FrameIcon(Interruptible).png FrameIcon(Interruptible).png FrameIcon(Interruptible).png FrameIcon(Interruptible).png FrameIcon(Interruptible).png FrameIcon(Interruptible).png FrameIcon(Interruptible).png FrameIcon(Interruptible).png FrameIcon(Interruptible).png FrameIcon(Interruptible).png FrameIcon(Interruptible).png FrameIcon(Interruptible).png FrameIcon(Interruptible).png FrameIcon(Interruptible).png
Legend (1 square = 1 frame)
FrameIcon(Lag).png
Lag time
FrameIcon(Hitbox).png
Hitbox
FrameIcon(Autocancel).png
Autocancel
FrameIcon(Interruptible).png
Interruptible