SSBU Icon.png

Marth (SSBU)/Down tilt

From SmashWiki, the Super Smash Bros. wiki
Jump to navigationJump to search
The printable version is no longer supported and may have rendering errors. Please update your browser bookmarks and please use the default browser print function instead.
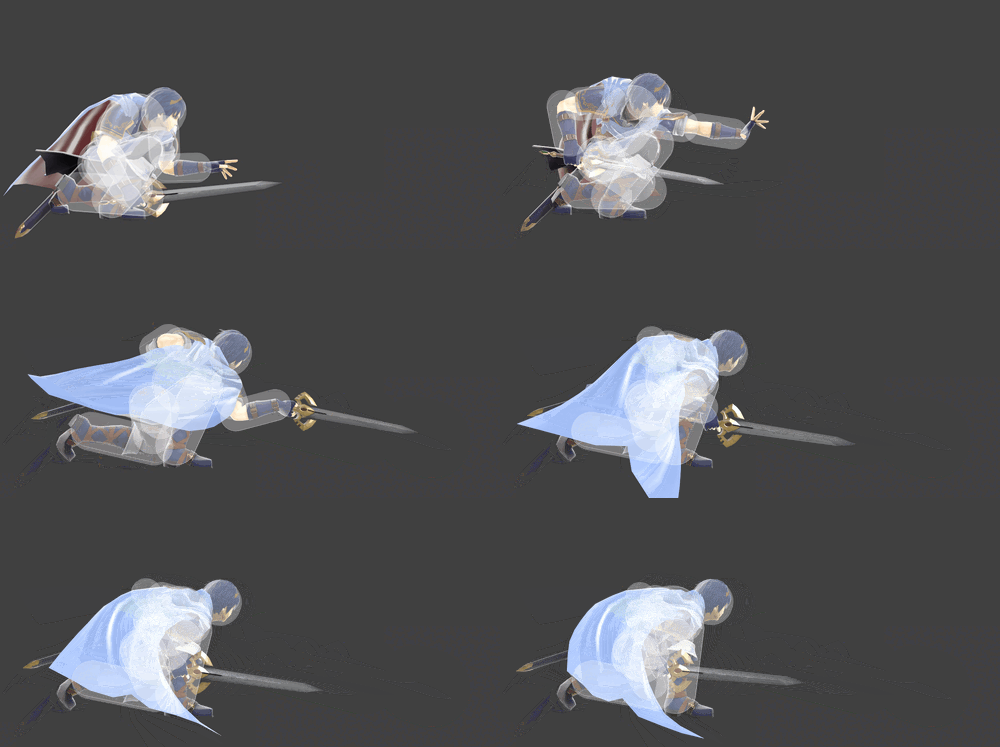
Hitbox visualization showing Marth's down tilt.
Competitive.png This article or section may require competitive expertise.
The editor who added this tag elaborates: More details on shield pressure and different tech scenarios
You can discuss this issue on the talk page or edit this page to improve it.

Overview

Marth's down tilt is one of his safest poke tools that also leads to any kind of meaningful reward. If an approach is stuffed, at lower percents this often leads to a tech chase situation if a dash is buffered as soon as possible. This leads to the following follow-ups:

  • If no tech or tech in place occurs, an additional down tilt or down smash can be applied to either continue inflicting damage or end a stock.
  • If a tech rolls occur, either a forward tilt (more reliable) or forward smash (less reliable) can be used to end a stock.

The latter scenario is potentially hard to execute correctly, relying on a high reaction speed or a hard read. Therefore, one backup strategy is to down tilt again anyway and react thereafter. Sometimes Marth will be able to dash into forward air in the correct direction to stuff mashing or grab to punish habitual shielding.

At mid to higher percents, depending on the opponent's directional influence, Marth may instead attempt to follow up with a dash into neutral air or forward air. Sometimes this does not combo, in which case overshooting or feigning the approach should be anticipated to avoid being shield grabbed.

Down tilt is a deceptively underwhelming tool for edgeguarding low recoveries. The more eminent method of edgeguarding either involves leaving the stage itself to attack directly with an aerial, or using ledge trump into back air for a near-stage edgeguarding option. Regardless, it still has usage as an edgeguarding tool. In particular, there are a great many recoveries that move a character linearly, often towards the ledge, but which do not immediately grab the ledge immediately on contact. In this case, down tilt can be used to determine whether this timing is even possible to exploit, however forward smash has a tendency to hit slightly below the ledge, allowing for a strong punish if the opponent's recovery fails to grab the ledge.

Update History

Super Smash Bros. Ultimate 12.0.0

  • Buff The tipper hitbox of down tilt is larger, and sourspot has been slightly shrunken (16.7u → 15.7u), making it easier to land the sweetspot.

Hitboxes

ID Part Rehit rate Damage SD Angle Angle type BK KS FKV Set weight Radius Bone Offset SDI× T% Clang Rebound Effect Type G A Sound Direct Hit bits Hit part Blockable Reflectable Absorbable Flinchless No GFX Heedless
0 0 0 7.0% 0 AngleIcon30.png Standard 40 40 0 HitboxTableIcon(False).png 2.7 top 0.0 2.7 to 4.4 15.7 to 9.2 0.7× 1.0× 35% HitboxTableIcon(Clang).png HitboxTableIcon(Rebound).png EffectIcon(Stab).png TypeIcon(Sword).png HitboxTableIcon(GroundedTrue).png HitboxTableIcon(AerialTrue).png M Slash SpecialsDirect.png All All HitboxTableIcon(Blockable).png HitboxTableIcon(Unreflectable).png HitboxTableIcon(Unabsorbable).png HitboxTableIcon(False).png HitboxTableIcon(False).png HitboxTableIcon(False).png
1 0 0 10.0% 0 AngleIcon30.png Standard 50 40 0 HitboxTableIcon(False).png 2.7 sword1 0.0 0.0 8.2 to 7.2 1.25× 1.0× 35% HitboxTableIcon(Clang).png HitboxTableIcon(Rebound).png EffectIcon(Stab).png TypeIcon(Sword).png HitboxTableIcon(GroundedTrue).png HitboxTableIcon(AerialTrue).png L Marth Sword SpecialsDirect.png All All HitboxTableIcon(Blockable).png HitboxTableIcon(Unreflectable).png HitboxTableIcon(Unabsorbable).png HitboxTableIcon(False).png HitboxTableIcon(False).png HitboxTableIcon(False).png

Timing

Hitboxes 7-8
Interruptible 24
Animation length 49
FrameIcon(Lag).png FrameIcon(Lag).png FrameIcon(Lag).png FrameIcon(Lag).png FrameIcon(Lag).png FrameIcon(Lag).png FrameIcon(Hitbox).png FrameIcon(Hitbox).png FrameIcon(Lag).png FrameIcon(Lag).png FrameIcon(Lag).png FrameIcon(Lag).png FrameIcon(Lag).png FrameIcon(Lag).png FrameIcon(Lag).png FrameIcon(Lag).png FrameIcon(Lag).png FrameIcon(Lag).png FrameIcon(Lag).png FrameIcon(Lag).png FrameIcon(Lag).png FrameIcon(Lag).png FrameIcon(Lag).png FrameIcon(Interruptible).png FrameIcon(Interruptible).png FrameIcon(Interruptible).png FrameIcon(Interruptible).png FrameIcon(Interruptible).png FrameIcon(Interruptible).png FrameIcon(Interruptible).png FrameIcon(Interruptible).png FrameIcon(Interruptible).png FrameIcon(Interruptible).png FrameIcon(Interruptible).png FrameIcon(Interruptible).png FrameIcon(Interruptible).png FrameIcon(Interruptible).png FrameIcon(Interruptible).png FrameIcon(Interruptible).png FrameIcon(Interruptible).png FrameIcon(Interruptible).png FrameIcon(Interruptible).png FrameIcon(Interruptible).png FrameIcon(Interruptible).png FrameIcon(Interruptible).png FrameIcon(Interruptible).png FrameIcon(Interruptible).png FrameIcon(Interruptible).png FrameIcon(Interruptible).png
Legend (1 square = 1 frame)
FrameIcon(Lag).png
Lag time
FrameIcon(Hitbox).png
Hitbox
FrameIcon(Interruptible).png
Interruptible

Trivia

  • The move has a 35% trip chance that can only happen on slants due to the launch angle.